You are using an out of date browser. It may not display this or other websites correctly.
You should upgrade or use an alternative browser.
You should upgrade or use an alternative browser.
KP's JKUR Build
- Thread starter KPM171
- Start date
KPM171
New member
On the level (RKJKBBLT)
Before my master plan for a lift came up again in my head recently, I found myself in an interesting suspension predicament. After adding on a full width front bumper and a steel cable winch and a steel skid under the front axle, the rake on the Jeep started resembling a moonshine runner’s 1940 Ford V8. A little research on the situation & a quick call to Mr. K later, Rock Krawler’s Long Travel Leveling Kit was on the way to my house.
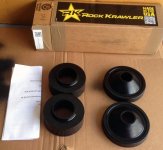
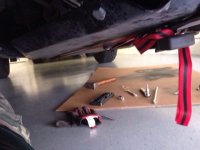
Unboxing the kit, the product seems very solid and the install pretty straight forward. The instructions tell you to drop the front springs, install the pucks, and connect everything back together. Drop the rear springs, and do the same. Unfortunately (or fortunately) the jack stands I borrowed were entirely too short to even get the Jeep off the ground so I went out scouring for another set. My mechanic had some for me to borrow, buuuut he also had an open bay and an hour or two free to play with my Jeep. As much as I’d like to say I did this install, my mechanic promptly kicked me out of the bay and knocked it out himself.
Here are some before and after pix to show the difference a leveling kit can make.


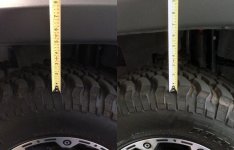
^^Front^^
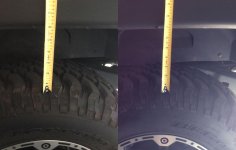
^^Rear^^
When picking out the kit, I decided not to get the additional front sway bar disconnects/extensions. If you have a non-rubi and are installing this kit, I suggest you get the full kit and enjoy the sway bar quick discos. On a rubi, the extensions just don't seem to be necessary. With out them, the sway bar is still pretty much parallel to the ground.
Before my master plan for a lift came up again in my head recently, I found myself in an interesting suspension predicament. After adding on a full width front bumper and a steel cable winch and a steel skid under the front axle, the rake on the Jeep started resembling a moonshine runner’s 1940 Ford V8. A little research on the situation & a quick call to Mr. K later, Rock Krawler’s Long Travel Leveling Kit was on the way to my house.

Unboxing the kit, the product seems very solid and the install pretty straight forward. The instructions tell you to drop the front springs, install the pucks, and connect everything back together. Drop the rear springs, and do the same. Unfortunately (or fortunately) the jack stands I borrowed were entirely too short to even get the Jeep off the ground so I went out scouring for another set. My mechanic had some for me to borrow, buuuut he also had an open bay and an hour or two free to play with my Jeep. As much as I’d like to say I did this install, my mechanic promptly kicked me out of the bay and knocked it out himself.
Here are some before and after pix to show the difference a leveling kit can make.


^^Front^^

^^Rear^^
When picking out the kit, I decided not to get the additional front sway bar disconnects/extensions. If you have a non-rubi and are installing this kit, I suggest you get the full kit and enjoy the sway bar quick discos. On a rubi, the extensions just don't seem to be necessary. With out them, the sway bar is still pretty much parallel to the ground.
KPM171
New member
Tackerdown
Banned
Nice:thumbup:
Tom
Tom
KPM171
New member
Holy Quote Post!


I'm still here and the build is still going strong. I've been out on trails, but plenty of mods are still on my radar, don't you worry!Lol go figure, I was just snooping through your thread earlier looking at your sPOD install (cause I'm wanting one now) and here a few hours later theres life in your thread again! Lol I feel your pain. Theres so much I want to do but it's all costing so much. I'm saving for 33's right now and that alone is breaking my bank so I can only imagine how broke you'd feel
LOL. Yeah, that's about right! :yup:Evetytime I think "I'm gonna lift!!" I look at my bank account... weep.... and go back to window shopping lol
Always happy to help (aka enable!) a fellow addict.Damnit KP now you're got me piecing together what I want to do for my lift lmfao thanks a lot bro!!!
I've tried this route before and have spent too much money to mod just to remod and I'm already running a cheap lift (leveling kit) with rubi tires. If I got a 2.5" lift, it would look pretty damn goofy with stock rubber. No, if I'm gonna lift... I'm gonna lift! :brows:Get a cheap 2.5 lift (you can run rubi tires with it) and run this for awile until you have the money built up and have taken the time to out together the lift you want
Thanks! Hope to show it to you in person on trail soon. :thumb:Looks great KP!!!!
Lol. The tech has known me for around 10 years, so yeah no shock to me getting tossed out!That was quick,funny how the tech kicked you out with your magnifying glass :shock:, I would have done the same :cheesy::cheesy::cheesy:
Thanks! Those skids provide quite a bit of coverage.Nice:thumbup:
Yes sir, looking forward to some really hard core green trails!Looking sweet KP now to test it out this weekend
JK_Dave
Caught the Bug
So far, everything I've added onto my Jeep has some form of purpose beyond just being pretty. The bumpers are stronger and have winch mountings or a tire carrier, the wheels adjust spacing, the intake gives me a little more oomph! This mod... well, I just really like the look of it. Especially on a Billet Silver JK!
Parts from Crown Automotive & Slee Off-Road
View attachment 43984
Onward to the next round of goodies.
In case anyone else was interested (you know I am since I'm stalking your mods here), the part numbers for the clear parking lights are -
Parking lamp (clear) right - 55077884ADC
Parking lamp (clear) left - 55077885ADC
Clear lamp kit (parking lamp, side markers and orange bubs all around) - JKCR4
The parking lamps individually are around $24 and the kit is around $56 on sale.
bl17z90
New member
I've tried this route before and have spent too much money to mod just to remod and I'm already running a cheap lift (leveling kit) with rubi tires. If I got a 2.5" lift, it would look pretty damn goofy with stock rubber. No, if I'm gonna lift... I'm gonna lift! :brows:
I had my stock tires for awile after i lifted.......it looked just fine after i got spacers.
Sent from my phone?
KPM171
New member
Hey Bro, could ya do me a solid? (Solid Axle Industries SA44 Diff Cover)
One thing about my TJ that drove me absolutely batty was the fact that the drain plug, no matter how much you sweet talked it, would never perfectly seal the opening in the oil pan. This resulted in very regular (every other day?) oil cleanings of my garage floor. So you might be able to imagine when the JK started to leave me little pictograms made of oil on the floor at around 8000 miles on the clock, I was less than amused. What can I say? I keeps it tidy. The JK’s drips weren’t coming from the oil pan, but the rear diff. No problem, I’m under warranty. I'll just let the Jeep boffins take care of it. But the more I stared at it, the more I wondered why bother fixing a sub-par stamped metal part? Equipment failure can be an excuse to upgrade, even if the failure is just a simple gasket.
A heavy duty diff cover is a relatively 'low cost/high protection gain' product and as I looked around I saw many, many options. That ARB one sure is pretty, but after the rear bumper head ache I don’t know if I’m ready to trust anything from ARB just yet. Why the hell is the Mopar piece so much more expensive than everything else? The Riddler piece looks nice and I also really like the Poison Spyder Bombshell (both have recessed bolts & rounded construction). Too bad the PS diff cover won’t fit with an OEM track bar. In the end, the best bang for the buck was a cover from Solid Axle Industries. Not only was it on sale for $65 (beating out the next closest competitor on my list by over $30/axle), but it can actually withstand a .454 Casull at 30 yards.
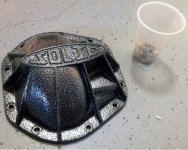
I took a look at Eddie’s write up, called my buddy for a spare set of hands (Thank you ScottC!), cued the theme music, and got to work.
Lately, regardless of the situation, my optimistic catch phrase seems to have become “hell, it’s only 8 bolts!” but in this situation, it actually applies. 10 bolts around the edge, 1 fill plug, 1 drain plug, and you are done. I CAREFULLY lined up the oil drain pan below the rear diff to catch the oil, and then slowly loosened the drain plug to try to prevent any spillage. The "oil" pouring out of the rear differential was absolutely disgusting. And when I say disgusting, I don’t mean it in a dainty ‘oh look, this oil is dirty’ kind of way. I'm talking the dregs of a port-a-john at the end of week long intense Burning Man Festival level of filth. What do the fine folks at the Jeep plant use to fill rear diffs? How the hell can it be THIS bad after only 8700 miles? I was so shocked at the black sludge pouring out that I didn’t even notice as it perfectly missed the oil drain pan and covered my floor in a shade of black that could have made Darth Vadar jump for joy.
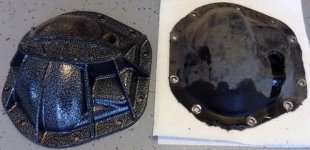
With the "oil" drained and the spillage crisis averted, I popped 9 of the remaining 10 bolts. This next part is Eddies trick, and let me tell you it is fan-freaking-tastic! With only the top bolt holding the cover on, I took a hammer to the cover to loosen it from the axle. After a few whacks, it popped with a very satisfying ping of metal but swung slowly back and forth on the top bolt that was left in. Had I had removed all 10 bolts instead of 9, that thing would have bounced off my gears and flown across the garage. Now pull that last bolt, grab your diff cover, and it’s time to take a look at your gears for the first time!
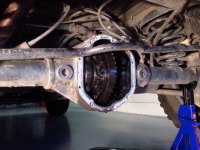
In addition to scraping off the gasket residue, I like to take a look at my gears using brake cleaner to get all that gunk out. Ooooh... Shiny! If you aren’t sure if it’s clean enough, clean it some more. The last thing you want is any debris or dirt in your gears.
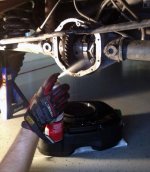
It’s good practice to test fit (everything!) it to make sure you didn’t fat finger your order and grab a cover for a Dana 60 while you were day dreaming and to also make sure your track bar clears it. Sure, it’s a little annoying to get your Jeep on the ground to move your track bar just to lift it back up onto the jack stands, but it’s important to check clearances now rather than find out the hard way on the trail.
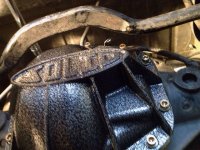
With the test fit complete, it’s time to clean out both the gears and the new diff cover with a little more brake cleaner. You know, just for good measure. Once dry, apply your RTV (I’m using Permatex Ultra Black, but a tube does come with the cover from Solid) carefully not getting any in the bolt holes. This is an important step, so make sure to take your time and get this part right. After your RTV is applied, quickly (don’t run, but don’t dilly dally either) line up your cover onto the differential and finger tighten the bolts. This is another step where a spare set of hands can make life so much easier.
Following the instructions, tighten the bolts in a star pattern. If like me, you are using an OEM track bar it can really get in the way. Something that really helped me out was to use a jack and jack stands to adjust the height of my Jeep on the passenger side to move the track bar up or down a bit. There were always two or three bolts that were blocked by the track bar at any height, so raising/lowering my Jeep a little always gave me a clear shot at all the bolts. Take your time because you really don’t want to strip or cross thread any of these bolts by accident. That’ll make for a bad day. With all 10 bolts tightened to 25 lb-ft, it's time to install your drain plug. Let me say that again, don’t forget to install your drain plug!
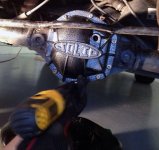
When topping off your fluids, it is incredibly helpful to have a pump that attaches to the gear oil bottle (Thank You ScottC!). For gear oil, I went with Royal Purple 75W140. I wanted the heavier weight since I do trailer fairly frequently and have been finding myself off road quite a bit too. I don’t want to take business from local auto parts shops, but this much oil is actually a big cost of the job and you can find a much better deal online. Pepboy’s wanted around $22/quart vs. $15 online and when you consider you’ll need almost 3 quarts (4.75 pints), that’s savings worth looking into.
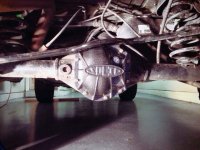
The cover really is very solid (lolz!) and looks great on the axle imho. If I had to pick something I didn’t care for, it’s that the cover sticks down about 1/16-1/8” (guessing here, I haven't measured it yet) below the rear diff. I know, it’s not much but it’s enough to catch on a rock when you are in a rock garden or tricky crossing. Outside of that little nitpicky detail, I’m happy with it. So much so that I ordered another one for the front the very same day I installed this one on the rear Dana 44. Matchy matchy!
One thing about my TJ that drove me absolutely batty was the fact that the drain plug, no matter how much you sweet talked it, would never perfectly seal the opening in the oil pan. This resulted in very regular (every other day?) oil cleanings of my garage floor. So you might be able to imagine when the JK started to leave me little pictograms made of oil on the floor at around 8000 miles on the clock, I was less than amused. What can I say? I keeps it tidy. The JK’s drips weren’t coming from the oil pan, but the rear diff. No problem, I’m under warranty. I'll just let the Jeep boffins take care of it. But the more I stared at it, the more I wondered why bother fixing a sub-par stamped metal part? Equipment failure can be an excuse to upgrade, even if the failure is just a simple gasket.
A heavy duty diff cover is a relatively 'low cost/high protection gain' product and as I looked around I saw many, many options. That ARB one sure is pretty, but after the rear bumper head ache I don’t know if I’m ready to trust anything from ARB just yet. Why the hell is the Mopar piece so much more expensive than everything else? The Riddler piece looks nice and I also really like the Poison Spyder Bombshell (both have recessed bolts & rounded construction). Too bad the PS diff cover won’t fit with an OEM track bar. In the end, the best bang for the buck was a cover from Solid Axle Industries. Not only was it on sale for $65 (beating out the next closest competitor on my list by over $30/axle), but it can actually withstand a .454 Casull at 30 yards.

I took a look at Eddie’s write up, called my buddy for a spare set of hands (Thank you ScottC!), cued the theme music, and got to work.
Lately, regardless of the situation, my optimistic catch phrase seems to have become “hell, it’s only 8 bolts!” but in this situation, it actually applies. 10 bolts around the edge, 1 fill plug, 1 drain plug, and you are done. I CAREFULLY lined up the oil drain pan below the rear diff to catch the oil, and then slowly loosened the drain plug to try to prevent any spillage. The "oil" pouring out of the rear differential was absolutely disgusting. And when I say disgusting, I don’t mean it in a dainty ‘oh look, this oil is dirty’ kind of way. I'm talking the dregs of a port-a-john at the end of week long intense Burning Man Festival level of filth. What do the fine folks at the Jeep plant use to fill rear diffs? How the hell can it be THIS bad after only 8700 miles? I was so shocked at the black sludge pouring out that I didn’t even notice as it perfectly missed the oil drain pan and covered my floor in a shade of black that could have made Darth Vadar jump for joy.

With the "oil" drained and the spillage crisis averted, I popped 9 of the remaining 10 bolts. This next part is Eddies trick, and let me tell you it is fan-freaking-tastic! With only the top bolt holding the cover on, I took a hammer to the cover to loosen it from the axle. After a few whacks, it popped with a very satisfying ping of metal but swung slowly back and forth on the top bolt that was left in. Had I had removed all 10 bolts instead of 9, that thing would have bounced off my gears and flown across the garage. Now pull that last bolt, grab your diff cover, and it’s time to take a look at your gears for the first time!

In addition to scraping off the gasket residue, I like to take a look at my gears using brake cleaner to get all that gunk out. Ooooh... Shiny! If you aren’t sure if it’s clean enough, clean it some more. The last thing you want is any debris or dirt in your gears.

It’s good practice to test fit (everything!) it to make sure you didn’t fat finger your order and grab a cover for a Dana 60 while you were day dreaming and to also make sure your track bar clears it. Sure, it’s a little annoying to get your Jeep on the ground to move your track bar just to lift it back up onto the jack stands, but it’s important to check clearances now rather than find out the hard way on the trail.

With the test fit complete, it’s time to clean out both the gears and the new diff cover with a little more brake cleaner. You know, just for good measure. Once dry, apply your RTV (I’m using Permatex Ultra Black, but a tube does come with the cover from Solid) carefully not getting any in the bolt holes. This is an important step, so make sure to take your time and get this part right. After your RTV is applied, quickly (don’t run, but don’t dilly dally either) line up your cover onto the differential and finger tighten the bolts. This is another step where a spare set of hands can make life so much easier.
Following the instructions, tighten the bolts in a star pattern. If like me, you are using an OEM track bar it can really get in the way. Something that really helped me out was to use a jack and jack stands to adjust the height of my Jeep on the passenger side to move the track bar up or down a bit. There were always two or three bolts that were blocked by the track bar at any height, so raising/lowering my Jeep a little always gave me a clear shot at all the bolts. Take your time because you really don’t want to strip or cross thread any of these bolts by accident. That’ll make for a bad day. With all 10 bolts tightened to 25 lb-ft, it's time to install your drain plug. Let me say that again, don’t forget to install your drain plug!

When topping off your fluids, it is incredibly helpful to have a pump that attaches to the gear oil bottle (Thank You ScottC!). For gear oil, I went with Royal Purple 75W140. I wanted the heavier weight since I do trailer fairly frequently and have been finding myself off road quite a bit too. I don’t want to take business from local auto parts shops, but this much oil is actually a big cost of the job and you can find a much better deal online. Pepboy’s wanted around $22/quart vs. $15 online and when you consider you’ll need almost 3 quarts (4.75 pints), that’s savings worth looking into.

The cover really is very solid (lolz!) and looks great on the axle imho. If I had to pick something I didn’t care for, it’s that the cover sticks down about 1/16-1/8” (guessing here, I haven't measured it yet) below the rear diff. I know, it’s not much but it’s enough to catch on a rock when you are in a rock garden or tricky crossing. Outside of that little nitpicky detail, I’m happy with it. So much so that I ordered another one for the front the very same day I installed this one on the rear Dana 44. Matchy matchy!
Last edited:
Tackerdown
Banned
Very nice, but you have a cracked in your floor that needs tending to Lol . you could always grind the edge down. That's how I fixed my stock one. It kept catching the rocks and leaking. So the 2nd time it did it I pulled the cover hammered it flat and took a wheel to it. No problem since .
Tom
Tom
I agree it will snag everything!!!You could always grind the edge down. That's how I fixed my stock one. It kept catching the rocks and leaking. So the 2nd time it did it I pulled the cover hammered it flat and took a wheel to it. No problem since .
Tom
I second Tom; Die grinder with a 3m surface conditioning pad, take it down till its level, repaint it with some of that rustoleum hammered finish paint in a matching color and call it done!
I wish I had a grinder so I could do this magical mod.
Sent from my phone?
You and KP could borrow my 4" angle grinder whenever you want
KPM171
New member
You and KP could borrow my 4" angle grinder whenever you want
I might be very dangerous with an angle grinder... <insert evil laugh here!>
Tackerdown
Banned
^^ LOL mine would be perfect for you I took the guard off a long time ago. You can do all kinds of damage with it.
Tom
Tom
KPM171
New member
Matchy Matchy! (Solid Axle Industries SA44 Diff Cover)
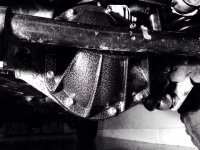
This past weekend I made quick work of the task of replacing the front diff cover. The diff fluid was just as gross as the rear, but after practicing on the rear diff cover, there were no accidents and it all went rather smoothly. The new cover looks great and everything lined up perfectly. I'm sad to report that this install yielded no humorous stories or excitement, just a nice, clean finished cover ready to tackle the rocks come spring time.
This past weekend I made quick work of the task of replacing the front diff cover. The diff fluid was just as gross as the rear, but after practicing on the rear diff cover, there were no accidents and it all went rather smoothly. The new cover looks great and everything lined up perfectly. I'm sad to report that this install yielded no humorous stories or excitement, just a nice, clean finished cover ready to tackle the rocks come spring time.


