I found this on WOL from 2013 for the flush. This is what he did and I'll start there.
"Tools and materials that I used:
Small adjustable wrench or 10 mm socket.
Small locking pliers.
~5' long 3/8" ID, 1/2" OD Clear Plastic Tubing.
3/8" Male-Male Pipe Barb.
1/4" to 5/8" Pipe Clamp
Flathead Screwdriver
Small ~6mm (small end) to ~9 mm Rubber Stopper
Pump from an old soap bottle (Turkey Baster is no doubt better).
Silicon spray lube
Latex or rubber gloves
2 Quarts ATF 4+
Procedure:
1.
Remove the air filter housing. Start by undoing the four clips on the cover, and disconnecting the crankcase ventilation hose. Remove the cover and bend the snorkel, pushing it off to the side (I put it over the radiator. If you're inclined, disconnect the snorkel and remove completely from the engine compartment. If you have very small hands that can squeeze between the air filter box and the PS reservoir you might be able to skip this step entirely). Remove the air filter and set it gently aside if you intend to reuse it, or else it's obviously a good time to replace if needed. Next remove the bottom of the air filter housing by wiggling it upward with a moderate amount of force. It is held in place only by three pins in rubber grommets. There are no fasteners as the Chilton Manual led me to believe. (You could also disconnect the snorkel and remove the air filter and housing as one piece, but if the housing is particularly dirty you might risk fouling the filter.)
2.
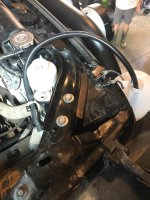
Prepare reservoir for flush. Place enough rags underneath the Power Steering reservoir to catch any spills. (I noticed too late that I had dripped ATF on a wiring harness.) Open the cap on the reservoir and use a turkey baster or small hand pump to remove as much fluid as possible (for me it was about half a pint), taking care not to damage the screen. Place the cap back on the reservoir. Remove the one 10 mm bolt holding the power steering reservoir. (Not strictly necessary but helpful). Get your clear plastic hose, pipe barb, pipe clamp and rubber stopper, and pliers, and screwdriver ready.
3.
Connect PS return line to tubing. Grab the PS reservoir and tip it perhaps 30-40 degrees with the return line facing up so that it's less likely to spill. Use pliers (or your fingers if you are brave) to pinch the clamp holding the PS return line. I slid it down 4-5 inches and released it there temporarily, it didn't seem to do any harm to the tubing. Others might not want to risk damaging the tubing especially if it's in poor condition. In any case, wiggle and pull the return line off the reservoir, trying to keep it upright. Place the rubber stopper in the PS return line entrance to the reservoir and return the reservoir approximately to its normal position. Slide the hose clamp onto the return line. Place one end of the barb in the clear plastic tubing and the other in the PS return line. Slide the hose clamp over the barb and tighten it down with the screwdriver. Place the other end of the clear plastic tubing into a bottle or tub to recieve the old fluid.
4.
The Flush. Open the reservoir cap and fill up the reservoir with fresh ATF 4+ almost to the top. Rock the steering wheel back and forth moderately 10-15 times. (I did it "dry", some might want to lift up the front end.) Check to see if the old fluid is being pumped out. Check the level in the reservoir and as needed. You'll need to get a feel for how much you can move the wheel before it's time to fill the reservoir again, don't let it get too low. Repeat until you see clear fresh fluid coming out the return line.
5.
Finishing up. Pump the fluid in the reservoir back down by rocking the steering wheel until the level is about where it was when first sucking/ pumping the old fluid out of the reservoir in step 2. Replace the cap on the PS reservoir. Loosen the hose clamp on hose barb on the return line. Remove barb and hold up return line and plastic tubing to minimize spilling and let the fluid drain out of the clear plastic tubing. Hold PS reservoir as in the start of step 3, remove rubber stopper and reconnect return line. Use pliers to depress the factory clamp and slide it up over the entrance to the PS reservoir. Return PS reservoir to original location and reattach bolt. Remove cap again, fill reservoir to about the max line, replace cap again. (I used a little over one quart if ATF 4+ total for the whole procedure. It might be possible to use less than 1 quart if you catch the exact moment that the fluid turns clear.) Replace bottom of air filter housing (It helped to give a shot of silicon spray lube on the rubber grommets to get the pins to go in again). Replace air filter and cover. Re-clip 4 clips on the cover. Reattach CCV hose. Reattach snorkel if you removed it.
6.
Workout air, test drive. I rocked the steering wheel dry a few more times. Then went on a short test drive around the neighborhood, with lots of turns to workout any potential air from the system. If you are careful not the let the level get too low in the reservoir you shouldn't have any problem with air, but if you do it's not that hard to work out. The level in my reservoir actually went up after my test drive due to the fluid warming up. The steering felt a little smoother and easier for me but it might have been all in my head. At any rate this is a fairly easy, often neglected bit of maintenance that should make life easier for the PS pump, prevent corrosion, and maybe even make it a little easier on your arms. When I do it again in 5 years I'll provide pictures! This time I was feeling my way around in the dark to a certain extent. I welcome comments and corrections."
Sent from my iPhone using
WAYALIFE mobile app
