You are using an out of date browser. It may not display this or other websites correctly.
You should upgrade or use an alternative browser.
You should upgrade or use an alternative browser.
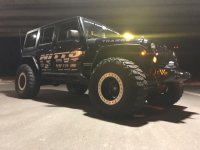
Project "Thanos" Build
- Thread starter iRonin
- Start date
Exodus 4x4
New member
Thinking about you buddy. Next time...
BTW probably going to run out to Wolf Caves next month if you're down.
Sent from my iPhone using WAYALIFE mobile app
iRonin
Member
Thanks bud !
Thinking about you buddy. Next time...
BTW probably going to run out to Wolf Caves next month if you're down.
Sent from my iPhone using WAYALIFE mobile app
Man, I wish I was there with y'all. Next for sure and yeah, Wolf Caves sounds great
iRonin
Member
EVO Full fender liners, Rigid Industries Capture Lightbar, SuperLiner Door Treatment
The last couple upgrades for JKX were cosmetic conveniences. I was bummed to have to remove my old liners when switching to coikovers but EVO answered with a version of their full liners that was cut out to accept the new footprint. They arrived just a week before rolling out and I had them powder coated black after test fitting.
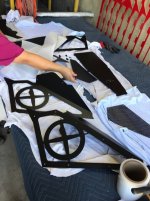
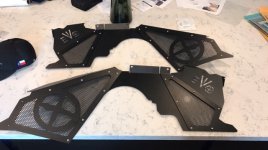
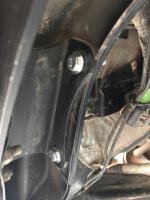
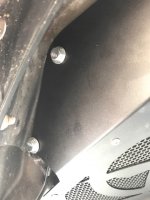
One minor issue with the liners is that if you have Poison Spyder Crusher flares, or similar ones that introduce a body brace, you'll want to drill pass through holes for the gusset bolts rather than use the supplied self-tappers that the liners come with:
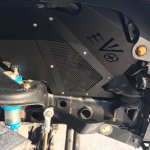
Final product looked great and actually has more inner clearance than the old liners, eliminating tire rub at full turn/stuff:
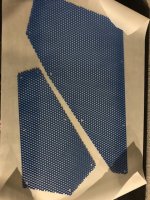
While working on the ram install, I needed to keep the driver side liner off which let me experiment with painting the backing gates blue to match the Thanos accent scheme, which turned out really nice:
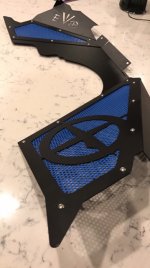
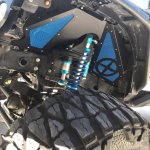
I ran out of time to remove and paint the passenger side, so it remained black for the road trip out to Missouri, where I would later finish painting it to match just before the JKX kicked off
The second last minute mod was the addition of a 10" Rigid Capture bar for the hood, courtesy of my co-driver. Since the JKX charges both a driver and co-driver fee, I gave him the cheaper option of getting me one of these and the mounting brackets instead, which he jumped on. The key feature of the Capture is that it comes with a powered, integrated housing for a GoPro Hero camera, which means being able to record as long as your card can handle without worrying about battery swaps or placement.
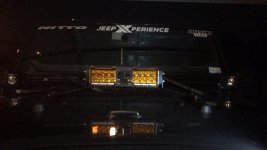
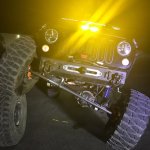
The amber covers over the flood style lights are removable, which is another nice feature. The beam itself can be toggled Hi or Low, so on low I totally abused them as day running lights on the trail so it's easy to tell which rig is mine in the videos
The last mod before the trip was for my doors. I avoid running doors as much as possible both because I love the freedom and visibility half (or no) doors gives me, but also just because they tend to be such a damage liability on the trails. Mine in particular are pretty pinstriped up from Texas wheeling, but I knew i'd need them both for getting stickered up, and for protecting us from the potential rain & mud we'd be seeing outside of TX.
So I hit up Simmons Industries in Pflugerville that sprays a pretty hearty product called SuperLiner/EzLiner and had them coat my doors for the event to see how well the stuff holds up. Their facility is pretty neat
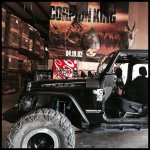
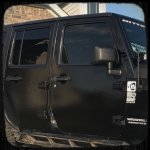
The final outcome was my doors lined with an almost rubber like glossy protective coating that wasn't your typical rough, scratchy berliner texture:
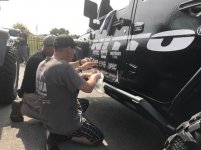
The coating was not only easy to clean/wipe down, but took really well to stickering which is otherwise a challenge for regular liner products:
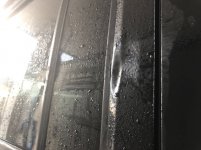
The liner held up well for the JKX, as most of the wheeling we did was twisty stuff with plenty of trees and branches wanting to reach out and touch somebody, but the scrapes wiped away clean. The worst of it was a pretty significant rub off a tight squeeze pressed against a tree (going back to what I said about hating doors) where the product held up about as best it could given the circumstances:
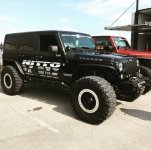
That pretty much wraps up the upgrades leading into Day 1 of the JKX. 3 years in the making, Thanos was ready for prime time
The last couple upgrades for JKX were cosmetic conveniences. I was bummed to have to remove my old liners when switching to coikovers but EVO answered with a version of their full liners that was cut out to accept the new footprint. They arrived just a week before rolling out and I had them powder coated black after test fitting.


One minor issue with the liners is that if you have Poison Spyder Crusher flares, or similar ones that introduce a body brace, you'll want to drill pass through holes for the gusset bolts rather than use the supplied self-tappers that the liners come with:


Final product looked great and actually has more inner clearance than the old liners, eliminating tire rub at full turn/stuff:

While working on the ram install, I needed to keep the driver side liner off which let me experiment with painting the backing gates blue to match the Thanos accent scheme, which turned out really nice:


I ran out of time to remove and paint the passenger side, so it remained black for the road trip out to Missouri, where I would later finish painting it to match just before the JKX kicked off
The second last minute mod was the addition of a 10" Rigid Capture bar for the hood, courtesy of my co-driver. Since the JKX charges both a driver and co-driver fee, I gave him the cheaper option of getting me one of these and the mounting brackets instead, which he jumped on. The key feature of the Capture is that it comes with a powered, integrated housing for a GoPro Hero camera, which means being able to record as long as your card can handle without worrying about battery swaps or placement.


The amber covers over the flood style lights are removable, which is another nice feature. The beam itself can be toggled Hi or Low, so on low I totally abused them as day running lights on the trail so it's easy to tell which rig is mine in the videos
The last mod before the trip was for my doors. I avoid running doors as much as possible both because I love the freedom and visibility half (or no) doors gives me, but also just because they tend to be such a damage liability on the trails. Mine in particular are pretty pinstriped up from Texas wheeling, but I knew i'd need them both for getting stickered up, and for protecting us from the potential rain & mud we'd be seeing outside of TX.
So I hit up Simmons Industries in Pflugerville that sprays a pretty hearty product called SuperLiner/EzLiner and had them coat my doors for the event to see how well the stuff holds up. Their facility is pretty neat

The final outcome was my doors lined with an almost rubber like glossy protective coating that wasn't your typical rough, scratchy berliner texture:

The coating was not only easy to clean/wipe down, but took really well to stickering which is otherwise a challenge for regular liner products:

The liner held up well for the JKX, as most of the wheeling we did was twisty stuff with plenty of trees and branches wanting to reach out and touch somebody, but the scrapes wiped away clean. The worst of it was a pretty significant rub off a tight squeeze pressed against a tree (going back to what I said about hating doors) where the product held up about as best it could given the circumstances:

That pretty much wraps up the upgrades leading into Day 1 of the JKX. 3 years in the making, Thanos was ready for prime time

Last edited:
wjtstudios
Hooked
tdougherty81
New member
EVO Full fender liners, Rigid Industries Capture Lightbar, SuperLiner Door Treatment
The last couple upgrades for JKX were cosmetic conveniences. I was bummed to have to remove my old liners when switching to coikovers but EVO answered with a version of their full liners that was cut out to accept the new footprint. They arrived just a week before rolling out and I had them powder coated black after test fitting.
View attachment 277565
View attachment 277566
One minor issue with the liners is that if you have Poison Spyder Crusher flares, or similar ones that introduce a body brace, you'll want to drill pass through holes for the gusset bolts rather than use the supplied self-tappers that the liners come with:
View attachment 277579
View attachment 277580
Final product looked great and actually has more inner clearance than the old liners, eliminating tire rub at full turn/stuff:
View attachment 277581
While working on the ram install, I needed to keep the driver side liner off which let me experiment with painting the backing gates blue to match the Thanos accent scheme, which turned out really nice:
View attachment 277582
View attachment 277583
View attachment 277584
I ran out of time to remove and paint the passenger side, so it remained black for the road trip out to Missouri, where I would later finish painting it to match just before the JKX kicked off
The second last minute mod was the addition of a 10" Rigid Capture bar for the hood, courtesy of my co-driver. Since the JKX charges both a driver and co-driver fee, I gave him the cheaper option of getting me one of thee and the mounting brackets instead, which he jumped on. The key feature of the Capture is that it comes with a powered, integrated housing for a GoPro Hero camera, which means being able to record as long as your card can handle without worrying about battery swaps or placement.
View attachment 277585
View attachment 277586
The amber covers over the flood style lights are removable, which is another nice feature. The beam itself can be toggled Hi or Low, so on low I totally abused them as day running lights on the trail so it's easy to tell which rig is mine in the videos
The last mod before the trip was for my doors. I avoid running doors as much as possible both because I love the freedom and visibility half (or no) doors gives me, but also just because they tend to be such a damage liability on the trails. Mine in particular are pretty pinstriped up from Texas wheeling, but I knew i'd need them both for getting stickered up, and for protecting us from the potential rain & mid we'd be seeing outside of TX.
So I hit up Simmons Industries in Pflugerville that sprays a pretty hearty product called SuperLiner/EzLiner and had them cost my doors for the event to see how well the stuff holds up. Their facility is pretty neat
View attachment 277587
The final outcome was my doors lined with an almost rubber like glossy protective coating that wasn't your typical rough, scratchy berliner texture:
View attachment 277588
The coating was not only easy to clean/wipe down, but took really well to stickering which is otherwise a challenge for regular liner products:
View attachment 277589
The liner held up well for the JKX, as plenty of the wheeling we did was twisty stuff with plenty of trees and branches wanting to reach out and touch somebody, but the scrapes wiped away clean. The worst of it was a pretty significant rub off a tight squeeze pressed against a tree (going back to what I said about hating doors) where the product held up about as best it could given the circumstances:
View attachment 277591
That pretty much wraps up the upgrades leading into Day 1 of the JKX. 3 years in the making, Thanos was ready for prime time
View attachment 277592
Came a long way since I last saw Thanos in May. Looking good! Next big thing for me will be coilovers.
dillard09
New member
I must say Thanos did awesome on JKX and so did the driver! 
I was a pleasure getting to hang with ya.
Jake
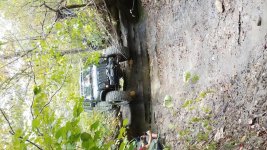
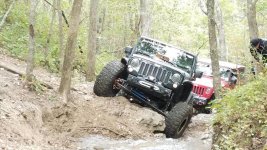
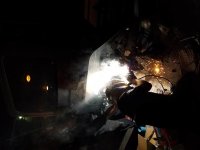
Sent from my SAMSUNG-SM-G935A using WAYALIFE mobile app
I was a pleasure getting to hang with ya.
Jake


Sent from my SAMSUNG-SM-G935A using WAYALIFE mobile app
TrainWreck618
Caught the Bug
Looks like a good time at jkx[emoji106] Jeep looks great
Sent from my iPhone using WAYALIFE mobile app
Sent from my iPhone using WAYALIFE mobile app
iRonin
Member
You'll definitely dig emCame a long way since I last saw Thanos in May. Looking good! Next big thing for me will be coilovers.
Hey nice! Thanks man, and likewise! Can't wait to head out West!I must say Thanos did awesome on JKX and so did the driver!
I was a pleasure getting to hang with ya.
Jake
Looks like a good time at jkx[emoji106] Jeep looks great
It was a pretty cool experience for sure, thanks dude
iRonin
Member
Ace Gatekeeeprr, PCI Race Radio
Totally lied in the last post when I said that was it for upgrades prior to the JKX.
As I don't typically run a spare, I also picked up the Ace Gatekeeper which gave me external rotopax & highlift jack mounts:
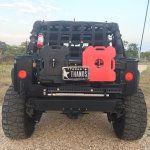
During the event we were required to have a spare, so I opted to run it longwise behind the driver seat using the single fold-down slot. This allowed me to still have a spare rear/middle seat and leverage trunk space for everything else.
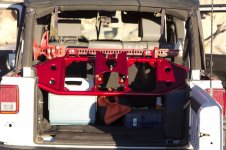
While on the trip though, one of the guests pointed me towards a sweet interior angled carrier by Excessive Offroad (also ironically named the GateKeeper) which mounts the tire at an angle in the rear without hard top interference. It can also be used to mount the highlift jack internally. I ordered one immediately as something like this was _exactly_ what I'd been looking for.
And finally, this JKX also brought with it the added requirement to run race radios rather than CBs. Mel and Lisa offered several options from renting some of their hand-helds to letting folks purchase PCI Race Radios pre-programmed to the KotH/Offroad Evolution channels. I went ahead and picked up one of the preprogrammed units and mounted it overhead in the sport cage:
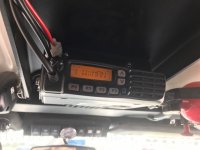
The radio worked great, pretty much plug-and-play with great range. My only complaint was that it comes with a very short cigarette lighter style power cable, which I didn't really have time to mess with, so for now I just ran the cable to the B-Pillar then back behind the driver seat to the cig lighter plug inside the center console. Now that I have time I def need to get a proper cable running out to the spod or battery thru the firewall.
Totally lied in the last post when I said that was it for upgrades prior to the JKX.
As I don't typically run a spare, I also picked up the Ace Gatekeeper which gave me external rotopax & highlift jack mounts:

During the event we were required to have a spare, so I opted to run it longwise behind the driver seat using the single fold-down slot. This allowed me to still have a spare rear/middle seat and leverage trunk space for everything else.
While on the trip though, one of the guests pointed me towards a sweet interior angled carrier by Excessive Offroad (also ironically named the GateKeeper) which mounts the tire at an angle in the rear without hard top interference. It can also be used to mount the highlift jack internally. I ordered one immediately as something like this was _exactly_ what I'd been looking for.

And finally, this JKX also brought with it the added requirement to run race radios rather than CBs. Mel and Lisa offered several options from renting some of their hand-helds to letting folks purchase PCI Race Radios pre-programmed to the KotH/Offroad Evolution channels. I went ahead and picked up one of the preprogrammed units and mounted it overhead in the sport cage:

The radio worked great, pretty much plug-and-play with great range. My only complaint was that it comes with a very short cigarette lighter style power cable, which I didn't really have time to mess with, so for now I just ran the cable to the B-Pillar then back behind the driver seat to the cig lighter plug inside the center console. Now that I have time I def need to get a proper cable running out to the spod or battery thru the firewall.
iRonin
Member
The Aftermath
All the back-to-back wheeling on the JKX takes its toll on components. Between the wheeling and the road miles, things break. Most rigs had at least 1-2 things that needed to be patched, from brake lines to tie rods to steering boxes.
For Thanos, the first issue we encountered was actually on the new ram assist. At one point during day 1, the front of the ram itself (where the shaft enters the ram body) began weeping fluid.
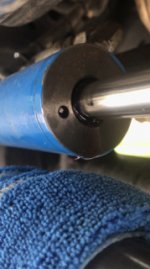
Only option here was to either pull the lines for the ram and cap things off at the box (I did have my caps with me) or just deal with having to top off the fluid a couple times a day. We opted to top fluid off and just keep a rag under it overnight as it was still worth it to have the assist working for us. Earlier this week after being back, we got a replacement ram in from WTO and I was able to swap it out without issue.
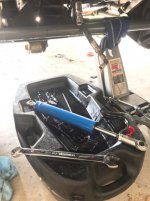
The second issue, which ended up being the most annoying by far, was that the front ARB locker on the PR44 started acting iffy, not always wanting to engage. After pulling the line to inspect, we found oil was able to blow back up into the line, which was then messing with the ability to pressurize the locker. Pulling the diff side on the line, we let the compressor run for a bit, blowing out the oil and even replaced the entire airline itself, but this fix was only temporary. It was clear the inner seal(s) were shot so it was just going to keep letting oil sling up into the line.
Unreliable front locker meant having to bump more obstacles that by design have one wheel hanging in the air, and there were a LOT of spots where this was the case:
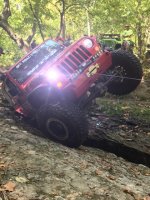
Thankfully, with some good spotting, good lines, and good throttle control, I only had to winch one obstacle early on because of it (Can Opener as shown in the previous pic) and avoid just one optional obstacle a bit later knowing that I would need working lockers to make it. We did everything else successfully so it wasn't a total bummer.
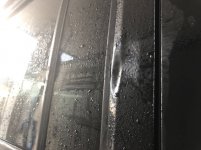
Next bit of damage was on the rear driver side door that I pointed out earlier, where a tight squeeze between some trees ended up pressing a little scrape/dent in the door trim:
A big drop in waterfall at SMORR bent up one of the ears on my trailer hitch:
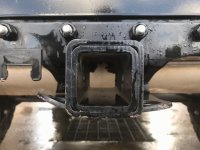
To which I guess I'm fine with because it may have otherwise ripped off my highlift jack mounted on the bottom of the carrier above it.
The "big break" for me came at about midweek while we were at Hot Springs (aka Superlift). After an otherwise un-eventful day of wheeling, we set up camp for the night. The next morning as we were leaving, the Jeep behind me gets on the horn and tells me that my rear passenger tire is wobbling as we get up to speed. I didn't feel it at all really until he pointed it out but sure enough, I somehow managed to bend the axle flange.
Needing to keep going, I shifted to the back of the pack where the crew and I could keep an eye on it while we traveled to the next stop,
looking for any signs of smoking the bearing or the wobble getting worse and keeping ample distance in the convoy.
At the next stop we determined that the wobble was slight enough to at least hobble along to the next day, and Mel coordinated a replacement shaft with Dynatrac to be overnighted to the hotel the next day.
The shaft held, and that following evening, the replacement arrived, but as we pulled the tire off to make the swap, we discovered another significant issue:
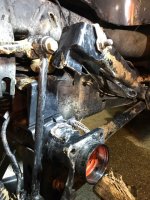
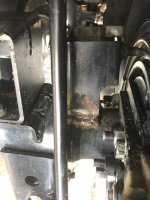
Yep, that's the upper control arm. Yep, the bracket is torn off the axle. More specifically, it appeared to have broken off just above the welds during whatever the heck bent the flange.
The co-driver and I spent some serious time trying to reflect back on what obstacle could have hit so hard and why we nor anyone else would have noticed when it happened, but honestly couldn't place it. There were a few "bump it" spots on a couple of the trails that day that could have been the culprit, but nothing we recall slamming into very hard at all.
Regardless, we knew we needed to patch the UCA at least well enough to get us home as the week was coming to an end, so Chris Durham was kind enough to weld the bracket back down in place as best he could (see the last pic dillard09 posted above)
With the bracket welded back on and the shaft replaced, we were at least good enough to hit the road safely and get back home.
Fast forward to now- while we were able to get the ram in and replaced, the ARB seals for the front locker still aren't in yet, and we're going to have to strip and replace/reweld new UCA brackets into the rear axle as Chris also noticed that stress fractures had already begun on the driver side.
Between these two issues my wife wasn't super comfortable with me rolling out for another 2000+ mi adventure, so we
called it on making the Exodus this year.
The silver lining for all of this was that shaft held and despite it and other issues, we didn't miss a single wheeling portion and made it home safe and sound. I'm super thankful, and a bit regretful that I didn't go full float rear to begin with. Will definitely remedy the situation as Thanos evolves onto 40s!
All the back-to-back wheeling on the JKX takes its toll on components. Between the wheeling and the road miles, things break. Most rigs had at least 1-2 things that needed to be patched, from brake lines to tie rods to steering boxes.
For Thanos, the first issue we encountered was actually on the new ram assist. At one point during day 1, the front of the ram itself (where the shaft enters the ram body) began weeping fluid.

Only option here was to either pull the lines for the ram and cap things off at the box (I did have my caps with me) or just deal with having to top off the fluid a couple times a day. We opted to top fluid off and just keep a rag under it overnight as it was still worth it to have the assist working for us. Earlier this week after being back, we got a replacement ram in from WTO and I was able to swap it out without issue.

The second issue, which ended up being the most annoying by far, was that the front ARB locker on the PR44 started acting iffy, not always wanting to engage. After pulling the line to inspect, we found oil was able to blow back up into the line, which was then messing with the ability to pressurize the locker. Pulling the diff side on the line, we let the compressor run for a bit, blowing out the oil and even replaced the entire airline itself, but this fix was only temporary. It was clear the inner seal(s) were shot so it was just going to keep letting oil sling up into the line.
Unreliable front locker meant having to bump more obstacles that by design have one wheel hanging in the air, and there were a LOT of spots where this was the case:

Thankfully, with some good spotting, good lines, and good throttle control, I only had to winch one obstacle early on because of it (Can Opener as shown in the previous pic) and avoid just one optional obstacle a bit later knowing that I would need working lockers to make it. We did everything else successfully so it wasn't a total bummer.
Next bit of damage was on the rear driver side door that I pointed out earlier, where a tight squeeze between some trees ended up pressing a little scrape/dent in the door trim:

A big drop in waterfall at SMORR bent up one of the ears on my trailer hitch:

To which I guess I'm fine with because it may have otherwise ripped off my highlift jack mounted on the bottom of the carrier above it.
The "big break" for me came at about midweek while we were at Hot Springs (aka Superlift). After an otherwise un-eventful day of wheeling, we set up camp for the night. The next morning as we were leaving, the Jeep behind me gets on the horn and tells me that my rear passenger tire is wobbling as we get up to speed. I didn't feel it at all really until he pointed it out but sure enough, I somehow managed to bend the axle flange.
Needing to keep going, I shifted to the back of the pack where the crew and I could keep an eye on it while we traveled to the next stop,
looking for any signs of smoking the bearing or the wobble getting worse and keeping ample distance in the convoy.
At the next stop we determined that the wobble was slight enough to at least hobble along to the next day, and Mel coordinated a replacement shaft with Dynatrac to be overnighted to the hotel the next day.
The shaft held, and that following evening, the replacement arrived, but as we pulled the tire off to make the swap, we discovered another significant issue:

Yep, that's the upper control arm. Yep, the bracket is torn off the axle. More specifically, it appeared to have broken off just above the welds during whatever the heck bent the flange.
The co-driver and I spent some serious time trying to reflect back on what obstacle could have hit so hard and why we nor anyone else would have noticed when it happened, but honestly couldn't place it. There were a few "bump it" spots on a couple of the trails that day that could have been the culprit, but nothing we recall slamming into very hard at all.
Regardless, we knew we needed to patch the UCA at least well enough to get us home as the week was coming to an end, so Chris Durham was kind enough to weld the bracket back down in place as best he could (see the last pic dillard09 posted above)
With the bracket welded back on and the shaft replaced, we were at least good enough to hit the road safely and get back home.

Fast forward to now- while we were able to get the ram in and replaced, the ARB seals for the front locker still aren't in yet, and we're going to have to strip and replace/reweld new UCA brackets into the rear axle as Chris also noticed that stress fractures had already begun on the driver side.
Between these two issues my wife wasn't super comfortable with me rolling out for another 2000+ mi adventure, so we
called it on making the Exodus this year.
The silver lining for all of this was that shaft held and despite it and other issues, we didn't miss a single wheeling portion and made it home safe and sound. I'm super thankful, and a bit regretful that I didn't go full float rear to begin with. Will definitely remedy the situation as Thanos evolves onto 40s!

Last edited:
Ddays
Hooked
Wow, that's crazy what happened to the UCA. I'm assuming you run a PR60 SF rear?
I do and bent a flange as well. I now carry a spare.
Curious on your suspension setup. Are you running coilovers in front only? If so are there any issues or quirks in the handling with coils in rear. I've eyed a setup like that to better handle towing a trailer but never ran into anyone with that setup.
Sent from my iThingie
iRonin
Member
Wow, that's crazy what happened to the UCA. I'm assuming you run a PR60 SF rear?
I do and bent a flange as well. I now carry a spare.
Curious on your suspension setup. Are you running coilovers in front only? If so are there any issues or quirks in the handling with coils in rear. I've eyed a setup like that to better handle towing a trailer but never ran into anyone with that setup.
Sent from my iThingie
It's the XD60, and yea SF. So far i've had no drivability issues with the c/o up front only. Now granted, the kings aren't "designed" to be paired with both plush rides in the rear, but there are plenty of suspension packages (Rock Kralwer Trail Gunner) that pair a front c/o with rear spring/shock. All I personally messed with was adjusting the ride height to level with the rear.
For me this setup was more of a budget constraint but so far ~2500mi plus wheeling a ton I have no complaints.
Krystianjk
New member
13_gecko_rubi
Caught the Bug
You did great especially keeping your spirits up with that axle issue. Was a pleasure meeting and hanging out for a week!!
Sent from my SM-G930V using WAYALIFE mobile app
Sent from my SM-G930V using WAYALIFE mobile app
iRonin
Member
You did great especially keeping your spirits up with that axle issue. Was a pleasure meeting and hanging out for a week!!
Thanks man; pleasure was likewise. Things break, and luckily in my case it wasn’t a show stopper so I was happy I got to keep wheeling
This past week the jeep was in the shop to address the front locker problem.
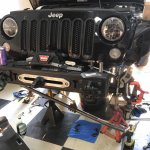
Having already troubleshot the issue back to the internal o-rings, ordered a replacement set from ARB (2 rings), pulled the carrier and swapped them out.
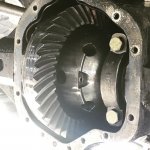
We also swapped out the line/solenoid for good measure, and while we had the carrier out anyways, it was a good time to address a leaky inner axle seal (replaced both for good measure).
This meant having to pull the RCV shafts which a labor of love.
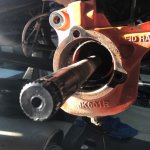
Still, this let us check everything- teeth, splines, joints, etc. The shafts, R&P etc were holding up nicely.
All back together the locker has a good seal and holds.
This leaves the rear to fix up. I contacted Dynatrac and they are sending me new UCA mounts. Once they arrive we’ll drop the rear, lop off the repaired bracket and weld the new one on. We’ll also inspect the other side a bit closer and replace it if it seems to be compromised.
iRonin
Member
Excessive Industries GateKeeper Tire Carrier
Special treat this week. Since day 1 I’ve been wanting a rear carrier delete option that give me an alternate way to carry a spare.
Until now I’ve either run the tire long-ways in the single rear slot, or simply propped it up against the rear seats. PITA having to secure the tire down with straps, etc.
After evaluating a few different potential options including having something custom fab’d up a-la EVO1 or Randy’s rig, I finally came across the perfect-for-me solution build by an outfit called Excessive Industries.
Presenting, the Gatekeeper (not to be mistaken for the ACE Engineering Gatekeeper, which I also coincidentally have)
Product arrived via freight bolted down and wrapped nicely to a palate jig.
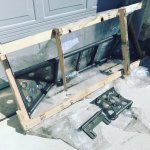
After confirming fitment & powder coating it was time for installation. The product is pretty straight forward hardware wise-
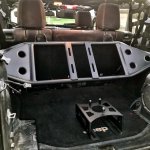
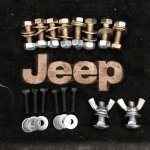
After removing the hard top, the main body of the carrier straddles the tub rails. The only other brackets are the wheel hub bracket itself, and two riser brackets that allow for vertical, depth, and tilt adjustment for tire placement.
The rails come with extended screws, and is slotted to be compatible with the hard top:
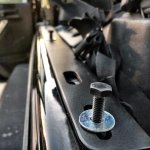
This positions the carrier relative to the trim and the back seats, offering enough space to mount a hi-lift jack on the backside. They even give you a nice set of wingnuts and compression washers for jack mounting:
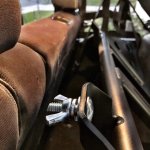
(I’m opting to keep my jack mounted externally on the Ace Gatekeeper, so I will likely turn this mount into a bow or gun rack solution)
With the carrier positioned, I elected to premount the wheel bracket to the ATX Slab spare:
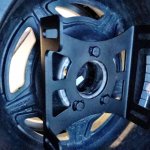
And then loosely mount the riser brackets onto the carrier:
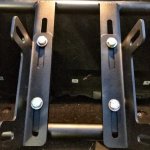
This allowed me to lift the tire up into the trunk and fasten just the lower hub bracket slots to the matching riser bracket slots, creating a “hinge” effect which then let me lift and tilt the wheel into an optimal position before adding and tightening the remaining bolts.
With a 37x13.5 Mud Grappler mounted, I was given enough clearance to not only retain my subwoofer:
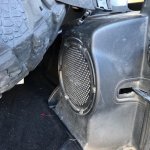
But also access to the storage bin under the tire:
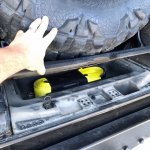
The concave/spanning design of the carrier also means the backside of the trunk is still accessible for behind-the-seat storage:
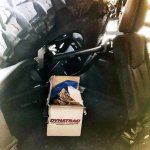
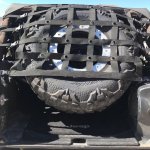
Not bad. I’ve even seen some pictures where folks will mount/run an air tank back there, which gave me a similar idea to establish some tool/air storage, and even a power charging station since this jeep came with a rear cig-lighter port.
I’ll revisit this once I decide to put the hard top back on, as the website calls for some minor gasketing/weatherstripping to fully finish out the sandwich effect to get it to work, but for now I’ve got Thanos in a Spring/Fall safari top config to show this thing off and enjoy the cooler weather!
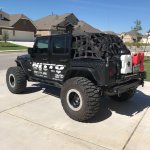
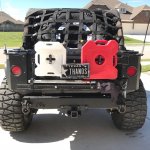
Special treat this week. Since day 1 I’ve been wanting a rear carrier delete option that give me an alternate way to carry a spare.
Until now I’ve either run the tire long-ways in the single rear slot, or simply propped it up against the rear seats. PITA having to secure the tire down with straps, etc.
After evaluating a few different potential options including having something custom fab’d up a-la EVO1 or Randy’s rig, I finally came across the perfect-for-me solution build by an outfit called Excessive Industries.
Presenting, the Gatekeeper (not to be mistaken for the ACE Engineering Gatekeeper, which I also coincidentally have)
Product arrived via freight bolted down and wrapped nicely to a palate jig.

After confirming fitment & powder coating it was time for installation. The product is pretty straight forward hardware wise-


After removing the hard top, the main body of the carrier straddles the tub rails. The only other brackets are the wheel hub bracket itself, and two riser brackets that allow for vertical, depth, and tilt adjustment for tire placement.
The rails come with extended screws, and is slotted to be compatible with the hard top:

This positions the carrier relative to the trim and the back seats, offering enough space to mount a hi-lift jack on the backside. They even give you a nice set of wingnuts and compression washers for jack mounting:

(I’m opting to keep my jack mounted externally on the Ace Gatekeeper, so I will likely turn this mount into a bow or gun rack solution)
With the carrier positioned, I elected to premount the wheel bracket to the ATX Slab spare:

And then loosely mount the riser brackets onto the carrier:

This allowed me to lift the tire up into the trunk and fasten just the lower hub bracket slots to the matching riser bracket slots, creating a “hinge” effect which then let me lift and tilt the wheel into an optimal position before adding and tightening the remaining bolts.
With a 37x13.5 Mud Grappler mounted, I was given enough clearance to not only retain my subwoofer:

But also access to the storage bin under the tire:

The concave/spanning design of the carrier also means the backside of the trunk is still accessible for behind-the-seat storage:


Not bad. I’ve even seen some pictures where folks will mount/run an air tank back there, which gave me a similar idea to establish some tool/air storage, and even a power charging station since this jeep came with a rear cig-lighter port.
I’ll revisit this once I decide to put the hard top back on, as the website calls for some minor gasketing/weatherstripping to fully finish out the sandwich effect to get it to work, but for now I’ve got Thanos in a Spring/Fall safari top config to show this thing off and enjoy the cooler weather!


Last edited:
iRonin
Member
Love the new carrier, been waiting to see one installed:thumb:
Thanks bud, really diggin' it.
