HighwayTrout
Hooked
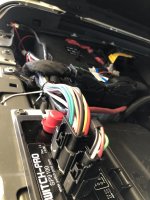
It’s not ideal and I believe Switch Pros does not recommend installing like this. But it works. 
I may seal all the wires at the plug with silicone for water protection.
 .
.  .
.
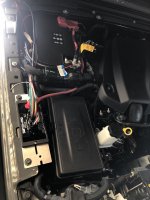
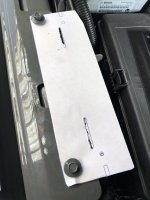
I think I received a JK kit or a generic kit for a side by side. Its the same minus the bracket and it didn’t come with a heavy ground cable or stud. Being that I have a diesel the battery and fuse box is in a different location compared to the gas powered JL/T’s. I was considering mounting it behind the engine, center of the fire wall area but didn’t want to poke new holes. I think it would be a great place for it. So I traced the bracket the Switch Pro came with onto a sheet of paper and made a template. Then started the dance, walking around the engine bay a hundred times flipping, turning and sliding the bracket and trying to keep in mind where the mess of wires will end up.
 .
.
Luckily after flipping the bracket and drilling two new holes it ended up not far from where it’s “supposed” to go. Lucked out as the power cable just barely reached and I mean barely. I already had a set of jumper cables on stand by that I was going to cannibalize.
After getting over the initial fretting of splicing into factory stuff and just committing to it. The install was very straight forward and simple after watching Eddies video on it a dozen or so times.
Now that the hard part is done. Onto the fun stuff and adding accessories.
I may seal all the wires at the plug with silicone for water protection.
 .
.  .
. I think I received a JK kit or a generic kit for a side by side. Its the same minus the bracket and it didn’t come with a heavy ground cable or stud. Being that I have a diesel the battery and fuse box is in a different location compared to the gas powered JL/T’s. I was considering mounting it behind the engine, center of the fire wall area but didn’t want to poke new holes. I think it would be a great place for it. So I traced the bracket the Switch Pro came with onto a sheet of paper and made a template. Then started the dance, walking around the engine bay a hundred times flipping, turning and sliding the bracket and trying to keep in mind where the mess of wires will end up.
 .
. Luckily after flipping the bracket and drilling two new holes it ended up not far from where it’s “supposed” to go. Lucked out as the power cable just barely reached and I mean barely. I already had a set of jumper cables on stand by that I was going to cannibalize.
After getting over the initial fretting of splicing into factory stuff and just committing to it. The install was very straight forward and simple after watching Eddies video on it a dozen or so times.
Now that the hard part is done. Onto the fun stuff and adding accessories.

