You are using an out of date browser. It may not display this or other websites correctly.
You should upgrade or use an alternative browser.
You should upgrade or use an alternative browser.
GraniteCrystal build thread
- Thread starter GraniteCrystal
- Start date
GraniteCrystal
New member
Enjoyed reading and seeing your photos! Beautiful country!
Glad you enjoyed! Hope there's years more of those to come!
catahoula
Caught the Bug
Just got back from Estes Park for the weekend. Awesome trip. Beautiful place.
First evening we went to the Rooftop Rodeo. It's a big deal and most of the hotels were sold out because of it. It was a great time, highly recommended.
First full day there, the main event was hiking an 8 mile loop inside Rocky Mountain National Park. We purchased the nationwide pass: for $80 we can get into any National Park from now till July 31, 2017.
Here is Scout at the Fern Lake trailhead. We parked there, then took a shuttle over to the Bear Lake trailhead and hiked back to the Jeep:
View attachment 212037
Once hiking, this is the first lake: Lake Helene
View attachment 212038
View attachment 212051
Between Lake Helene and Odessa Lake you'll pass Grace Falls (look closely):
View attachment 212052
Second lake on the hike was Odessa Lake. This little creek follows the path leading you right up to it:
View attachment 212039
And here it is. Larger and had more people around it. There's some camp spots and folks were trout fishing.
View attachment 212040
After Odessa Lake is Fern Lake. About the same size, very beautiful:
View attachment 212041
Can you spot the trout?
View attachment 212042
Coming down from Fern Lake, you pass Marguerite Falls (pictured) as well as a few others:
View attachment 212043
That evening, we ate dinner at Mama Rosa's, right on the river walk with some live music. Fantastic. Following that, we hit up Old Fall River Road (http://www.traildamage.com/trails/index.php?id=122) right at dusk. Best choice ever. It's switchback after switchback as you climb the mountain. Here is a shot looking back down the valley toward the entrance to RMNP:
View attachment 212044
All in all that evening, we saw 5 bull elk (all with their velvet), about 20 cow elk and calves, 1 female moose (which had to be persuaded off the road with our horn), and a handful of mule deer. Everything was coming out of the woods as it got dark.
View attachment 212045
Old Fall River Road ends at the Alpine Visitor Center, where I took this shot right as the sun set:
View attachment 212046
All in all, great day in Estes Park and Rocky Mountain National Park. Pics from day 2 to follow.
Beautiful shots! I love Estes Park.
GraniteCrystal
New member
Beautiful shots! I love Estes Park.
Thanks! I'd never been but it's pretty great
WJCO
Meme King
Thanks! I'd never been but it's pretty great
I didn't realize that was your first time there. Congrats. It's an awesome place. We go up about once a month. Since you have the park pass now, do the loop sometime through grand lake, winter park, and Estes. Usually you will see moose. Makes for a great camping weekend too.
catahoula
Caught the Bug
Thanks! I'd never been but it's pretty great
I remember a coffee shop there that was in an Ark that had some pretty good coffee.
GraniteCrystal
New member
I remember a coffee shop there that was in an Ark that had some pretty good coffee.
Is that what that is? We saw it and had no clue what was going on there.
GraniteCrystal
New member
More attachment points
This was inspired by something in Sharkey's thread. I'll give a bit more detail here as well as an additional attachment method.
What you need:
M8-1.25x30mm cap screw (aka bolt), qty: 2 - mine are grade 5 steel, didn't have grade 8 SS in metric and probably not necessary, cost $0.25 each, length not super critical, just get something around 30mm
Climbing bolt hanger, qty: 2 - mine have a rating of 30 kN (i.e. it's not going to break) and cost $3.50/each
Lighter
Nail
Pliers, needlenose or regular
Here is a pic of the bolts and climbing bolt hangers

First step, unzip the roll cage cover using the zipper that runs left to right across the rear cross member. When looking at it from the cargo area, you'll see two nuts that look like this, one on the left and one on the right:

Now that you know where they are and what you're going for, zip it back up and feel for them by hand through the fabric.
Next, grasp the nail with the pliers and use the lighter to heat it up nice and hot. Only takes about 15-20 seconds to get it hot enough.

Now push the nail through the fabric into the holes we located previously. Move it around a bit. It will melt the fabric, helping to prevent it from further tears. Repeat a few more times, widening the hole in the fabric each time until it's the size of the hole in the crossbar. When finished it looks like this:

Next, take your M8 bolts and your bolt hangers and screw them in. Note that the M8 bolts I got had the grooves on the backside so I didn't do any lock washers:

Here is a close up of it bolted in:

Here is both sides attached:

Remounted my fishing poles without any problems:

And here are some finished shots of it all strung up. It seems very solid to me. No wiggle at all. I'll be testing it out in a month when we do a multi-day camping trip where we'll be sleeping in the hammocks each night.


Lastly, you may have noticed some yellow straps in the how-to pics. I added those as well. Available from any climbing store that has the bolt hangers, these guys are rated to a few thousand pounds and will serve as a back up attachment point. Here is a pic of me just holding one up. They only cost about $5 each.

Originally, I was worried about it crushing the foam that surrounds the rear crossmember, so I tried threading it under that and then was going to melt another hole for it to pop through, something like this:

I ultimately decided against that though because the strap moved around the crossmember too easily. Depending on how I was pulling the strap, it would've transferred that load to the fabric by pulling on the edges of the hole I would've melted. I don't want any stress on the fabric/zipper. Also, I decided the foam can handle its own and there's no real threat of crushing it beyond recognition. I did a simple test of wrapping the yellow strap around the whole thing and then putting my weight on it. The only sign of stress on the foam was this rounded over corner. My guess is it's the same stuff bike helmets are made out of, so it's going to take a large impact to crush it.

With that decided, I just looped them around the whole thing. This way there isn't any force on the fabric/zipper and I can move them wherever I want.
Hope that helps someone! It was a very easy mod, whole thing for under $20, and could be done in less than an hour once you have all the supplies.
This was inspired by something in Sharkey's thread. I'll give a bit more detail here as well as an additional attachment method.
What you need:
M8-1.25x30mm cap screw (aka bolt), qty: 2 - mine are grade 5 steel, didn't have grade 8 SS in metric and probably not necessary, cost $0.25 each, length not super critical, just get something around 30mm
Climbing bolt hanger, qty: 2 - mine have a rating of 30 kN (i.e. it's not going to break) and cost $3.50/each
Lighter
Nail
Pliers, needlenose or regular
Here is a pic of the bolts and climbing bolt hangers
First step, unzip the roll cage cover using the zipper that runs left to right across the rear cross member. When looking at it from the cargo area, you'll see two nuts that look like this, one on the left and one on the right:
Now that you know where they are and what you're going for, zip it back up and feel for them by hand through the fabric.
Next, grasp the nail with the pliers and use the lighter to heat it up nice and hot. Only takes about 15-20 seconds to get it hot enough.
Now push the nail through the fabric into the holes we located previously. Move it around a bit. It will melt the fabric, helping to prevent it from further tears. Repeat a few more times, widening the hole in the fabric each time until it's the size of the hole in the crossbar. When finished it looks like this:
Next, take your M8 bolts and your bolt hangers and screw them in. Note that the M8 bolts I got had the grooves on the backside so I didn't do any lock washers:
Here is a close up of it bolted in:
Here is both sides attached:
Remounted my fishing poles without any problems:
And here are some finished shots of it all strung up. It seems very solid to me. No wiggle at all. I'll be testing it out in a month when we do a multi-day camping trip where we'll be sleeping in the hammocks each night.
Lastly, you may have noticed some yellow straps in the how-to pics. I added those as well. Available from any climbing store that has the bolt hangers, these guys are rated to a few thousand pounds and will serve as a back up attachment point. Here is a pic of me just holding one up. They only cost about $5 each.
Originally, I was worried about it crushing the foam that surrounds the rear crossmember, so I tried threading it under that and then was going to melt another hole for it to pop through, something like this:
I ultimately decided against that though because the strap moved around the crossmember too easily. Depending on how I was pulling the strap, it would've transferred that load to the fabric by pulling on the edges of the hole I would've melted. I don't want any stress on the fabric/zipper. Also, I decided the foam can handle its own and there's no real threat of crushing it beyond recognition. I did a simple test of wrapping the yellow strap around the whole thing and then putting my weight on it. The only sign of stress on the foam was this rounded over corner. My guess is it's the same stuff bike helmets are made out of, so it's going to take a large impact to crush it.
With that decided, I just looped them around the whole thing. This way there isn't any force on the fabric/zipper and I can move them wherever I want.
Hope that helps someone! It was a very easy mod, whole thing for under $20, and could be done in less than an hour once you have all the supplies.
Last edited:
WJCO
Meme King
This was inspired by something in Sharkey's thread. I'll give a bit more detail here as well as an additional attachment method.......
Hope that helps someone! It was a very easy mod, whole thing for under $20, and could be done in less than an hour once you have all the supplies.
Wow. That's really cool.
GraniteCrystal
New member
Wow. That's really cool.
Thanks!
That turned out great. I've been hanging my hammock from my roll bar and you've changed my mind! Definitely going to do this soon[emoji106]
Let me know how it goes or if you have questions!
swampdog
New member
This was inspired by something in Sharkey's thread. I'll give a bit more detail here as well as an additional attachment method.
What you need:
M8-1.25x30mm cap screw (aka bolt), qty: 2 - mine are grade 5 steel, didn't have grade 8 SS in metric and probably not necessary, cost $0.25 each, length not super critical, just get something around 30mm
Climbing bolt hanger, qty: 2 - mine have a rating of 35 kN (i.e. it's not going to break) and cost $3.50/each
Lighter
Nail
Pliers, needlenose or regular
Here is a pic of the bolts and climbing bolt hangers
View attachment 212497
First step, unzip the roll cage cover using the zipper that runs left to right across the rear cross member. When looking at it from the cargo area, you'll see two nuts that look like this, one on the left and one on the right:
View attachment 212511
Now that you know where they are and what you're going for, zip it back up and feel for them by hand through the fabric.
Next, grasp the nail with the pliers and use the lighter to heat it up nice and hot. Only takes about 15-20 seconds to get it hot enough.
View attachment 212499
Now push the nail through the fabric into the holes we located previously. Move it around a bit. It will melt the fabric, helping to prevent it from further tears. Repeat a few more times, widening the hole in the fabric each time until it's the size of the hole in the crossbar. When finished it looks like this:
View attachment 212501
Next, take your M8 bolts and your bolt hangers and screw them in. Note that the M8 bolts I got had the grooves on the backside so I didn't do any lock washers:
View attachment 212500
Here is a close up of it bolted in:
View attachment 212502
Here is both sides attached:
View attachment 212503
Remounted my fishing poles without any problems:
View attachment 212504
And here are some finished shots of it all strung up. It seems very solid to me. No wiggle at all. I'll be testing it out in a month when we do a multi-day camping trip where we'll be sleeping in the hammocks each night.
View attachment 212505
View attachment 212506
View attachment 212507
View attachment 212508
Lastly, you may have noticed some yellow straps in the how-to pics. I added those as well. Available from any climbing store that has the bolt hangers, these guys are rated to a few thousand pounds and will serve as a back up attachment point. Here is a pic of me just holding one up. They only cost about $5 each.
View attachment 212498
Originally, I was worried about it crushing the foam that surrounds the rear crossmember, so I tried threading it under that and then was going to melt another hole for it to pop through, something like this:
View attachment 212513
I ultimately decided against that though because the strap moved around the crossmember too easily. Depending on how I was pulling the strap, it would've transferred that load to the fabric by pulling on the edges of the hole I would've melted. I don't want any stress on the fabric/zipper. Also, I decided the foam can handle its own and there's no real threat of crushing it beyond recognition. I did a simple test of wrapping the yellow strap around the whole thing and then putting my weight on it. The only sign of stress on the foam was this rounded over corner. My guess is it's the same stuff bike helmets are made out of, so it's going to take a large impact to crush it.
View attachment 212512
With that decided, I just looped them around the whole thing. This way there isn't any force on the fabric/zipper and I can move them wherever I want.
Hope that helps someone! It was a very easy mod, whole thing for under $20, and could be done in less than an hour once you have all the supplies.
So, now that you added the climbing bolt hangers, how are you connecting your hammock strap to that? Just looping it through the bolt hanger over itself, or a using an extra carabiner between one of the loops on the strap to the bolt hanger?
GraniteCrystal
New member
So, now that you added the climbing bolt hangers, how are you connecting your hammock strap to that? Just looping it through the bolt hanger over itself, or a using an extra carabiner between one of the loops on the strap to the bolt hanger?
Yes, just looping it through.
These are straps I actually made myself. Here is a close up of the two straps:

Here is a close up of looping it through the climbing bolt hangers:

Here is the little pouch I keep them in, which is attached to the ENO hammock pouch:

And all that is stored inside another bag (red and white in pic), along with a bluetooth speaker, which is hung from my hanging system so it doesn't fly around:

So no matter where we go, as long as I have one other anchor point, I can set up a hammock and listen to some tunes!
GraniteCrystal
New member
Great stuff! And the pics of Estes & the surrounding area bring a tear to this east coast boys eye. Thanks for sharing!
My pleasure! Glad you enjoyed! I used to live on the east coast, so I feel your pain.
GraniteCrystal
New member
WJCO
Meme King
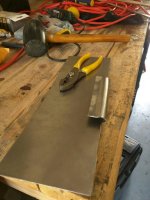
Teaser pic of a new project. Any ideas what I'm up to?
Fairlead plate bracket? I've got a plasma cutter if you need to borrow.
GraniteCrystal
New member
Fairlead plate bracket? I've got a plasma cutter if you need to borrow.
Good guess. Nope.