DIY Spod- Waytekwire

Order 10 amps from waytekwire, but you could always pick up (2) 5 amp fuses from auto store or radio shack if you wanted to later. Being a little over is fine. You just don't want to be way over like a 40 amp fuse for a 10 amp circuit.

Sent from my SM-N900V using WAYALIFE mobile app

Okay great, thanks! That's the plan then. I'll get 10 amps from waytek and if I want a few other sizes then I'll just source them locally.
 
One more quick question. I'm ordering the female quick disconnects per the parts list which will go on the back of the switches, but I'll also be putting them on the ends of all the outputs in case I want to swap stuff around easily (just like pvanweelden did)... I figured that I need to get some male quick disconnects then too but I was unsure if the full insulated with the extra sleeve would fit with the fully insulated extra sleve female, or if I need to get a male without the extra sleeve?

Basically, get this:
http://www.waytekwire.com/item/31712/MALE-DISCONNECT-250-X-032/

Or this:
http://www.waytekwire.com/item/31918/16-14-GA-MALE-DISCONNECT/

Thanks for all the help thus far. I'm going to order a soldering iron, rosin core solder, and heat shrink from Amazon too. Ready to put all the planning to the test.
 
The fully insulated males will work with the fully insulated females.
Let me know if you have any other questions. Have fun and good luck!

Sent from my SM-N900V using WAYALIFE mobile app
 
And Steve- that switch will work, but it is a switch with only one led, I would call to see if they have a dual blue led switch body

Sent from my SM-N900V using WAYALIFE mobile app
 
And Steve- that switch will work, but it is a switch with only one led, I would call to see if they have a dual blue led switch body

Sent from my SM-N900V using WAYALIFE mobile app


ok cool! yea i know i only want it to light up when i turn it on anyway so im fine with it being a single LED. thanks paul! :rock:
 
ok cool! yea i know i only want it to light up when i turn it on anyway so im fine with it being a single LED. thanks paul! :rock:

Thats what i have is just single lights!

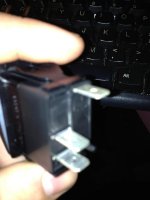
top is ground
middle is power from battery
bottom goes to light!
 

Attachments

  • sw3.jpg
    sw3.jpg
    45.1 KB · Views: 395
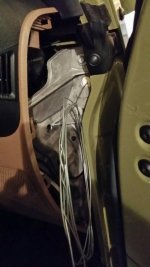
I am working on my DIY Spod and I need a little help with how to route the 16 guage wires from the passenger side A pillar through the fire wall and into the engine compartment. I have a 2013 and have removed the passenger side, side dash panel and found a small hole in the fire wall that is filled with foam. I saw in a thread that Eddie did while installing on board air in Rubicat that he used a similar hole to go through the fire wall. Is this the same hole on my 2013? Or is there another route I should take? Any suggestions will be greatly appreciated!

Sent from my SM-N900V using WAYALIFE mobile app

Same hole. Just poke out the foam with a long screwdriver and feed the wire through.
 
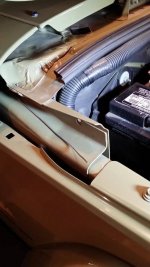
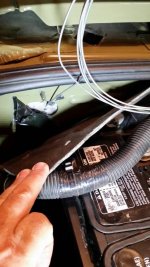
Or there is the hole behind and above the battery- there is a pic of it on the first or 2nd page of this thread

Sent from my SM-N900V using WAYALIFE mobile app
 
1399764966538.jpg

Ran a wire through to see where it comes out.

1399765078654.jpg

The exit location is not what I expected but I can make it work. Thanks for the help!

Sent from my SM-N900V using WAYALIFE mobile app
 
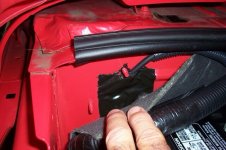
Here's the hole in the firewall behind the battery- pull back the insulation and you will see it
1399766004280.jpg

Sent from my SM-N900V using WAYALIFE mobile app
 
1399770325113.jpg

Found it. Makes a lot more sense to go through that hole than the other one but it is a more difficult route to go. After you pulled your wires through did you seal the hole with silicone or spray foam?

Sent from my SM-N900V using WAYALIFE mobile app
 
There is also a foam filled hole on the drivers side. Depending on where you are mounting your switches and fuse panel you may want to use it instead of routing your wires from one side to the other. I found it easier to install the fuse panel on the drivers side and route only a power wire from the battery to the panel. My switches are on the drivers side so I used the hole on the drivers side.


--rccrwlr
 
If you run an auto tranny, there is a great whole through the firewall where the clutch would be. The Daystar boot works great for this spot.
 
Thanks guys for all the help and suggestions. Got it figured out. Will post some pics when I get it finished.

Sent from my SM-N900V using WAYALIFE mobile app
 
pvanweelden I tried to PM you back but it says your box has exceeded the limit.

Sent from my SM-N900V using WAYALIFE mobile app
 
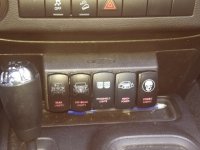
Great thread with tons of info! Here is my install location in my 2013 JK Rubi.

Anyone running a lower Daystar Panel in a 2012+? I cannot get the clips to stay secure. I have tucked the wires in as much as possible but the panel will not stay on.
View attachment 74536

The orange factory clips are not metal on mine, they look (and feel) plastic(nylon). I like the location of the switches and want to keep the Daystar but this pissing me off. :mad:

Good idea on the metal clip ans thanks for the part #s. I will give that a try. If not there is always drywall screws. :D

WAYALIFE mobile app
I had same problem and resolved it by putting a 45 degree edge on top edge of panel with a planer.
IMG_20140511_182331_446.jpg
This is with the stock clips, I'll get a pic of the panel tomorrow..
 
I had same problem and resolved it by putting a 45 degree edge on top edge of panel with a planer.
View attachment 82689
This is with the stock clips, I'll get a pic of the panel tomorrow..

Looks good!

Yea, I finally got mine to fit by grinding plastic off the backside. Daystar has some work to do.:naw::naw:

The metal clips from earlier JK s do not work either.
 
Top Bottom