You are using an out of date browser. It may not display this or other websites correctly.
You should upgrade or use an alternative browser.
You should upgrade or use an alternative browser.
Anyone have the LOD Destroyer Rear Bumper w/ Tire Carrier?
- Thread starter eazy
- Start date
aermid
Member
Thanks Erin for the info and pics. Looks good, andnof course that bumper looks great.
I don't know why they would have to make the installation so involved when many other aftermarket bumpers just bolt right up to the original mounting.
Sure thing, and thanks. It seems like a really solid bumper. The directions aren't too bad. I think most of it is just my inexperience, but I would definitely follow the online version of the install manual. I think my print copy was a little old, but the online version seems on point.
Sent from my iPhone using WAYALIFE mobile app
aermid
Member
Awesome. I ordered one of these in November.
How long did you guys wait for your order to ship? Hoping mine will ship soon.
Took mine 4 weeks. I ordered Nov 15 got here Around Dec 7
Sent from my iPad using WAYALIFE mobile app
The Cock Father
New member
Took mine 4 weeks. I ordered Nov 15 got here Around Dec 7
Sent from my iPad using WAYALIFE mobile app
I've been looking at this bumper. Any comments on living with it for a couple weeks? Any squeaks or rattles? Smooth and functional operation?
Just looking for as much insight as possible before buying ANOTHER rear bumper...
Edwrds
Caught the Bug
Got the first half installed last night. Finished around 2am. Lots of mistakes by us; this was our first bumper.
Things that we found out the directions sorta glossed over:
The side cross-member holes gotta be drilled inside and out; we dry fit to double check the directions "3/8" distance. That was spot on so could have saved a lot of time not doing that. The directions say 5/8 holes; don't short change that else the bottom cross member bolts will be hell.
To help hold it and level it we used a normal tire changing jack. I don't have a high jack yet; I'm sure that would have helped or a floor jack. Jack stands weren't accurate enough imo to help level. Also I ended up hooking tie downs from the toe points to the roll cage to help front-to-back to get in line with the body (I just eye balled that direction). I used a 3ft level going driver/passenger.
Do NOT tighten down anything till all 10 of the bolts are in; found that out the hard way
The washers are huge and will overlap. Looks like that's same as in their direction pictures.
The bolts seem short but after tightening everything down; seemed like there was enough bite.
No idea what the 4.5" bolts are for yet; going to call them this morning.
Sent from my iPhone using WAYALIFE mobile app
I started mine then found out that you have to install the lights before you install the bumper. LOD said you can drill the holes with just the two stock bolts in on both sides? Just received my lights so going to install the bumper tomorrow will let you know how it goes. Your right the online directions are way better than the prints. The middle holes were easy to drill.
Sent from my iPad using WAYALIFE mobile app
Last edited:
aermid
Member
I started mine then found out that you have to install the lights before you install the bumper. LOD said you can drill the holes with just the two stock bolts in on both sides? Just received my lights so going to install the bumper tomorrow will let you know how it goes. Your right the online directions are way better than the prints. The middle holes were easy to drill.
Sent from my iPad using WAYALIFE mobile app
Good luck. We got it all together before the trip but I think we are going to have to level it more front-to-back. The carrier arm ended up being just a little off from flush. I was able to use a thinner bolt on the top rubber bumper to make it flush but it sways out a little on its own. This is something we will have to go back and correct. We measured a few times on both sides and middle to try and get it right. It has to be flush when closed. If it doesn't fit exactly in the latch it will be noisy. Once I fix it, it's been silent.
Sent from my iPad using WAYALIFE mobile app
Edwrds
Caught the Bug
Good luck. We got it all together before the trip but I think we are going to have to level it more front-to-back. The carrier arm ended up being just a little off from flush. I was able to use a thinner bolt on the top rubber bumper to make it flush but it sways out a little on its own. This is something we will have to go back and correct. We measured a few times on both sides and middle to try and get it right. It has to be flush when closed. If it doesn't fit exactly in the latch it will be noisy. Once I fix it, it's been silent.
Sent from my iPad using WAYALIFE mobile app
Guess I'll let you know how it went. Really don't look forward to messing with it. Hope I have better luck.
Thanks for the info.
NotInStock
Caught the Bug
Well, I ordered mine back on the 16th of December so hopefully I will see it in another couple weeks. Any advice anyone has on installing it is very much appreciated... I am doing a ton of upgrades at this time and my poor jeep has been half disassembled in my garage the last 2+ weeks... But I should have it back on the road this weekend needing an alignment though...
Rubicon310
New member
I ordered mine dec 6th. Still have not received it. I'm hoping to get it in the next week or so.
Sent from my iPhone using WAYALIFE mobile app
Sent from my iPhone using WAYALIFE mobile app
I ordered mine on December 13th. They didn't respond to any of my emails or private messages for a status update so I gave them a call today. They said they expect it to ship next week.
Sent from my Nexus 6P using WAYALIFE mobile app
Sent from my Nexus 6P using WAYALIFE mobile app
I had a similar experience, they outsourced their powder coating to a third party and it took me a few weeks to get mine. They did miss a few small spots, so keep an eye out for rust and touch it up with some black paint. Otherwise, nice bumpers...
Sent from my iPhone using WAYALIFE mobile app
Sent from my iPhone using WAYALIFE mobile app
Phaetonman7
New member
Mine is supposed to be here Tuesday. I ordered it on cyber Monday 11-28-16. It was a Christmas present for my wife's jeep that didn't make it here in time.
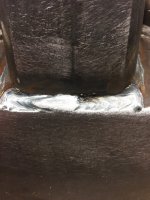
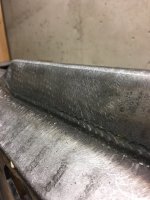
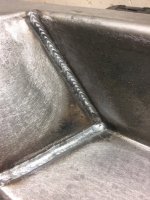
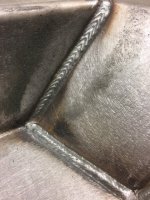
Order mine on Black Friday, just received it 2 days ago. Good looking bumper but the welds don't look great.
Sent from my iPhone using WAYALIFE mobile app
Sent from my iPhone using WAYALIFE mobile app
Any pics?Order mine on Black Friday, just received it 2 days ago. Good looking bumper but the welds don't look great.
Sent from my iPhone using WAYALIFE mobile app
Sent from my Nexus 6P using WAYALIFE mobile app
I don't have it mounted yet or painted either. As far as the welds go, it's not that they are necessarily bad, just don't look as good as evo, and some of the other manufacturers. Welds were run hot and have a lot of undercutting. Hoping the spray on bedliner covers it up!
Sent from my iPhone using WAYALIFE mobile app
Sent from my iPhone using WAYALIFE mobile app
Rubicon310
New member
Post pics of the welds. I'm expecting mind some time soon! I ordered it 4 weeks ago.
Sent from my iPhone using WAYALIFE mobile app
Sent from my iPhone using WAYALIFE mobile app
GraniteCrystal
New member
Those don't look bad to me. Educate me?
°°°°°°°°°°°°°°°°°°°°°°°°°°°°°°°°°°°°°°°°°°°°°°°°°
Build thread: http://wayalife.com/showthread.php?t=32769
°°°°°°°°°°°°°°°°°°°°°°°°°°°°°°°°°°°°°°°°°°°°°°°°°
Build thread: http://wayalife.com/showthread.php?t=32769


