UncensoredAggression
New member
 here's the wallet breaker here's the wallet breaker
View attachment 34439 here's the wallet breaker


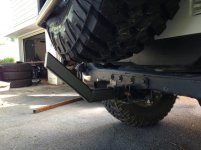
Just finished up a couple of my homemade hitch sliders
<img src="http://wayalife.com/attachment.php?attachmentid=34459"/>
<img src="http://wayalife.com/attachment.php?attachmentid=34460"/>
<img src="http://wayalife.com/attachment.php?attachmentid=34461"/>
Sent from my EVO
Just finished up a couple of my homemade hitch sliders
<img src="http://wayalife.com/attachment.php?attachmentid=34459"/>
<img src="http://wayalife.com/attachment.php?attachmentid=34460"/>
<img src="http://wayalife.com/attachment.php?attachmentid=34461"/>
Sent from my EVO
Wow nice welds you gotta teach me some time I can pay with beer lol
How? Aren't you like 17? Lol
How? Aren't you like 17? Lol

Finally got around to making and installing a Hi-Lift mount on Serenity's rear roll cage. Used 2 x 2" U-bolts that I stretched around the 2 1/4" roll cage bars. Snugged those down tight after wrapping the cross bracket in electrical tape. Created some spacers using washers to offset the mounts. The mount for the base of the jack is a made from a modified gate hinge (drilled out holes and made new holes to accommodate the U-bolt and the jack plate). The mount for the top of the jack was made from about 6 inches of 2"x2" angle iron. Drilled holes for the U-bolt and another to secure the top then curved and smoothed all the edges. Jack is held in place by three bolts using wing nuts to secure and can be rotated out of the way on the gate hinge without completely removing it if more access is needed in the rear. View attachment 34452View attachment 34453View attachment 34454View attachment 34455View attachment 34456View attachment 34457View attachment 34458
Very nice. I like how you can swing it out of the way.
Wow nice welds you gotta teach me some time I can pay with beer lol
Ima have to get me one of those.
Copied bob and make myself a hitch slider
Looks good! Can you still open the tailgate without removing the slider?
Sent from my EVO
Representing Wayalife properly.
View attachment 34470
I have to put my new dozer one on. :thumb: