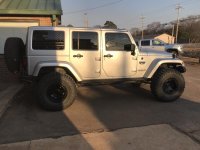
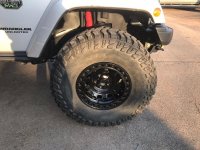
What was done to your rig this week?

I’m around 3.5” in lift height. I did the install solo, I used a plasma cutter so that really made things easier. The front took 1 grinding wheel and 5 hrs. The rear took 2 grinding wheels to make everything really clean and right at 6 hrs to complete. Some final adjustments at the very end after driving with adjusting the coilovers, all in all it was a 12hr Job for me to complete. It wasn’t really that bad, I was dreading the rear but it went really smooth. The difference is amazing. No more limit straps and these coilovers are designed for the longarm. After installing the arms I determined the coilovers kit should be sold with the long arms. It’s like a peanut butter and jelly sandwich without the jelly if ya know what I mean. [emoji4]

This was the front only before I did the rear.

View attachment 359670


Sent from my iPhone using WAYALIFE

I thought this was on your gladiator. Did you get another JL?
 
200 mile test drive. Good time to test out the Rancho 9000s. Setting 3 with the bed empty seems to be the sweet spot.

With the way you use your rig, they should last a long time.

I pound mine harder than most, and my set lasted about a year, before they would fade after a few minutes of trail.

Don't get me wrong, I still think they are good shocks, but not so much for repeated hard use.
 
Are the instructions included on how to do the re-key? I need to do this with mine as well.

No instructions, but it’s not hard. Remove the lock cylinder from the door. Take the e-clip off one end and pry the cylinder cap off the other. (The cylinder cap will get destroyed, which is why you need to have new ones.)

The internal cylinder will then come out. There are six or eight spring loaded plates. Each is numbered 1, 2, 3, or 4. Stick your key into the cylinder and see which plates stick out (thereby preventing the internal cylinder from rotating in the outer cylinder). Swap plates until none of them stick out with the key in. A bit of trial and error but no big deal.

Once you have the correct set of plates, insert the internal cylinder into the outer, reinstall the e clip on one end, and put a new cylinder cap on the other. Easy peasy.


Sent from my iPhone using WAYALIFE
 
Last edited:
No instructions, but it’s not hard. Remove the lock cylinder from the door. Take the e-clip off one end and pry the cylinder cap off the other. (The cylinder cap will get destroyed, which is why you need to have new ones.)

The internal cylinder will then come out. There are six or eight spring loaded plates. Each is numbered 1, 2, 3, or 4. Stick your key into the cylinder and see which plates stick out (thereby preventing the internal cylinder from rotating in the outer cylinder). Swap plates until none of them stick out with the key in. A bit of trial and error but no big deal.

Once you have the correct set of plates, insert the internal cylinder into the outer, reinstall the e clip on one end, and put a new cylinder cap on the other. Easy peasy.


Sent from my iPhone using WAYALIFE

Nice - thanks for the info!
 
I’m around 3.5” in lift height. I did the install solo, I used a plasma cutter so that really made things easier. The front took 1 grinding wheel and 5 hrs. The rear took 2 grinding wheels to make everything really clean and right at 6 hrs to complete. Some final adjustments at the very end after driving with adjusting the coilovers, all in all it was a 12hr Job for me to complete. It wasn’t really that bad, I was dreading the rear but it went really smooth. The difference is amazing. No more limit straps and these coilovers are designed for the longarm. After installing the arms I determined the coilovers kit should be sold with the long arms. It’s like a peanut butter and jelly sandwich without the jelly if ya know what I mean. [emoji4]

This was the front only before I did the rear.

View attachment 359670

Sent from my iPhone using WAYALIFE

looking forward to the day my JL does that :hmm:
 
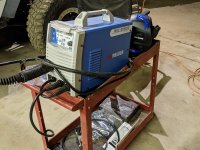
Preparing for the long arm install, and I needed to start getting some welding practice in with the new welder.
I had a Lincoln, but it grew legs and walked off.

I decided to give the Yeswelder a chance, and so far so good. It came with lots of alleged capability, and at around $300, will be a good deal if it keeps working.
It will run wire, with or without gas, and do stick welding, in the same box. I'm starting off with 0.35" inner shield wire, no gas. I will work up to gas later

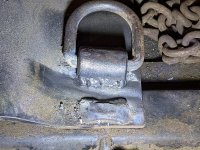
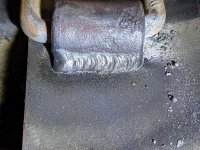
First job was to weld a pair of "D" rings onto my gooseneck hitch in the F-350. The welder did a good job, and the operator (me) is in need of more practice, but I didn't completely forget how.

The first pass was a bit rough, but by the fourth, it was getting to the acceptable range.
 

Attachments

  • PXL_20210224_030244529_copy_800x600.jpg
    PXL_20210224_030244529_copy_800x600.jpg
    144.6 KB · Views: 123
  • PXL_20210224_025912857_copy_800x600.jpg
    PXL_20210224_025912857_copy_800x600.jpg
    241.9 KB · Views: 124
  • PXL_20210224_025929529_copy_800x600.jpg
    PXL_20210224_025929529_copy_800x600.jpg
    227.1 KB · Views: 123
Preparing for the long arm install, and I needed to start getting some welding practice in with the new welder.
I had a Lincoln, but it grew legs and walked off.

I decided to give the Yeswelder a chance, and so far so good. It came with lots of alleged capability, and at around $300, will be a good deal if it keeps working.
It will run wire, with or without gas, and do stick welding, in the same box. I'm starting off with 0.35" inner shield wire, no gas. I will work up to gas later

First job was to weld a pair of "D" rings onto my gooseneck hitch in the F-350. The welder did a good job, and the operator (me) is in need of more practice, but I didn't completely forget how.

The first pass was a bit rough, but by the fourth, it was getting to the acceptable range.

Looks good to me... A good argon/Co2 mix with solid core wire is defiantly worth while if you are welding indoors, it produces so much less smoke, spatter, and no slag.
 
Looks good to me... A good argon/Co2 mix with solid core wire is defiantly worth while if you are welding indoors, it produces so much less smoke, spatter, and no slag.

Good advice. I had forgotten how much I enjoy welding fumes in my face🤮

This little rig is set up for it, I just need to get a bottle and regulator.

Then practice more on what settings to use for thinner metal, and get practiced up on controlling my speed.
 
Preparing for the long arm install, and I needed to start getting some welding practice in with the new welder.
I had a Lincoln, but it grew legs and walked off.

I decided to give the Yeswelder a chance, and so far so good. It came with lots of alleged capability, and at around $300, will be a good deal if it keeps working.
It will run wire, with or without gas, and do stick welding, in the same box. I'm starting off with 0.35" inner shield wire, no gas. I will work up to gas later

First job was to weld a pair of "D" rings onto my gooseneck hitch in the F-350. The welder did a good job, and the operator (me) is in need of more practice, but I didn't completely forget how.

The first pass was a bit rough, but by the fourth, it was getting to the acceptable range.

Looks good Jerry! I say Yes! 🤣


Sent from my iPhone using WAYALIFE
 
Preparing for the long arm install, and I needed to start getting some welding practice in with the new welder.
I had a Lincoln, but it grew legs and walked off.

I decided to give the Yeswelder a chance, and so far so good. It came with lots of alleged capability, and at around $300, will be a good deal if it keeps working.
It will run wire, with or without gas, and do stick welding, in the same box. I'm starting off with 0.35" inner shield wire, no gas. I will work up to gas later

First job was to weld a pair of "D" rings onto my gooseneck hitch in the F-350. The welder did a good job, and the operator (me) is in need of more practice, but I didn't completely forget how.

The first pass was a bit rough, but by the fourth, it was getting to the acceptable range.

Looks good. I personally love the fluxcore wire because of the convenience of not dealing with gas. Sure it's not as pretty but it functions.
 
Preparing for the long arm install, and I needed to start getting some welding practice in with the new welder.
I had a Lincoln, but it grew legs and walked off.

I decided to give the Yeswelder a chance, and so far so good. It came with lots of alleged capability, and at around $300, will be a good deal if it keeps working.
It will run wire, with or without gas, and do stick welding, in the same box. I'm starting off with 0.35" inner shield wire, no gas. I will work up to gas later

First job was to weld a pair of "D" rings onto my gooseneck hitch in the F-350. The welder did a good job, and the operator (me) is in need of more practice, but I didn't completely forget how.

The first pass was a bit rough, but by the fourth, it was getting to the acceptable range.

Subscribed.. ;)
 
Preparing for the long arm install, and I needed to start getting some welding practice in with the new welder.
I had a Lincoln, but it grew legs and walked off.

I decided to give the Yeswelder a chance, and so far so good. It came with lots of alleged capability, and at around $300, will be a good deal if it keeps working.
It will run wire, with or without gas, and do stick welding, in the same box. I'm starting off with 0.35" inner shield wire, no gas. I will work up to gas later

First job was to weld a pair of "D" rings onto my gooseneck hitch in the F-350. The welder did a good job, and the operator (me) is in need of more practice, but I didn't completely forget how.

The first pass was a bit rough, but by the fourth, it was getting to the acceptable range.

Nice looking welds, Jerry! Like riding a bike!


Sent from my iPhone using WAYALIFE
 
Installed my new KMC Tank wheels yesterday. I had KMC swap out the gold bolts for black. I’m digging them!!

IMG_1376.jpgIMG_1377.jpg


Sent from my iPhone using WAYALIFE
 
Top Bottom