You are using an out of date browser. It may not display this or other websites correctly.
You should upgrade or use an alternative browser.
You should upgrade or use an alternative browser.
Up Next.......
- Thread starter Strike Force Zebra
- Start date
While I was installing the kits this time, I wanted to put up a couple "tips" that I wish someone would have done for me. I'm an OK mechanic but still have so much to learn. I love to wrench on my own rig( I tell my wife it's actually my therapy). Again, I'm sure others have better tips but here are a few that I used.
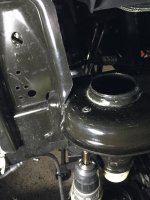
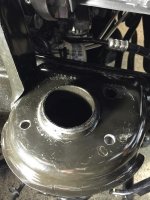
For the fronts, you have to drill two holes in the upper spring perch for the upper CO base to be supported. I bought some non-locking nuts and bolted everything in place without drilling the two holes. I then marked the holes with a sharply marker.
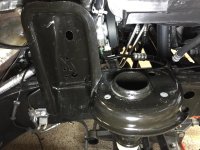
For the fronts, you have to drill two holes in the upper spring perch for the upper CO base to be supported. I bought some non-locking nuts and bolted everything in place without drilling the two holes. I then marked the holes with a sharply marker.

Last edited:
I then got a right angle drill from Lowes and a drill bit with a hex connection that would fit in the right angle adapter. The diameter of the drill bit matches the tip of my drill but to make the hole that needs drilled(again, not being able to see the holes to drill from the bottom up and no room to drill from the top down) to align with the two holes. 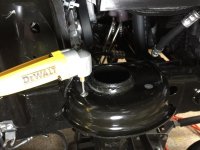
Pilot drill bit that has the hex end.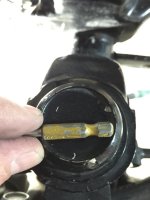
Tip of needed hole diameter drill bit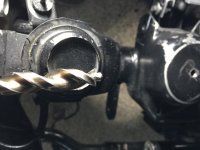
Then drill the pilot hole.

Pilot drill bit that has the hex end.

Tip of needed hole diameter drill bit

Then drill the pilot hole.
Last edited:
The second "tip" I remembered from last time was to mark my brake bolts so I got them aligned right. When you add on new brake lines, you want to make sure you replace the two copper washers ( one on each side of the brake line "block"). You also need to make sure you tighten the bolt so that the hole lines up with your brake lines. When I removed the bolt from my old brake lines, I sprayed them with some brake cleaner and marked with a paint pen where the hole is in the bolt. I marked both the outside and inside the head. That way the inside mark was still there after my dirty brake fluid hands had eaten the paint off the outside mark.
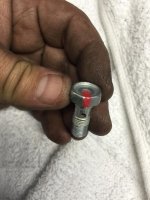
Then tighten to align the paint mark to the brake line.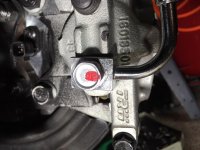
I hope these little tips help someone out down the road.

Then tighten to align the paint mark to the brake line.

I hope these little tips help someone out down the road.
hinrichs
Caught the Bug
That is the coolest/oddest drill bit I have ever seen, but that sure looks like the best option for the drilling of the upper plate, way easier and precise than what I did for sure. I wonder if my brake bolts are one right, but I guess they wouldnt work if not correct?
Looking good man, this will deff help out more guys installing these at home.
Looking good man, this will deff help out more guys installing these at home.
That is the coolest/oddest drill bit I have ever seen, but that sure looks like the best option for the drilling of the upper plate, way easier and precise than what I did for sure. I wonder if my brake bolts are one right, but I guess they wouldnt work if not correct?
Looking good man, this will deff help out more guys installing these at home.
Good question on the bolt. I would assume not though, if they weren't lined up.
I hope so, just like your tip to remove the battery before cutting into the passenger side plastic on the 012 and up models.
jedg
New member
Good question on the bolt. I would assume not though, if they weren't lined up.
I hope so, just like your tip to remove the battery before cutting into the passenger side plastic on the 012 and up models.
I don't believe they need to be aligned. There is a recess around them to allow fluid flow.
I don't believe they need to be aligned. There is a recess around them to allow fluid flow.
Yep. There is. They were snug, not too tight with aligning so I continued. I figured if it was that big of a deal, there would already be a mark on them.
NecessaryEvil
Caught the Bug
I don't believe they need to be aligned. There is a recess around them to allow fluid flow.
Banjo bolts don't need to be aligned. You are right about the recess. But it wouldn't hurt, given you can torque them and line them up.
NecessaryEvil
Caught the Bug
Yep. There is. They were snug, not too tight with aligning so I continued. I figured if it was that big of a deal, there would already be a mark on them.
Why were they that snug you think? The brake line just that different? You should not have to line up a banjo bolt.
Why were they that snug you think? The brake line just that different? You should not have to line up a banjo bolt.
It wasn't "tight". About the same torque as when I took it off. Thanks for the feed back on the bolts. Good to know
Exodus 4x4
New member
FYI, your inbox is full. So what size do the nutsert holes need to be drilled to and what size for the brake lights? There are roto cut sets on eBay that are only 3/8" for about $40.
FYI, your inbox is full. So what size do the nutsert holes need to be drilled to and what size for the brake lights? There are roto cut sets on eBay that are only 3/8" for about $40.
Sorry, I didn't see this sooner. Work has kept me busy this year. Ya, that 3/8 roto cut set is the one I have. It works great. I drill a 1/8" pilot hole once I get the skins where I want them. Then that pilot is the centering hole for the roto cut drill. I just put my rear skins on this week using this tool.
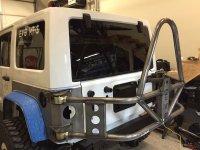
I mounted my skins like I did before on my other JK. Pretty easy install. I feel pretty good about how they turned out. The ratchet straps sucking them on and tight are the key. I lined up the tops so I have an even gap between my hard top and the top of the skin. The bottoms came out right at the bottom of the tub.
Then onto the tire carrier. First was the driver top. Line led that one up with the hole. Secured with one bolt and drilled the other three. Then I used a measurement between the bottom of the top of the skin plate and the top of the plate on the corner mount. 1/2". I mounted the top on the passenger side and drilled all the holes. Each one got a bolt and locked down with just regular nuts and then onto the next one. There is a pinch seem on the side where the back corner meets the rear quarter panel. I missed it on the top mount. Just enough room to put a nut on the inside. Bottoms tomorrow.
allwhitejeeps
New member
Sorry, I didn't see this sooner. Work has kept me busy this year. Ya, that 3/8 roto cut set is the one I have. It works great. I drill a 1/8" pilot hole once I get the skins where I want them. Then that pilot is the centering hole for the roto cut drill. I just put my rear skins on this week using this tool.View attachment 185045
Looks great dude. Are you going to paint them?
Exodus 4x4
New member
Sorry, I didn't see this sooner. Work has kept me busy this year. Ya, that 3/8 roto cut set is the one I have. It works great. I drill a 1/8" pilot hole once I get the skins where I want them. Then that pilot is the centering hole for the roto cut drill. I just put my rear skins on this week using this tool.View attachment 185045
Yeah I put mine on this week too. I ended up buying and using this tool also. I got the skins lined up, used a transfer punch to perfectly mark the center, and then drilled the 1/8" pilot. The rotokut was amazing and worked flawlessly so thanks for the recommendation. The only problem I found was that it actually cut the hole so close to .375 that I had to follow it up with a 25/64" in order to get the nutsert to go in. Now that I've used it I can say theres no going back, it really is the best and fastest way to cut those holes. Takes longer to drill the pilot hole than it does the 3/8".
Looks great dude. Are you going to paint them?
I'm going to powder coat the skins white and powder coat the hinges and carrier black.
Yeah I put mine on this week too. I ended up buying and using this tool also. I got the skins lined up, used a transfer punch to perfectly mark the center, and then drilled the 1/8" pilot. The rotokut was amazing and worked flawlessly so thanks for the recommendation. The only problem I found was that it actually cut the hole so close to .375 that I had to follow it up with a 25/64" in order to get the nutsert to go in. Now that I've used it I can say theres no going back, it really is the best and fastest way to cut those holes. Takes longer to drill the pilot hole than it does the 3/8".
They are tight when using this tool. I found that if I screwed the nutzert onto the bolt (with a nut screwed on first) that came with the nutzerts, a small amount of silicone as a watertight gasket, and a rum low from a rubber mallet, they popped right in. Then use the bolt as an alignment tool to get the nutzert flush and centered and the thread the crimping tool and squeeze. Nice and centered.

