Trembley's Build

Got my Quadratec Winchline installed after I did some fab work on the bumper. I had to enlarge the opening to accommodate the angle of the bumper a bit better, plenty of clearance now. I also installed some Inspired Engineering Pods on the front end as Foglights. They came plug n' play for the stock harness and operate off the stock switch. I Modified it's function with the flashcal so that I can have fog lights on while my High Beams are on. Best of both worlds. I decided on pods over the light bar for the time being. I can always swap them to the back for rear lights if I decide I need the bar...with my Trucklite's I don't see that being an issue.
IMG_0263[1].jpg

I also picked up some crown extended brake lines that will be going in shortly.
IMG_0257[1].jpg

Next up...probably a DIY exhaust set up or some pillar lights or some brackets....whatever I can slide past the wife lol!!!!
 
A brief update...I picked up some Putco Dome Lights, very happy with the light output and necessary as I am always shuttling my kids around and they need the light.

IMG_0305[1].jpg


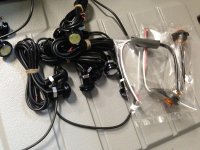
Also Picked up some ebay LED's for rock lights and some Marker/Blinker LED's to replace the stockers I ripped off last wheeling trip...I had them mounted in the wheel well after cutting my flares.

IMG_0307.jpg


I also finally got the Anti flicker harness for my trucklites...very happy with that and can highly recommend that purchase.

IMG_0306[1].jpg

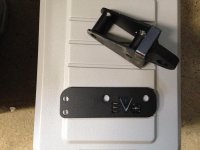
Also just waiting on my Evo Fascia delivery so I can install the D-rings as well, stock bumper had to go after almost causing body damage twice last trip out...These should solve my departure angle issues.

IMG_0308.jpg
 
Aww...wish I knew that too, we could have worked something out....Im also in the market for a Genright carrier Jim....any ideas?
 
I have for about a year and a half with some of those daystar tailgate bumbs. I have noticed the top of the tailgate starting to pull a little so when I rotated the tires last week I left it off and am trying to find a way to pay for a Genright carrier.

I also needed to add a spacer for the 35 on the stock wheel to clear the bumper, I used a synergy bracket for that purpose and it has served me well...should be for sale soon when I can figure out how to pay for a carrier lol.

You mean a separate spacer from the tailgate bumps? To clear the stock rear bumper?
 
Yup, synergy bracket moved the tire up and out about an inch in each direction...worked fine for the time, just ready for something more permanent.
 
Well I got my rear frame trimmed and my Evo Fascia fit...looks pretty good. Just waiting on the weather to finish up the Rings and paint under the tailgate.

IMG_0324[1].jpgIMG_0323[1].jpgIMG_0322[1].jpg
 
Evo rear fascia looks great! Makes mgr want one. Let us know how you get the nut in the frame for the d rings.
 
Success!!!!

My secret.....not telling...it involves a hole...??

IMG_0342[1].jpg

Properly tourqed and ready for recovery this weekend!!

Really happy with this...first purchase I had been on the fence about...got it on there and love it...matches the styling of my Front bumper and should compliment my future carrier well!!
 
Drilled a hole in the bottom with a step bit fished it in there..my fingers just long enough to reach the bolt....hit it with the impact...bingo!!!
Torqued to 120 call it a day...did burn myself a bit...hot metal is hot lol!
 
Ordered some bumpstops and a Magnaflow muffler, going to DIY myself a rock krawler set up and hopefully keep my tires out of the fenders a bit better.

My wife hates it when I come home from a wheeling trip and order parts lol!
 
Drilled a hole in the bottom with a step bit fished it in there..my fingers just long enough to reach the bolt....hit it with the impact...bingo!!!
Torqued to 120 call it a day...did burn myself a bit...hot metal is hot lol!

I still have to trim my frame, what did you use on yours? I have access to a SawAall with hacksaw (metal cutting) blade, I also have a Dremel Carbide metal cutting blade for my MultiMax MM45, last option is either a 3" cutting wheel on a Harbor freight air angle cutter or the HF High speed metal cutting air saw (not super trustworthy of the Harbor Freight stuff, but they usually work in a pinch). the one thing I don't have is a angle grinder :(
 
I used my Dewalt grinder with a cutting wheel and then a grinding disc. Cut nice and straight then some clean up grinding on it...came out great.
 
Drilled a hole in the bottom with a step bit fished it in there..my fingers just long enough to reach the bolt....hit it with the impact...bingo!!!
Torqued to 120 call it a day...did burn myself a bit...hot metal is hot lol!

This is what I did. I gave in and saw no other way. I even tried the vice grip trick and no luck. Just used a step bit big enough to get my finger in.
 
Top Bottom