Torque settings for tailshaft/dirveshaft install

Wizard

New member
I damaged the rear tailshaft on my JK out wheeling a week or so ago, and have since ordered a new rear driveshaft, and new front drive shaft.

My JK is a 2013 Unlimited Rubicon with an automatic gearbox.

My question is, is there set (or factory) torque settings for the nut on the front and rear pinion, flange nuts on transfer case, as well as torque settings for the smaller bolts associated with the tailshaft. If someone could provide these torque setting it would be appreciated.

Is there anything I should be careful of when making the change?

It probably doesn't look bad, but it's caused a hell of a vibration at road speed.

Tailshaft008_zpsdd2db678.jpg
 
http://project-jk.com/jeep-jk-write...-front-1310-drive-shaft-installation-write-up

This is the front drive shaft says 160 ft. Lbs. for the pinion nut. When I I installed mine I used an impact wrench and tightened it until there was in play at all on the flange. 160 ft. Lbs. is quite a bit. Hope this helps.

I thought this would happen. I did a search around and couldn't find any write ups that mentioned the torque settings, but knew there would be one somewhere. Appreciate the link to the write up, as well as the advice with the impact wrench.

Thank you Project-JK for making this write-up available to us all. :clap2:

Would the torque settings for the rear shaft be the same as the front?
 
Last edited:
Pinion Nut Torque

I thought this would happen. I did a search around and couldn't find any write ups that mentioned the torque settings, but knew there would be one somewhere. Appreciate the link to the write up, as well as the advice with the impact wrench.

Thank you Project-JK for making this write-up available to us all. :clap2:

Would the torque settings for the rear shaft be the same as the front?

Sounds like you're scouting out what it may take to upgrade or replace you drive shafts and flanges/yokes.

In pinion applications nut torque isn't the the most important metric, it's rotational torque of the pinion assembly. Rotational torque is really getting after pinion bearing pre-load. There are a lot of variables that just nut torque alone doesn't take into account to ensure proper preload. In most cases getting the nut torque in the ball park should get your pre-load close. Take credit for some basics, without brakes and tires assembled on the axles just get a feel for rotational torque with your hand. At this point it would be optimal to measure the rotational torque with an in-lb torque wrench. After you do your flange/yoke replacement ensure there is not fore/aft or in/out movement of the pinion assembly. Once again if you have an in-lb torque wrench just match the original rotational torque.

In my opinion and based on my time working with Timken as an engineer you are much better with a slightly higher bearing pre-load the to have your pinion not properly located ultimately affecting the gear meshing in the case.

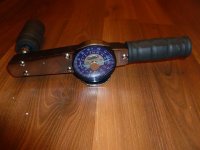
FYI, the range of rotational torque I'd target is 8-12 in-lbs. Here is a picture of my torque wrench I use, it measures 0-30 in-lbs.

Hopefully this is helpful and may be too much info for some of the guys out there.

One last note, this is all much less sensitive on the t-case side, just get those nuts tight, target 80-90 ft-lbs. Ensure you seal the splines on the front output shaft. P1000708.JPG
 
Sounds like you're scouting out what it may take to upgrade or replace you drive shafts and flanges/yokes.

In pinion applications nut torque isn't the the most important metric, it's rotational torque of the pinion assembly. Rotational torque is really getting after pinion bearing pre-load. There are a lot of variables that just nut torque alone doesn't take into account to ensure proper preload. In most cases getting the nut torque in the ball park should get your pre-load close. Take credit for some basics, without brakes and tires assembled on the axles just get a feel for rotational torque with your hand. At this point it would be optimal to measure the rotational torque with an in-lb torque wrench. After you do your flange/yoke replacement ensure there is not fore/aft or in/out movement of the pinion assembly. Once again if you have an in-lb torque wrench just match the original rotational torque.

In my opinion and based on my time working with Timken as an engineer you are much better with a slightly higher bearing pre-load the to have your pinion not properly located ultimately affecting the gear meshing in the case.

FYI, the range of rotational torque I'd target is 8-12 in-lbs. Here is a picture of my torque wrench I use, it measures 0-30 in-lbs.

Hopefully this is helpful and may be too much info for some of the guys out there.

One last note, this is all much less sensitive on the t-case side, just get those nuts tight, target 80-90 ft-lbs. Ensure you seal the splines on the front output shaft.

Thanks for this information highlighting a few tricks/techniques to getting this right. Very much appreciated.

As for scouting out, maybe more like on a mission. I have two new drive shafts ready to pick up on Friday (arrived here in Australia from the US yesterday), which I have to fit up asap. I knew this was the place to come to for some real hands-on advice with doing this.
 
When you're ready...

No problem Wizard, when you've got your hands dirty and if you need any help/advice. PM me and I'll hop on a plane to lend a hand, well... maybe that's not practicle just post up or PM me. What shafts did you go with?
 
No problem Wizard, when you've got your hands dirty and if you need any help/advice. PM me and I'll hop on a plane to lend a hand, well... maybe that's not practicle just post up or PM me. What shafts did you go with?

LOL. I think I might have this job done before your plane lands, but appreciate the offer.

I picked up the shafts today from my supplier, after they arrived from the states super quick. I went with Tom Wood's drive shafts, a 1350 for the rear and a 1310 for the front.

Woody011Small_zps3b642b2f.jpg


OEM -v- Tom Wood's (rear shaft).

Woody010Small_zps9e67f232.jpg
 
Top Bottom