ROAM Offroad - JL Development - Front and Rear Bumpers, 4-Link Long Arm, & Side Armor

Thanks for the interest and support!

Where are you located and will you be doing your own installs?

On our JL long arm kit, we're currently out of shocks and rear springs. When we've got the next batch in from Fox and Hypercoil I'd be happy to discuss sending a JL Long Arm kit out towards you for a review/sponsorship/brand ambassador. We'll also have upgraded axle housings for the M210 and M220 (3/8" - 1/2" wall) if you're interested. If you don't have a JL Rubicon then it'll be another three weeks before we get our half-shaft prototypes in. Gears will come from a third party.

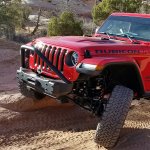
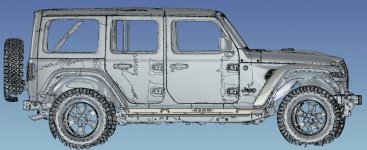
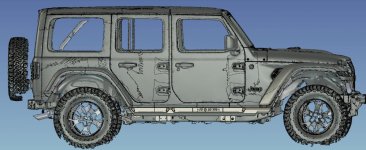
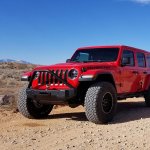
The pictures attached below should show the approach angle of our current front bumper and how our JL long arm kit looks installed. The production version of our JL long arm kit has straight lower control arms which will require cutting the rear OE lower control arm brackets. We do have an optional OE rear control arm bracket repair kit if that helps.

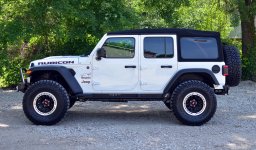
Holy shit that looks big!! What’s the total amount of lift on that setup???


Sent from my iPhone using WAYALIFE mobile app
 
Can you guys see the pictures on the site? I can’t

Holy shit that looks big!! What’s the total amount of lift on that setup???

When are you planing on releasing your products for sale?

The bumpers look good, I have my JLR on order (hopefully it will be here in the next month) do you have pricing on them yet? I live about 1 hour away from the Rubicon and plan to go up there and test out the Jeep when we get it.


Thanks for the interest and support! We'll have more content, info, and pictures up on our site after we're back from EJS.
 

Attachments

  • ROAM - JL Front Bumper and Side Armor Steps 002.jpg
    ROAM - JL Front Bumper and Side Armor Steps 002.jpg
    64.2 KB · Views: 243
  • ROAM - JL Budget Lift 001.jpg
    ROAM - JL Budget Lift 001.jpg
    329.8 KB · Views: 246
Last edited:
Not trying to be an antagonist here, but I'm sure lots of guys are thinking this so I'll go ahead and ask: Looks like this LA kit loses you quite a bit of ground clearance with those arm mounting points even from stock. Any chance of some close up pics to get better views of them? Got any action shots from EJS?
 
Not trying to be an antagonist here, but I'm sure lots of guys are thinking this so I'll go ahead and ask: Looks like this LA kit loses you quite a bit of ground clearance with those arm mounting points even from stock. Any chance of some close up pics to get better views of them? Got any action shots from EJS?

I agree. Trying to be nice because they are new and a supporter but that's not going to last forever here. So here's the less politically correct version. That long arm kit looks like something that belongs on an old school monster truck. You only need to look at the EVO version to see the difference. The arms look like they are upside down and the are going to hang up on everything.


Sent from my iPad using WAYALIFE mobile app
 
I'm sure lots of guys are thinking this so I'll go ahead and ask: Looks like this LA kit loses you quite a bit of ground clearance with those arm mounting points even from stock.

You only need to look at the EVO version to see the difference. The arms look like they are upside down and the are going to hang up on everything.


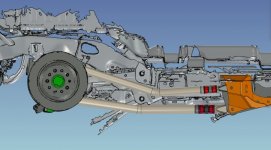
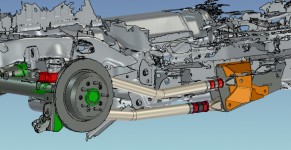
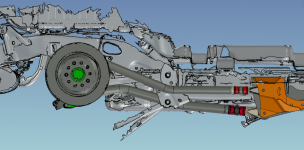
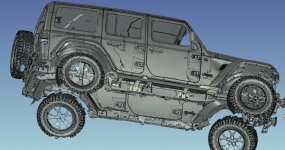
What you're actually looking at on the photo above is our preproduction version which has the rear lower control arms bent downwards to clear the OE rear lower control arm brackets. To clarify, with this version of our JL Long Arm kit, the OE rear control arm brackets do not need to be cut or trimmed at all. Our production JL Long Arm kit has either straight arms or high clearance rear lower control arms. <images attached below>

I've attached a few images below comparing the two versions (preproduction version vs the production high clearance version) and the version that has the control arms bent downwards should clearly show where the rear OE lower control brackets that we're trying to clear are. We did not want to cut up the OE rear control arm brackets while we were perfecting the geometry so that in the case that we still had to test or develop anything that utilized the rear OE control arm mounts they're still there. The production version of our JL Long Arm kit with the straight rear lower control arms will have superior ground clearance (when compared against our preproduction geometry test version) and our high clearance version will improve ground clearance further.

There's nothing wrong with Mel's (EVO) approach for a long arm kit at all, but to us its a design tradeoff that we've made; maybe I'm mistaken, but on Mel's kit only the rear lower control arms were extended but where we've made a design tradeoff is that we wanted to extend all four control arms for what we considered to be a true long arm kit. Not saying that Mel's kit is not, but to us our preproduction version was a geometry test for extending all four rear control arm locations.


Our design constraints and considerations for our JL Long Arm kit design include:


1. Not relocating the fuel tank because the fuel tank is in the way of where you'd want to mount the rear inboard control arms. The best example that I can currently find would be the "Genright JK Elite Coilover Suspension Kit". Its an pretty awesome build but having to delete/relocate both the fuel tank and the stock exhaust system wasn't something that we wanted to do.

2. According to Quadratec, the current best selling long arm kit for the JK that does not require relocating either the exhaust or the fuel tank on a JK is the Rancho LA kit which is a radius arm setup or the Teraflex LCG kit. We wanted to build a 4-Link kit, which in our opinion, has better geometry and articulation qualities when compared to a radius arm kit. The rear lower control arm mounting points are indeed lower than stock on our current JL Long Arm kit, but no more so than a Teraflex JK long arm kit. By lowering the rear lower control arm mounting points, our JL Long Arm kit improves suspension geometry because (when lifted) the control arms are more parallel (to the vehicle) which results in less of a wheelbase change during suspension articulation, less squat during acceleration, and reduced brake dive (as is the case with most long arm kits). Our JL Long Arm kit does not require any exhaust modifications at all.

3. Not requiring anything to be welded onto the axles. Our rear lower control arm brackets use (located by) preexisting bolt holes on the JL frame. They're already strong as is without welding but if they're welded to the frame then they're even stronger. Mel's (EVO) kit, from what it looks like in his video, appears to use a pretty similar mounting location on the JL frame. However, his kit appears to utilize relocation brackets which at least on the video are welded to the axle, which in our case went against our original design constraints. Mel's (EVO) kit does look extremely well built and correctly engineered.


Any chance of some close up pics to get better views of them? Got any action shots from EJS?


Our production JL Long Arm kit uses straight lower control arms (instead of the ones that bend downwards which clear the OE rear lower control arm mounts) and we've got the option for high clearance arms as well. We'll post more pictures and some videos once we get back from EJS and once we've got some time to sort through some of the content that we've gathered.

Thanks for your patience
 

Attachments

  • ROAM Long Arm 4 Link, March 15th 2018 010.jpg
    ROAM Long Arm 4 Link, March 15th 2018 010.jpg
    68.9 KB · Views: 414
  • ROAM Long Arm 4 Link, March 15th 2018 011.png
    ROAM Long Arm 4 Link, March 15th 2018 011.png
    448.4 KB · Views: 426
  • ROAM Long Arm 4 Link, March 15th 2018 019.png
    ROAM Long Arm 4 Link, March 15th 2018 019.png
    347.9 KB · Views: 436
Thanks for the thorough explanation. Looking forward to seeing the full production kit and the rest of your pieces.
 
Hi!

We're a bit late to the party, but we're excited to announce our Jeep Wrangler JL Front Bumper, Side Armor Steps, and Rear Bumper with Tire Carrier.

Stay tuned for updates!

Thanks everyone!

Looks great and the price is right! Your side steps say their rocker guards too? How does that work?
 
Thanks for the interest and support! We'll have more content, info, and pictures up on our site after we're back from EJS.

I spoke with you via email so soon as you get the 8” kit I will be able to give some reviews. Unfortunately there isn’t a lot of rock here in Louisiana so my rig will Be more geared for mud. I currently have a set of 42” Fury Mt’s ordered right now. It will get abused , but in a different way than most people on here use there rigs. Seems like a great site happy to be a member and hope to learn a lot.
 
Thanks for the thorough explanation. Looking forward to seeing the full production kit and the rest of your pieces.

Bumpers and sliders look great! Welcome to Wayalife!

Looks great and the price is right!

Thanks for the interest and support everyone!


Your side steps say their rocker guards too? How does that work?

In my opinion, while there are different ways that protection can be added to the actual rocker panels on the JL Body, before heading down that road we should first pose the question of: what are we protecting the rocker panels from? In my opinion, in this case protection should be added to resist rocks strikes (either kicked up by the tires or protruding from the ground) and/or car door strikes (from vehicles parked next to you). By adding side steps (any manufacturer), unless you're being impacted by a door that can clear the side steps (e.g. lifted truck or suv), you're covered already on the door strikes to your rocker panels.

Rock strike and rock impact protection should be addressed by testing. In my opinion, there are two standards to beat for add-on rock impact production, the OE JL Rubicon rock rails (as the base standard) and then an underframe skid plate.

The OE JL Rubicon rock rails are body mounted. While the OE JL Rubicon rock rails should bear the weight of the vehicle (forklift test), they're actually not meant to be load bearing because they're body mounted. The "rock rails" description actually refers to deflecting rocks that are kicked up as opposed to "rock sliders" which are more of an underframe skid plate.

Our JL Side Armor Steps are constructed from mixed 7/32″ and 1/4" (high strength steel brackets) and mixed 1/8" and 5/32" high strength steel (topside outer surfaces) and are seam welded along the step plates. Any impact forces are dispersed and spread across all of the mounting points evenly as opposed to being concentrated in one area.

The primary issue with adding any sort of underframe skid plate meant to protect the frame rails themselves is that you will lose ground clearance where the skid plate is attached. While there are solutions on other vehicles where they're advertised as allowing you to drag your vehicle over rocks and debris, if anyone actually attempts something like that the odds of getting high centered are pretty high. To clarify, in our opinion, avoiding the rocks will be safer than dragging/sliding your Jeep over them. On our JL Side Armor Steps, the mounting brackets sit higher than the lowest part of the OE body mount brackets.

There are also the issues of maintenance, the ability to repair whatever its attached to, and then also if installation can be reversed (in the case that you've leased your JL as opposed to outright ownership). With most of the current rocker guards that attach to the rocker panels by means of either drilling a series of holes on the vehicle rocker panels or using adhesives, in my opinion, water ingress (at the holes drilled), water retention (in the gap between the rocker panel and the product attached to the rocker panels), how applied forces are absorbed/spread/dispersed (shear vs compression, e.g. on a sheet of metal attached to the rocker panel, how thick is the metal and if it dents is it just transferring the impact to the rocker in a localized area, dimple to dimple), and if a serious enough force was applied, can the underlying area be repaired.


We've got both a body mounted version and a frame mounted version of our JL side steps: The ROAM JL Side Armor Steps which are body mounted and the ROAM JL Rock Sliders which are frame mounted. Our JL Side Armor Steps utilizes the same attachment points as the OE JL Rubicon rock rails. Our JL Rock Sliders utilizes preexisting bolt locations on the OE JL vehicle frame. Both our JL Side Armor Steps and our JL Rock Sliders do not require drilling or cutting or welding at all for installation and are designed to bear the weight of the vehicle (forklift test). Our JL Side Armor Steps are in production but we're still at least another few weeks out before our JL Rock Sliders will be committed to production. We're still testing our JL Rock Sliders to see if they're an improvement over our JL Side Armor Steps.


The Great Grape Ape said:
The ROAM slider are nice looking, and seem perfect as a step, but they likely won’t function the same for protection.

Most people don’t need or care for that level of protection and primarily need a functional step, that both looks the part and and has some of the added benefits not found on others (good platform with smaller gaps for dogs or high heels, good stone chip protection, etc), for most the ROAMs will be perfect

The Great Grape Ape said:
However, that difference in price is also likely due to that difference in build priorities.

What sets our design, build process, and quality apart isn't just how strong our JL Side Armor Steps are, but rather how they're designed and built. They're not just straight square tubes, but profiled and precision laser cut on the interior edge to evenly and consistently follow the curvature of the vehicle. While they're built to carry the weight of the vehicle (forklift test), in my opinion, the forklift test should not be the defining benchmark for strength because the OE JL Rubicon Rock Rails will also carry the weight of the vehicle during the forklift test. Our side steps feature heavy duty 7/32" high strength steel brackets and mixed 1/8" and 5/32" high strength steel superstructure construction (topside outer surfaces). I've attached an image below showing the inside profile of our JL Side Armor Steps.

ROAM JL Side Armor Steps 001 - Curved Profile.jpg


I spoke with you via email so soon as you get the 8” kit I will be able to give some reviews. Unfortunately there isn’t a lot of rock here in Louisiana so my rig will Be more geared for mud. I currently have a set of 42” Fury Mt’s ordered right now. It will get abused , but in a different way than most people on here use there rigs.

Thanks for the interest and support!

We're still a few weeks out from releasing our 6" and 8" JL Long Arm suspension systems. We have a policy of testing everything on our own development and demo vehicles so what our customers receive will be perfect. We're still in the process of sorting through how much actual suspension travel we can get out of a set of coilovers that a 3rd party is currently co-developing with us. The design specifications call for: lets say if we were adding 4 inches of lift to a vehicle then we also need to add at least 4" of suspension travel so you're not losing negative suspension travel and articulation.

Stay tuned for updates!


Welcome Roam! I dig the white letters. You can send me some of those slider/steps. I’ll give you a review.

Thanks for support!

When we're caught back up on production lets talk :)
 

Attachments

  • ROAM JL Side Armor Steps 002.jpg
    ROAM JL Side Armor Steps 002.jpg
    76.2 KB · Views: 552
  • ROAM JL Side Armor Steps 003.jpg
    ROAM JL Side Armor Steps 003.jpg
    10.9 KB · Views: 559
  • ROAM JL Side Armor Steps 004.jpg
    ROAM JL Side Armor Steps 004.jpg
    43.2 KB · Views: 564
  • ROAM JL Side Armor Steps 005.jpg
    ROAM JL Side Armor Steps 005.jpg
    43.2 KB · Views: 559
  • ROAM JL Rock Sliders 001.jpg
    ROAM JL Rock Sliders 001.jpg
    71.6 KB · Views: 561
  • ROAM JL Rock Sliders 002.jpg
    ROAM JL Rock Sliders 002.jpg
    41.4 KB · Views: 554
  • ROAM JL Rock Sliders 003.jpg
    ROAM JL Rock Sliders 003.jpg
    93.3 KB · Views: 572
  • ROAM - JL Side Armor Steps 001.jpg
    ROAM - JL Side Armor Steps 001.jpg
    45.9 KB · Views: 514
  • ROAM - JL Side Armor Steps 004.jpg
    ROAM - JL Side Armor Steps 004.jpg
    181.7 KB · Views: 575
  • ROAM - JL Front Bumper and Side Armor Steps 005.jpg
    ROAM - JL Front Bumper and Side Armor Steps 005.jpg
    176 KB · Views: 581
Last edited:
I am a huge fan of your rear bumper design. It gives you the benefits of the bumperless jeep clearance, but with a finished look and a great amount of function as well. I love the extra hitch options, but what's stopping me is the separate linkage mechanism. In your future renditions, I'd love to see a tail-gate linked carrier, as well as expansion options, like a top of the tire basket, or a way to mount 2 rotopax units. I also absolutely love the side rails, especially the lighted steps, but would really want to have them mount to the frame and be able to take a hit without buckling into the body. I do love the fact that they are tight to the body and hide the pinch seam. Would be cool to see you guys make a video showcasing how much of a beating they can take, so we can gauge if they would work for our application. :thumb:
 
I recieved ROAM's products today to test out and give my opinion on. I must say they are very well thought out , and very ,very well built . I am in the process of the installation , test fit . And so far everything has been spot on . I'm attaching pics of the products so you can check them out

So how do you like the bumpers? It’s been over 2 months now, any updates?
 
I recieved ROAM's products today to test out and give my opinion on. I must say they are very well thought out , and very ,very well built . I am in the process of the installation , test fit . And so far everything has been spot on . I'm attaching pics of the products so you can check them out

Im really hoping their rear bumper becomes available soon, I really like the low profile design with hitches included!!
 
Top Bottom