You are using an out of date browser. It may not display this or other websites correctly.
You should upgrade or use an alternative browser.
You should upgrade or use an alternative browser.
Learning to Weld-- Tips for Beginners on Welding and Gear
- Thread starter LoPo
- Start date
Rubicon310
New member
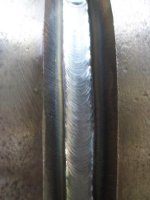
Looks to me like you need to bring the circles closer together like the photo below.
View attachment 248621
Wow. Yeah I'm way off if that's the end goal. I've got plenty of metal to practice on. I'll try to get them closer and run a continuous bead instead of stitching it together like I did.
Sent from my iPhone using WAYALIFE mobile app
NecessaryEvil
Caught the Bug
When you say "a touch hot" what do you mean? That it could melt the metal too much? Sorry, I'm still learning the lingo.
Sent from my iPhone using WAYALIFE mobile app
As you weld the metal heats up and the weld will penetrate deeper. On thinner metals you are more likely to melt through (blow out) the metal you are working with if you don't adjust. On thicker metal you can still warp the metal being too hot or staying too long. Welding is not as easy as it seems and there're many variables (wire thickness, wire type, amperage, wire speed, metal type, metal thickness,cold start, hot start, and predicting metal warp. Practice practice practice. I am no expert but have learned a lot just by doing it.
Would you say the welds look acceptable for stitching? Or should I hold the trigger longer?
Sent from my iPhone using WAYALIFE mobile app
Towards the end it looks good. Nice and evenly spaced and the stacking looks cool. Stitching is just not that great of a method with thicker steel and or mig welding. A lot of people have a misconception on what their welds should look like. They look at tig welding beads and think their mig welding should look the same. With mig welding you will never get the true "stack of dimes" look. Idk if that's what your trying to achieve with stitching.
Sent from my iPad using WAYALIFE mobile app
QuicksilverJK
Caught the Bug
I wouldn't stitch anything that thick. As for heat that would be your voltage. You ultimately want your voltage just high enough to get the edges of your puddle to flow into the material (not humped way up, and not undercut) a small amount of arch is perfect.
Sent from my iPhone using WAYALIFE mobile app
Sent from my iPhone using WAYALIFE mobile app
QuicksilverJK
Caught the Bug
The weld that WJCO posted is not stitched. That is the results that you can expect from an even drag with very small slow circles. Try a slow drag in a straight line and see what happens, you will be impressed.
Sent from my iPhone using WAYALIFE mobile app
Sent from my iPhone using WAYALIFE mobile app
NecessaryEvil
Caught the Bug
This is 1/4 inch steel. I basically am drawing e's as I weld and watching the bead. As you can see the some what even heat transfer and evidence of even penetration. Thicker metal is A LOT easier to weld with a mig welder. 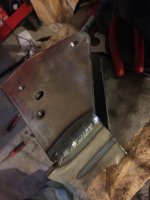
Sent from my iPhone using WAYALIFE mobile app

Sent from my iPhone using WAYALIFE mobile app
SDG
Caught the Bug
I would say forget the stack of dimes with mig until you know what you are doing. Worry about wetting the ears, try doing 90's, uphill, downhill, etc with a straight pull.
Here is when I was learning...
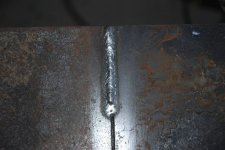
And after a bit got to this...
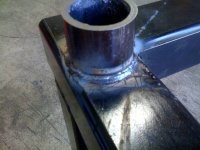
This is stick, but learning process is the same.
Sent from my SM-G900P using WAYALIFE mobile app
Here is when I was learning...

And after a bit got to this...

This is stick, but learning process is the same.
Sent from my SM-G900P using WAYALIFE mobile app
NecessaryEvil
Caught the Bug
I would say forget the stack of dimes with mig until you know what you are doing. Worry about wetting the ears, try doing 90's, uphill, downhill, etc with a straight pull.
Here is when I was learning...
View attachment 248629
And after a bit got to this...
View attachment 248630
This is stick, but learning process is the same.
Sent from my SM-G900P using WAYALIFE mobile app
Agreed
Sent from my iPhone using WAYALIFE mobile app
Rubicon310
New member
Very good advice. Thank you guys. I've been watching a ton of YouTube videos. After watching Eddie work on Jane, I was inspired to learn welding. It's a skill I've wanted to learn for a while. I'll post more pictures tomorrow.
Sent from my iPhone using WAYALIFE mobile app
Sent from my iPhone using WAYALIFE mobile app
Scoop315
Caught the Bug
The best for the buck are probably Speedglas, and Miller infinity or Miller Titanium. Figure anywhere from $275-$350. The Miller Titanium is a split shell hood that allows the hood to be opened sort of like a clam shell and has a 4X4.5" clear glass to grind with. Both of the above also have a shade 5 level of protection for using an oxy-acetylene burning outfit. I tend to set my Speedglas at 11 shade for stick welding, but as I get older I'm relying more on a 10 shade more. I still go to my old school Jackson or Fiber Metal hoods without autodarkening shade. $35 and you can do anything an auto darkening hood does, except you have to get the quick nod of the head motion down when starting the weld.Thanks. I was actually wondering about some of the Northern Tool helmets. We have one close by. I have noticed the large price range in helmets, and no, I won't be doing a lot of welding. Honestly, for the money, I'd be better off to pay a welder, but like I said, I've always wanted to know how, so I'm going to start burning. Dad has a little scrap metal he's saved, so I may go to his place and practice. My brother has a torch he uses with a stick welder that he taught himself on.
Unknown on the gas or flux core. I suppose wind would affect gas, so probably flux, here at the house.
Sent from my iPhone using WAYALIFE mobile app
If you get into welding stainless steel, you're definitely going to want to go to a shade 11 as it's brighter when welding. For that you'll also want to definitely make sure you have ventilation because welding stainless because of hexavalent chromium getting into your lungs. It's bad stuff that causes lung cancer and can actually change the DNA if exposed too much. For a hobbyist, it's probably not a huge risk. But if anyone has kids, or a wife they like, I'd still take the precautions to ensure they're not exposed to the stuff in the air, or the ultraviolet light.
Aluminum welding is something I wouldn't get into at all. Aluminum is different to weld than other metals and has to be super clean and the fumes from welding are really nasty. If the metal isn't clean, it takes very little time for the welds to fracture/break.
As far as using gas for MiG welding, blocking off wind is the trick, while still ventilating the fumes.
Scoop315
Caught the Bug
If you get flash, I've heard cucumber slices on the eyes, or cold, wet tea bags. But really, a good set of safety glasses (ANSI rated) protects the best and blocks 75% of the UV rays. And those electric arc UV rays are stronger than the UV rays from the sun. At the end of the day, if you don't protect skin and eyes, the healing process is time, really. Getting your eyes flashed sucks.When you burn your eyes it will happen get some Vicks and put under your eyes like eye black for sports and it will take away the sand feeling that wakes you up in the middle of the night
Sent from my iPhone using WAYALIFE mobile app
Scoop315
Caught the Bug
I have a northern tool auto helmet and also an auto miller. The northern tool one has worked fine, but as it does have its drawbacks, which may or may not apply to you. For everyday stuff its fine. Problem is when you get into tight spaces there are fewer sensors and they may get blocked by an obstruction in which case it may or may not trigger. The nicer helmets have more sensors in diff locations and also have a grinding mode so they wont trigger when you are using an angle grinder so less helmet on and off.
I like the flat wire wheel for the grinder myself if using flux core. Be careful with any wire wheel, have gotten wires thrown through my t-shirt and into the skin in my stomach before haha.
Sent from my SM-G900P using WAYALIFE mobile app
If you go to a welding supply retailer, you can buy welding jackets made of either nomex or leather to protect against wires sticking in your skin. The biggest thing is eye protection!
Let me repeat that: The most important part of grinding and welding is eye protection!!
QuicksilverJK
Caught the Bug
If you go to a welding supply retailer, you can buy welding jackets made of either nomex or leather to protect against wires sticking in your skin. The biggest thing is eye protection!
Let me repeat that: The most important part of grinding and welding is eye protection!!
I second that. And to that point don't do the "it's a quick clean up grind so I will just close my eyes". Your eye lids will not protect you from a wire wheel coming apart.
Sent from my iPhone using WAYALIFE mobile app
Rubicon310
New member
Here's my attempt at a bead. The ultimate goal is for it to look nice. My main focus is making sure I have good penetration and that it will hold. Thoughts? 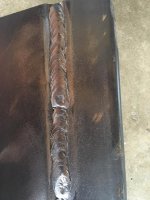
I stopped half way to check it. Then continued. You can see the split in the middle.
Sent from my iPhone using WAYALIFE mobile app

I stopped half way to check it. Then continued. You can see the split in the middle.
Sent from my iPhone using WAYALIFE mobile app
Rubicon310
New member
Here are 3 more smaller beads. Again, I'm not going for the best looking bear award. I'm trying to get the feeling of laying down a good bead that penetrates. I'll work on prettiness once I'm sure I have a good weld. 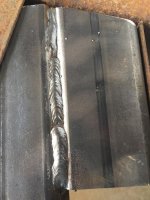
Sent from my iPhone using WAYALIFE mobile app

Sent from my iPhone using WAYALIFE mobile app
Scoop315
Caught the Bug
Here's my attempt at a bead. The ultimate goal is for it to look nice. My main focus is making sure I have good penetration and that it will hold. Thoughts? View attachment 248722
I stopped half way to check it. Then continued. You can see the split in the middle.
Sent from my iPhone using WAYALIFE mobile app
Keep practicing. And when you stop and start, make it look like you never stopped.
Scoop315
Caught the Bug
Here are 3 more smaller beads. Again, I'm not going for the best looking bear award. I'm trying to get the feeling of laying down a good bead that penetrates. I'll work on prettiness once I'm sure I have a good weld. View attachment 248723
Sent from my iPhone using WAYALIFE mobile app
The bottom bead is the one that looks the best, and it doesn't tie in the base metal on the left completely. At the end of the bead, I travel to the end of joint I'm welding, then change my position to travel back into the bead I just laid down to make sure the bead is uniform. Welding is not a natural thing for humans to do, so you're constantly looking at where you're going, the bead size is right and uniform all the way, and stops and starts are seamless (I've spent a lot of time doing pick ups on others' welds over the years, and I'm not that great a welder). As well, you're moving from say, left to right, holding the proper arc distance, and more.
Hang in there. Watch YouTube and pick up a Hobart or Miller pocket welding guide for reference (though, I think Miller has an app now).
Edit: weld on the flat surface of the metal starting at the end farthest from you and make a pass, then the next pass over about two thirds of the first pass, then on the third pass cover two thirds of the second pass. Keep doing it all the way until you come to the edge of the metal closest to you. You'll get a better feel for the way it all feels and you'll be getting practice at pad welding. If you get to the point that you're beads are all straight, you're doing it right.
Last edited:
limon_three
Member
Found a 110 wire feed at a pawn shop today...would that be okay to weld my new track bar bracket on to axle since broke the factory mount this past week?
Sent from my iPad using WAYALIFE mobile app
Sent from my iPad using WAYALIFE mobile app
WJCO
Meme King
Found a 110 wire feed at a pawn shop today...would that be okay to weld my new track bar bracket on to axle since broke the factory mount this past week?
Sent from my iPad using WAYALIFE mobile app
Should be good. Just grind it down really well and make sure the weld gets good penetration.

