wjtstudios
Hooked
Does anyone know if the Magnaflow Loop Delete is compliant with this long arm kit?
No. I had to have a custom section made after the long arm was added to correct the loop delete.
Sent from my iPhone using WAYALIFE mobile app
Does anyone know if the Magnaflow Loop Delete is compliant with this long arm kit?
If you have the work space I'd say go for the install yourself. Having installed a long arm lift myself it isnt the easiest thing to do but you learn a lot. For me it was part of the reason I bought it, to build it too.I’m interested to see how this goes. I’ve been wanting to do the install by myself. But seems like a pain. Don’t want to get in trouble at the apartments again. [emoji23] good luck on the install![emoji1303]
Sent from my iPhone using WAYALIFE mobile app
^^^This^^^
The rear CA brackets are easier to cut off than the front but gas tank and exhaust removal is required. Up front the brackets are harder to get to but exhaust removal is required. I'd try to focus on a full disassemly (axle, driveshaft, etc.) of which end you choose to do the evening you get home. Also you can set the starting arm lengths in advance. Then start bright and early with cutting. That takes the longest. Don't forget to consider paint drying time.
Sent from my 2PYB2 using WAYALIFE mobile app
Follow the instructions included. When in doubt start with the smaller bit. It's always easier to make a small larger not the other way around.I’m seeing conflicting information in various places. Do I use a 1/2” drill bit or 9/16”?
Follow the instructions included. When in doubt start with the smaller bit. It's always easier to make a small larger not the other way around.
Sent from my 2PYB2 using WAYALIFE mobile app
I didn't bother with drilling pilot holes. A good center punch and the drill bit nice and straight going slow with oil and you should be good to go.Got it... I saw a thread on here referencing 9/16”.
I bought a couple of 1/4” bits to use as pilots hopefully that makes the drilling a little easier.
I’m seeing conflicting information in various places. Do I use a 1/2” drill bit or 9/16”?
I did mine myself. it WAS a pain, but Still glad to this day I did it. Check my build thread for some tips on it. :thumb:
Good Luck :beer:
I’ve read your thread several times prior to committing and now lead up to the first cut.
The Jeep goes up on the jack stands as soon as I get home from work tomorrow night. The plan as of now is just the front end. If things go well I might try the rear as well, but I’m not going to push it.
Friday Night:
Jack Stands
Wheels off
Saturday:
Cut Passenger Mounts
Test Fit and transfer holes
Paint bracket
Drill passenger holes
Paint frame area
Cut Driver Mounts
Test Fit and transfer
Paint bracket
Drill driver holes
Paint frame
Sunday:
Mount brackets
Install arms
")
As many times as I've tried to visualize this my mind still won't let me see it...haha.Sounds like a solid plan. CUT THE LOOP STRAIGHT UP AND DOWN. :cheesy: NOT perpendicular to the pipe.
I meamt to tell you. Use corded tools. While cordless ones are great for convenience even the best batteries won't last long enough.A frustrating Saturday.
First I hit all kinds of delays because the sawzall and angle grinder are through my batteries faster than I could charge them. I even resorted to putting them in the fridge to cool them down after a use to get them charging quicker.
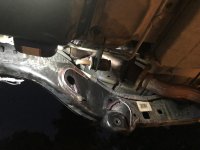
Then, as I was cutting off the driver side front control arm mounts I clipped the brake line!!!
Any advice on a fix?
I meamt to tell you. Use corded tools. While cordless ones are great for convenience even the best batteries won't last long enough.
Sucks about the break line. Didn't your kit come with longer ones? Or you meant the hard line?
Sent from my 2PYB2 using WAYALIFE mobile app

Hard line
Looking online there seem to be some couplers which maybe you can find at a local auto parts store. Hopefully it works out. How's progress coming?
Sent from my 2PYB2 using WAYALIFE mobile app