DIY Spod- Waytekwire

Rubi Locker Bypass Switches-

Swank has a link in his writeup to a great writeup on making bypass switches for the Rubi Lockers. I plan on adding 2 switches to my cluster of switches, but i want to point out- this mod does not require a relay. If you plan on doing this also, keep the 2 switches seperate from your 5 switches in this writeup. Use the 5 switches in this writeup to your full advantage, by dedicating them to circuits that need a relay, like lights, or air compressor.

As Swank mentioned above, some LED lights are getting to the point of such low current draw, that they do not necessarily require a relay. But i would still recommend using one (as did he). Especially since you never know how long you might one day need to have your lights on for (some Moab trails are 2 days long). Better to be safe than sorry.

If you choose to add the rubi bypass switches, and are using 2 switches like i used in this writeup- Pin 2- connect to a ground source, Pin 3- output ground to the locker relay purple wire (relays are located next to the battery.)
Pin 7 can be hooked up to a 12v source (put a fuse in fuse 8 in cooper bussman relay panel, and run a wire to the 2 locker switches) and then the switch will illuminate when the locker is activated.
 
^^^ Thanks for the plugs man :brows:

One thing that hasn't been addressed in the DIY SPOD units (This one or mine) is the run-down protection that the real SPOD offers. So for those that think this is an issue here are some solution. It does adds some more coin to the project, but it's better than being left stranded.

http://stores.rogue-engr.com/-strse-36/1950-dsh-222,-LVD,-Low-Voltage/Detail.bok

http://theelectricaldepot.com/index.php?main_page=product_info&products_id=1126

I live on the edge and opted not to add this. :eek:
 
Np Swank, thanks for your great writeup, and helping me keep my i's dotted and t's crossed on this writeup :thumb:

Those run-down protectors are great advice!

Since this writeup has a live circuit all the time, and i spend 8 months/year doorless, i added the disable switch on my Fuse 6 wire that feeds power to the switches. This way, i won't come out to my jeep and find out someone flipped on my accessory switches and drained my battery. Of course, there's nothing to stop them from turning on my domelight or headlight :doh:

Install note- instead of using the fuse 6 wire to the switches, you could tap off the 12v switched wire to the left cigarette lighter, and run that to feed the switches, and then none of the switches would power on without the key being turned on.
I however, wanted to be able to turn on lights without the Jeep being on, from time to time.

As did/do I. I often leave my Halos on when I'm parked at a Jeep type event cuz they look bad-ass :rock: Tapping the accessory 12V to power the relay coils is a great idea though!
 
Just to sum this up a little bit-
If you have an automatic- get the daystar KJ71034bk- perfect combination with the relay panel. No crude cutting of windshield trim panels, or center consoles, etc. Just replace your stock panel with the daystar.

You can use the daystar windshield pillar panel (only 4 switch spots, but you can cut in a 5th switch)- i however, plan on running a rollcage kit, and this will not work with the pillar switches.

I have a manual transmission, so my switch locations were limited to cutting a hole in the windshield trim panel and mounting the daystar panel behind it. I'm not happy with the screws, but very happy with the end result.
 
Pulled the trigger on parts. I'll try to mention any issues with the writeup I come across. :)

Am I looking for any particular *quality* of wire from the car audio store? Heat resistant, brand, etc? Any decent quality Amazon suggestions so I don't have to leave the couch? :D

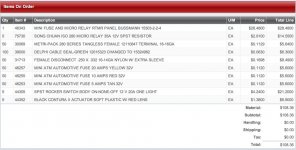
Here's what waytekwire came out to w/5 rockers since they're cheap (I can buy otrattw after I figure out what all the spots will be.)

If anyone in northern Los Angeles wants to share parts with me you're welcome to my spares! Just order the stuff that I didn't already order too many of (relays / panel / rockers).

Screen Shot 2013-12-31 at 11.05.59 AM.jpg
 
the problem with trying to order the wire from amazon, is you have to buy a spool. If you go to a car audio shop, they will have the spools, and then you can get several different colors to make your wiring easier, unless you label both ends of the wire before wirelooming it.
the wire is usually referred to as Primary wire. Car audio shops use it under the hood for alarms, etc.
it is usually 0.15-0.20 ft
Let me know if you have any other questions
Good Luck!
 
So I definitely need to do this to save me a sheite ton of dough compared to the sPOD but I'm so confused by the wiring its ridiculous. I've done a few wiring projects before but nothing like this. I have a headache already haha
 
Nice write-up!!

Now my question for the electronically retarded... How much to build me one!! :thumb:

Wonder if it's possible to get just a switch panel from spod??
 
Last edited:
Thanks HDGasser!
i did think about getting a switch mount from spod, but they don't list it seperately online. and i figured it would be alot more than the $20 for the daystar mount.

If anyone has any suggestions how i could make this writeup any easier, please let me know!
If you follow the layout i posted, it really is pretty simple.
 
After rereading it again I think I have it. This'll be a fun project for me and my buddy to tackle. This is awesome though I've seen one other person make a custom one and it was wayyyy more complicated than this one. Very cool. If you think about it...someone could make these for a side gig and sell them for an affordable price while still making decent money. There's no reason for their ridiculous price other than the fact that theres a lot of custom aluminum/plastic work with theirs.
 
After rereading it again I think I have it. This'll be a fun project for me and my buddy to tackle. This is awesome though I've seen one other person make a custom one and it was wayyyy more complicated than this one. Very cool. If you think about it...someone could make these for a side gig and sell them for an affordable price while still making decent money. There's no reason for their ridiculous price other than the fact that theres a lot of custom aluminum/plastic work with theirs.

While I made my own, I really don't think the SPOD is unfairly priced. These can be made less expensively because your time is free. If someone were to make these to sell, they would have to be paid for their time. Since the volumes would be low, both the labor and component buying power would likely drive the cost to more than SPOD. Additionally you would need to pay for some certifications that are very expensive and carry liability insurance that isn't cheap. I think the idea is better than the reality. None-the-less they can be made affordable if you are willing to put in the sweat equity yourself.
 
I think the idea is better than the reality. None-the-less they can be made affordable if you are willing to put in the sweat equity yourself.

I'd agree. If it was just a fun hobby to do when you're bored I think it'd be worth it. I tend to enjoy the wiring stuff when I'm into it but then again it's not my only job and they've always been simple projects, nothing like this hahaha
 
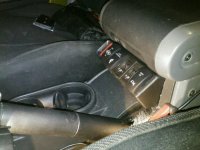
Here's a pic of the daystar mounted to the center console, 07-11 jk's can do this, 12 or newer has the power inverter here. This is a little tricky as the cut has to be perfect, and it is hard to slip the daystar under the mounting tabs to the inside of the center console, but I did it for my 2nd set of switches.
uploadfromtaptalk1389503448228.jpg
 
the problem with trying to order the wire from amazon, is you have to buy a spool. If you go to a car audio shop, they will have the spools, and then you can get several different colors to make your wiring easier, unless you label both ends of the wire before wirelooming it.
the wire is usually referred to as Primary wire. Car audio shops use it under the hood for alarms, etc.
it is usually 0.15-0.20 ft
Let me know if you have any other questions
Good Luck!

Just picked up 15 feet of 16g wire in 5 different colors - $17 at my local Auto stereo place - good deal I thought.
Project has gone very well, just about done now.
 
Last edited:
Got the Bussmann panel, and switches, and quick disconnects done yesterday. It was my first time soldering, consequently it was a good thing there were 50 wire terminators - I easily made 20 mistakes with bad crimps, forgetting seals, etc.

I tested all the switches and relays with two 6v lantern batteries in series. :rock:

Being a complete newb, I discovered that a 6v volt battery is enough to directly activate a relay, but not enough to activate the relay through a switch. Since the switch and the relay both worked independently, and my meter indicated the same output, this was a puzzling 20 minutes of my life. Ohm's law is probably laughing at me. :idontknow:

Just ordered up the rugged ridge a-pillar pod for ~$20 on Amazon.

So far so good.
 
Nice davantalus! Is the a pillar switch mount for four switches? I have not done it, but I believe you can cut a hole for the 5th switch and there is room for it
 
Top Bottom