You are using an out of date browser. It may not display this or other websites correctly.
You should upgrade or use an alternative browser.
You should upgrade or use an alternative browser.
2007-2011 Jeep Wrangler JK EGR Replacement
- Thread starter JeepFan
- Start date
fiend
Caught the Bug
Guess my luck ran out this time. No matter what I tried, the code came back almost immediately. Looks like I just got a bad part. I like O'Reillys... this is the first time one of their parts have failed me. Why oh why couldn't it have been easier to deal with!? :badday"
They’re pretty good with warranties. See if they’ll replace it free of charge.
Sent from my iPhone using WAYALIFE mobile app
If
I hope this helps anyone feeling adventurous repairing their own Jeep JK.
Thanks a ton mate. I actually joined the forum to see your write up. I'd watched a few vids, but really this walks you right through it.
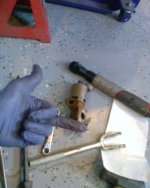
It was a brutal job to do especially because on one hand I dont have a thumb that works.
Its one of those jobs where you just have to have the right mindset and accept the hidden bolt may take 2 or more hours to get out.
If you have the auto tranny I highly recommend a stubby ratcheting wrench with the lowest profile and thinnest end ring you can find. Mine was too thick so it wouldn't allow getting between the dipstick and valve, and when it did the body of the valve pushed it too far from the bolt to get an angle on it. and I just used a regular stubby with the offset side toward the bolt. I stopped counting at 400 micro turns, and I couldn't use my fingers to turn it, right until it was out (ie not at all).
The whole job isnt fun, but today I have an extra $700 bucks in my pocket and that is definitely good. Plus it was a challenge I wanted to give er on, I been hearing about the 3.8 egr nightmare for years and now Im in the club!
Again, Thanks!
jkwaterdog
New member
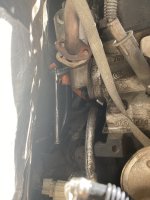
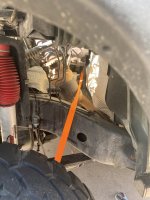
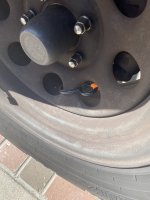
Super Helpful. thanks a bunch. i did get hung up with the pry bar for the dipstick tube. i just couldnt get it to move enough. I opted to use a strap on the dipstick tube. fed the strap behind the enging to the other side, hooked it up to my driver side tire rim and gave it a couple good wratchet pulls. I found it pulled the tube just enough to allow a socket wrench on the top egr bolt. (make sure the top of the dipstick does not bind on the wiring harness). thanks again for the great write up. I posted a couple pics of my strap option incase anyone cares.If your 07-11 JK Check Engine Light (CEL) has been coming on intermittently or is on at all times while the engine is running, you may have a bad Exhaust Gas Recirculation (EGR) Valve. Three possible diagnostic trouble codes (DTC) can be set in the Powertrain Control Module (PCM) if the EGR valve is bad. The specific codes are P0404, P0405 and, P0406. You will need code reader to plug into the OBD-II connector under the drivers side dash panel. If you do not have access to a code reader, head on over to https://project-jk.com/jeep-jk-writ...le-codes-dtc-how-to-check-them-what-they-mean to learn how to check for codes the manual way.
In my case, my 2009 JK has had the CEL coming on intermittently for about two years. Since I have a Supechips programmer, I was able to determine the code (P0404) was indeed related to a degraded EGR valve sensor performance.
While replacing an EGR valve is a relatively easy job, the fact that it is located in a very tight location on the JK will make it very difficult to replace. Consider yourself forewarned!
The EGR valve on a JK is located on the back of the passenger side cylinder head between the engine and the firewall.
What you will need:
- Replacement EGR valve. I chose the Dorman OE Solutions from O’Reilly Part# 911-242. It comes with two required gaskets and 4 new bolts.
- ¼” ratchet with a 4” Extension and 8mm socket.
- 10mm gear wrench and a regular 10mm open and box end wrench.
- 1 small mechanics pick.
View attachment 289565
View attachment 289564
The first thing you will need to do is disconnect the battery. This will clear the code and reset the EGR learn cycle from the PCM. Failure to clear the EGR learn cycle could trigger the CEL after you install the new valve.
The easiest way to get to the EGR valve is to remove the right front tire and RF inner fender liner.
What you will see with the fender liner removed.
View attachment 289566
Now would be a good time to spray penetrant on the four bolts. Remove #6 plug wire from the spark plug to gain a little more access to the valve.
Remove the two 8mm bolts holding the tube to the valve. Note: Be careful not to bend the tube!
With your 10mm gear wrench, loosen the lower 10mm bolt holding the valve to the cylinder head. This bolt will be extremely tight. Make sure your gear wrench is on the bolt all the way to prevent rounding off the head of the bolt! Do not remove completely.
Now the fun part…If you have an automatic transmission, you will need to slightly bent the dip stick tube towards the firewall to gain better access the top EGR valve bolt. Use a small pry bar between the valve and tube and bend back slightly. Chances are the tube will spring back to its original position so just work it a bit until you have better access to the bolt. This bolt is also very tight and to loosen it, you may need to double up two wrenches. What really sucks is as you loosen the bolt it will push up against the tube. With your 10mm gear wrench loosen the top bolt until it is completely unscrewed from the cylinder head leaving the bolt and wrench somewhat pinched in place. Now, with your second 10mm wrench or by hand, remove the lower bolt completely.
You should now be able to push the valve and wrench back towards the firewall and down slightly to gain access to the five-pin connector on top of the valve.
To remove the connector, you will need to slide the red lock clip back towards the firewall with your pick. The connector is very similar to the connector on your hard doors wiring harness. Once the red lock clip is pushed back (about 1/8”) you should be able to squeeze the top of the connector-locking tang and remove the connector. This will prove to be easier said than done. :crazyeyes:
View attachment 289568
After you unplug the connector, you can remove the EGR valve.
View attachment 289569
Install the new EGR valve in the reverse order starting with installing the two new 10mm bolts on the valve with the new metal gasket. Put a little anti-seize on the bolt threads. Now, work the valve into position, connect the electrical connector, and push in the lock pin.
With the valve in position, start threading in the lower 10mm bolt by hand. (Do not tighten) Be very careful not to cross thread the bolt! It should go in somewhat easy. Then, very carefully start threading in the top bolt with your gear wrench. Snug up both 10mm bolts to acquire an even seal. Do not over tighten.
Install the EGR tube with the new gasket and 8mm bolts. Do not forget to add a little anti-seize to the threads. These bolts do not need to be super tight; just snug!
Re-install the plug wire, connect the battery and, install all the other bits you removed.
I hope this helps anyone feeling adventurous repairing their own Jeep JK.
Attachments
JeepFan
Hooked
Glad it all worked out. I like how you used the strap to hold the dipstick tube out of the way!Super Helpful. thanks a bunch. i did get hung up with the pry bar for the dipstick tube. i just couldnt get it to move enough. I opted to use a strap on the dipstick tube. fed the strap behind the enging to the other side, hooked it up to my driver side tire rim and gave it a couple good wratchet pulls. I found it pulled the tube just enough to allow a socket wrench on the top egr bolt. (make sure the top of the dipstick does not bind on the wiring harness). thanks again for the great write up. I posted a couple pics of my strap option incase anyone cares.


