UNDER the JL WRANGLER RUBICON : A Look at Suspension / Steering Components & MORE!
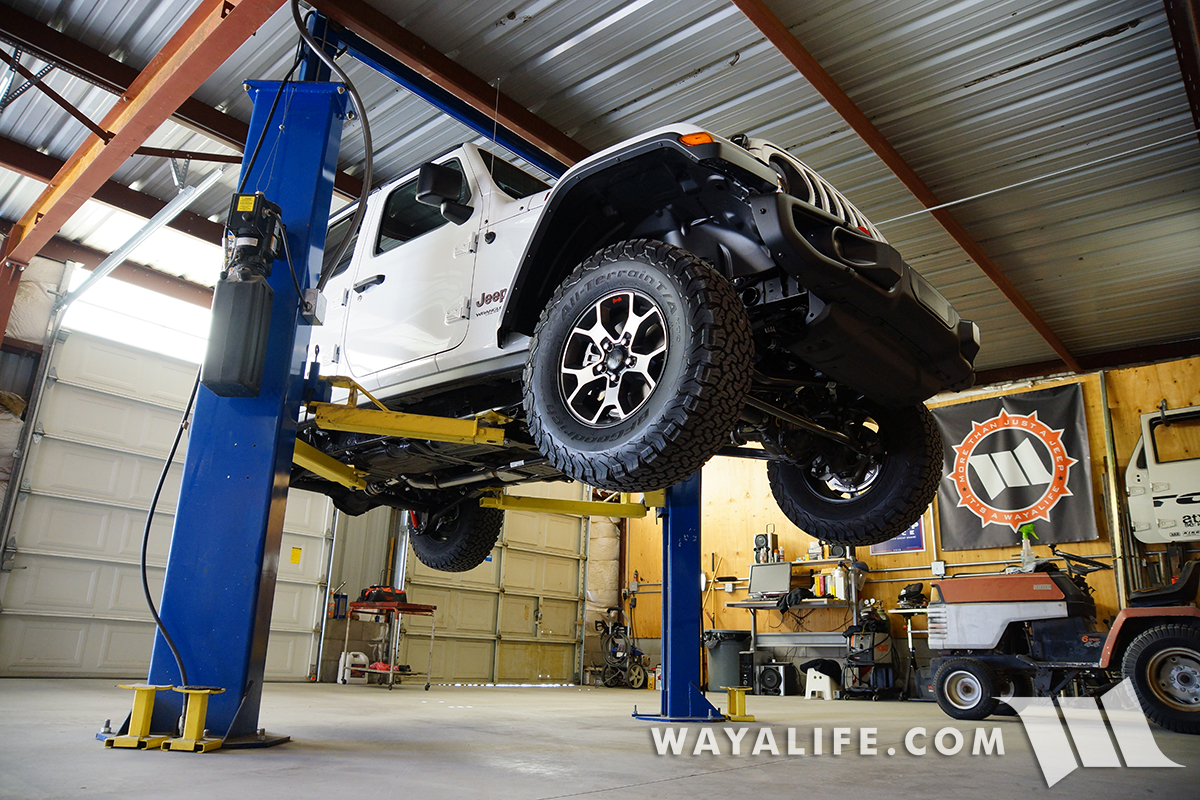
One of the first things that Cindy and I did soon after bringing home our brand new, Jeep JL Wrangler Rubicon Unlimited, was rack it up so that we could get a good look at everything underneath and while everything was still clean. Certainly, it's a lot easier to photograph and handle things like suspension and steering components, when dirt and mud isn't falling in your face. For those of you who are interested, these are the pics we took and hopefully, they'll give you a better idea of what you can expect to find, under a JL Wrangler.
Going up...
REAR END
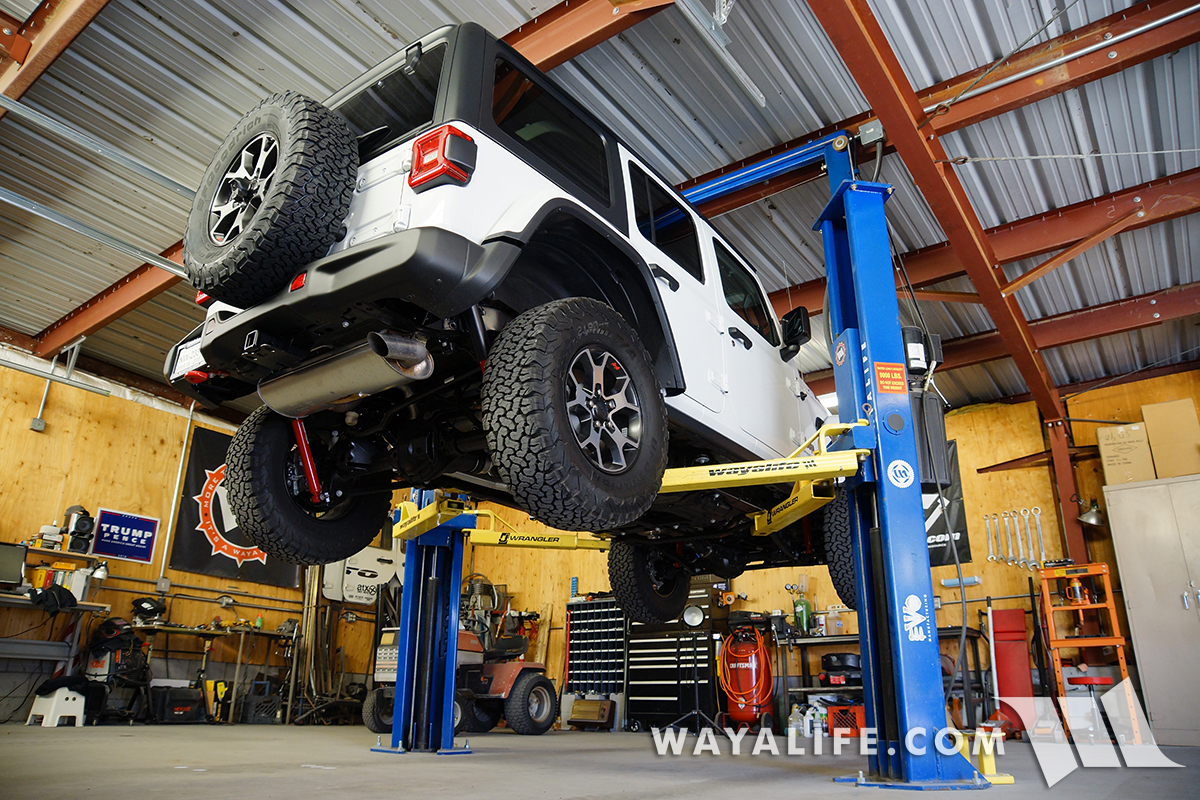
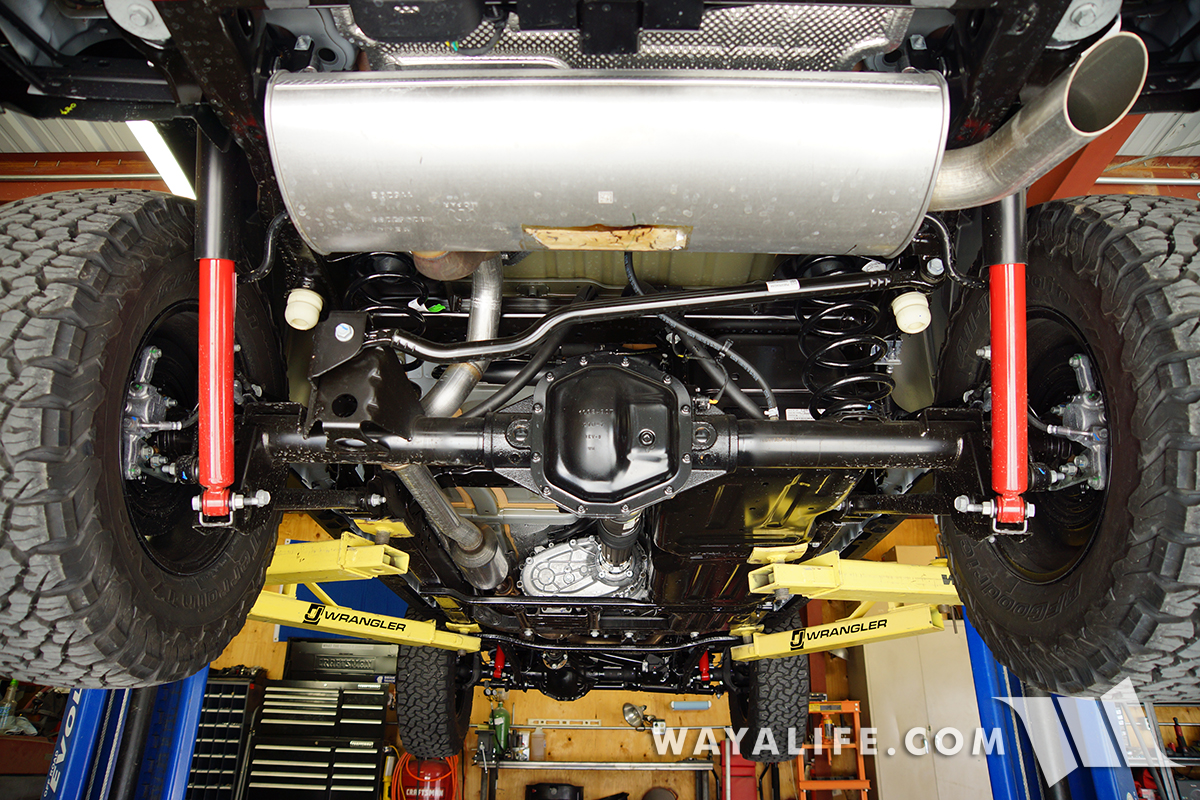
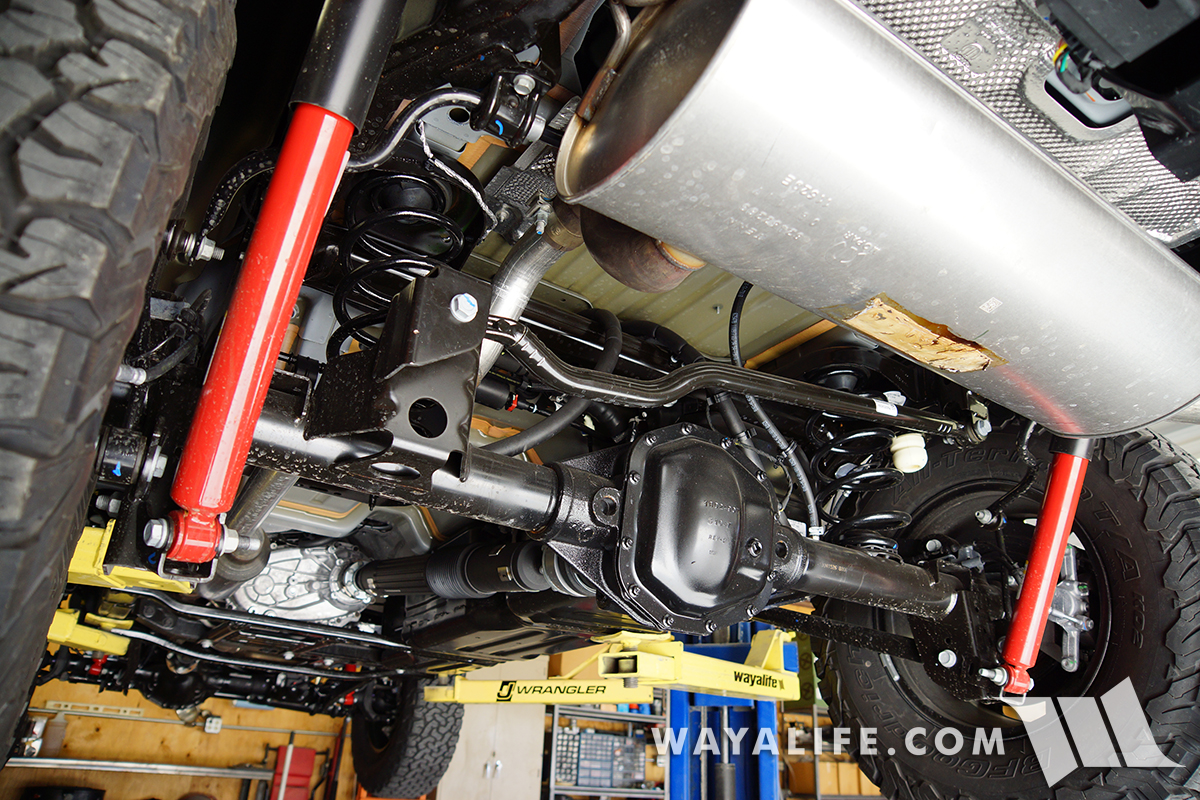
Okay, these first set of shots are all from the rear end and document in detail, some of components you'll most likely be working with there when lifting your JL Wrangler. First up, a total overview.
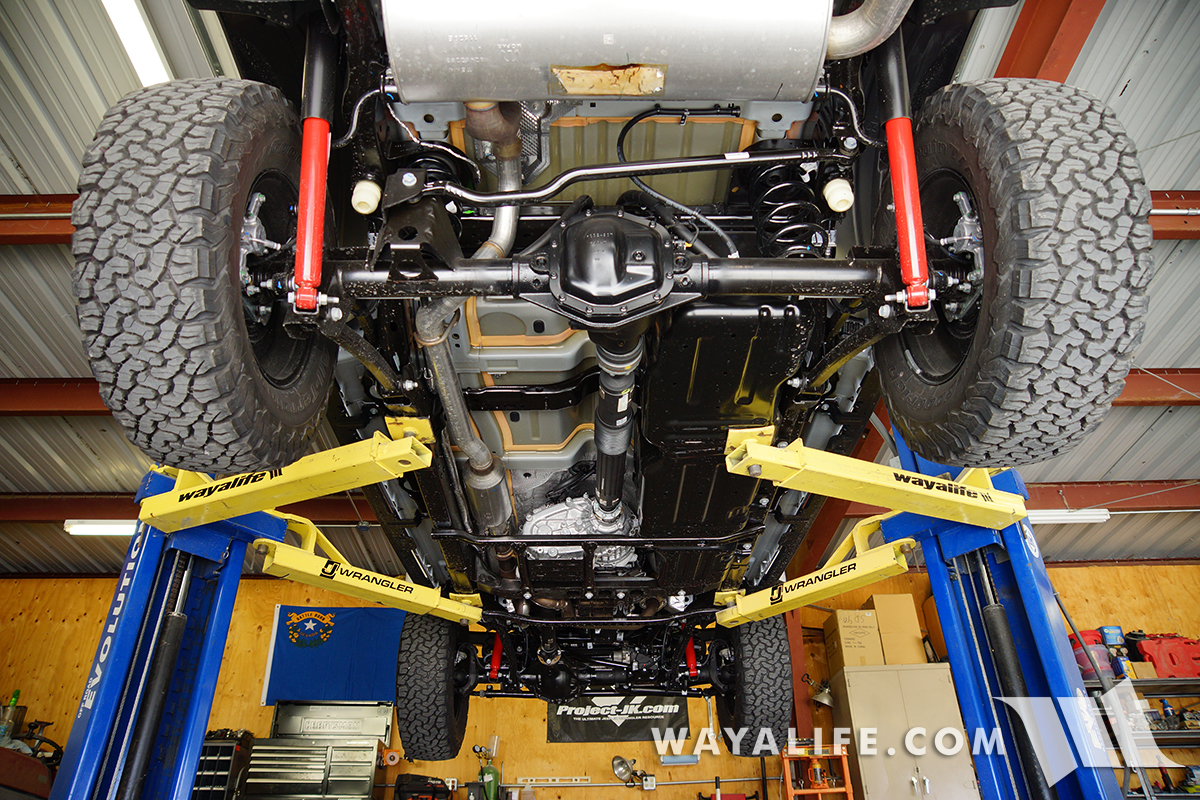
A couple of shots that give you a better look at the JL Wrangler muffler and its all new Dana M220 rear axle.
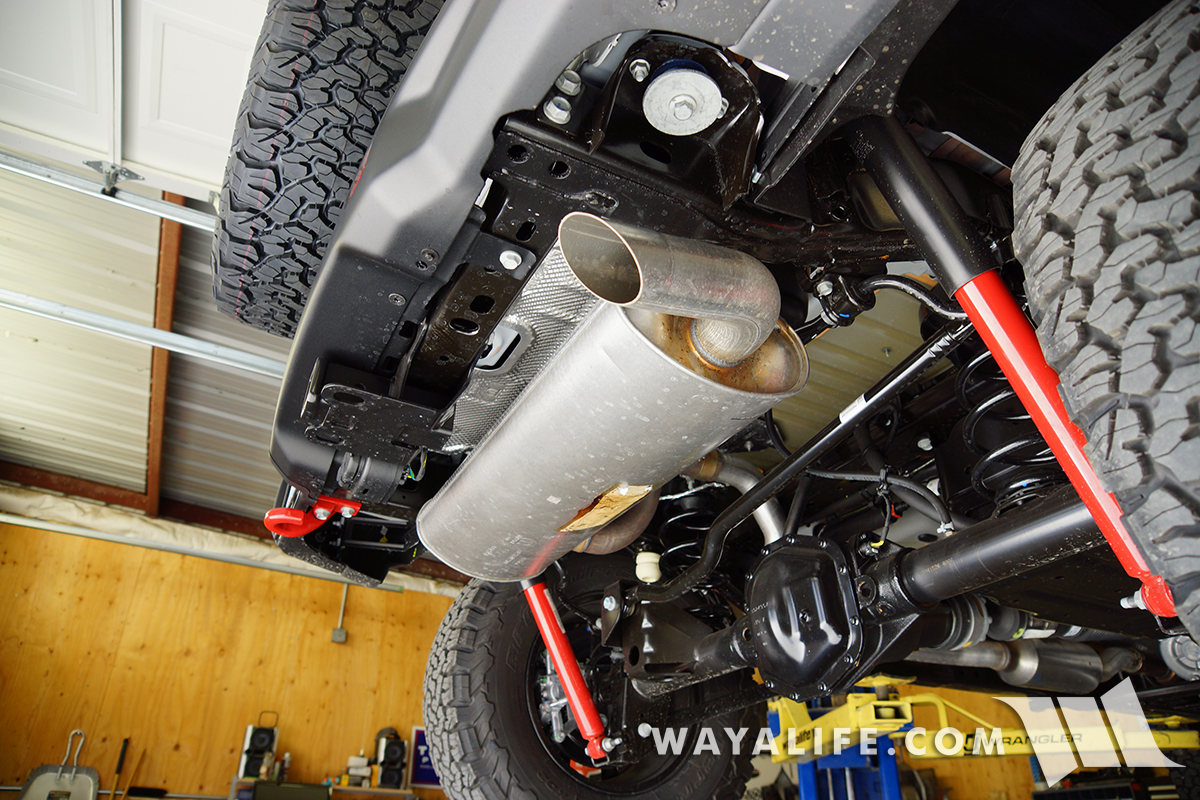
A side shot of the muffler.
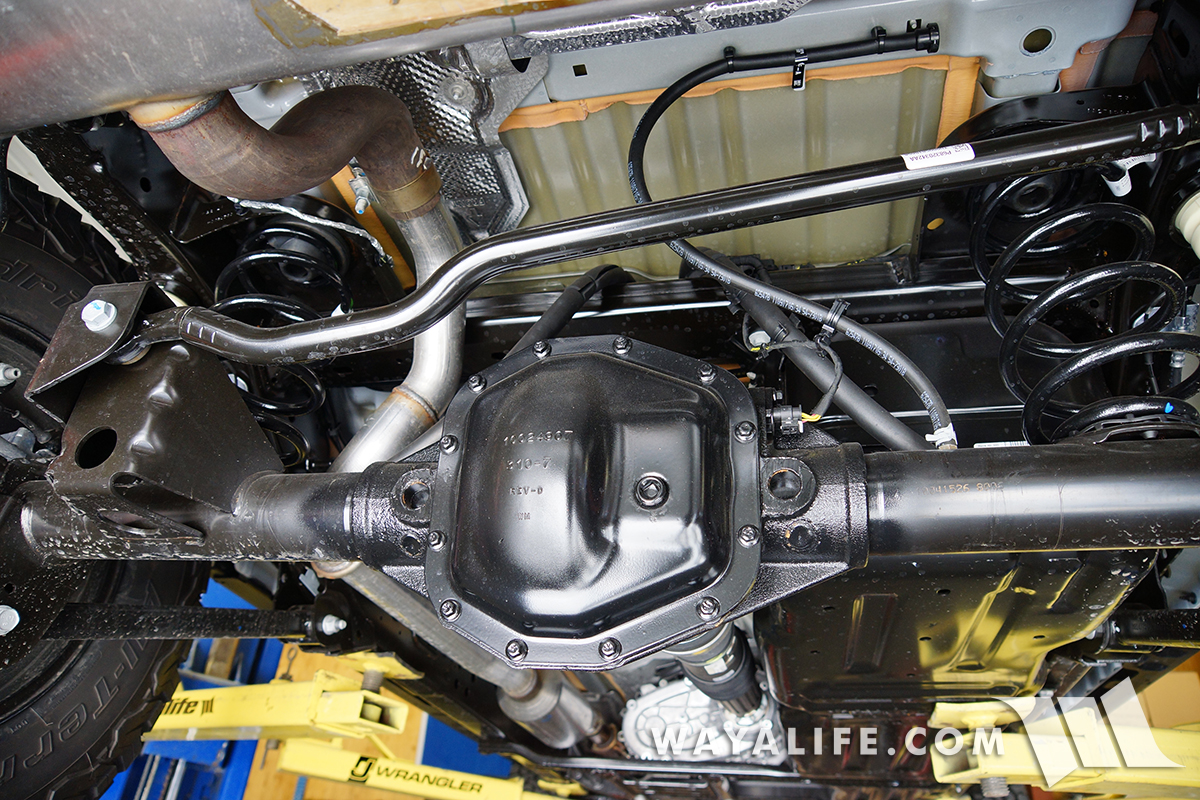
While similar to a Dana 44, the shape of the Dana M200 is definitely new and unique to it.
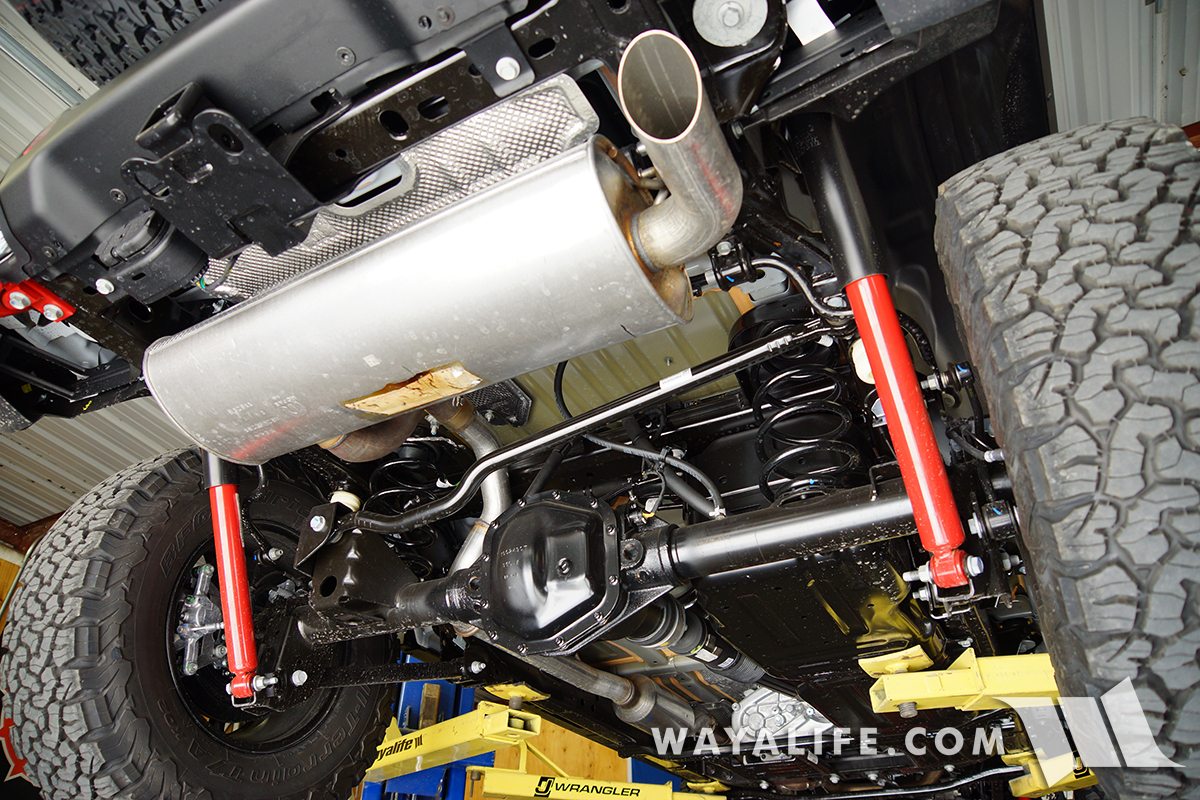
This passenger side 3/4 shot of the rear end shows how the rear shocks are now mounted on the outside of the frame rails. A nice improvement over the JK setup.
It's a little hard to see but here's a closer shot of where the shock is mounted on the frame rail. Nice thing is, it now uses a through bolt instead of a bar pin.
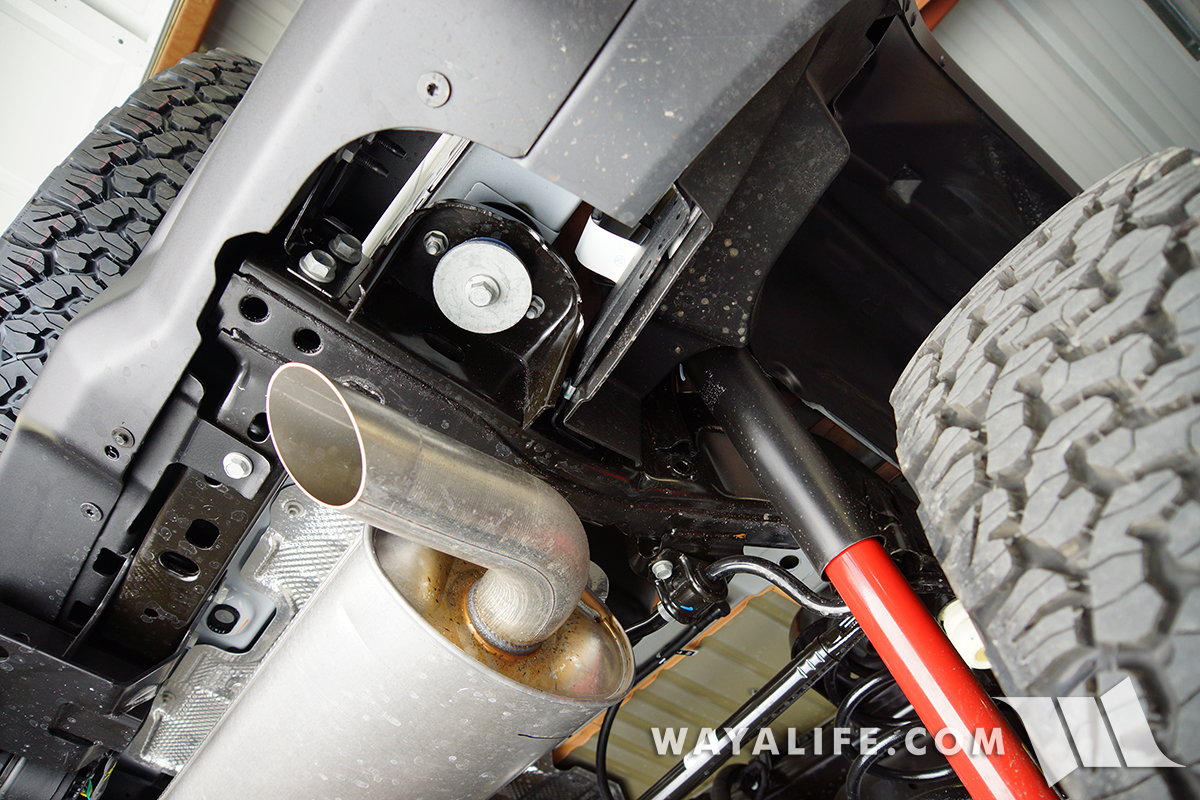
Here's a closer look at the passenger side rear coil, track bar frame mount, bump stop, shock and sway bar.
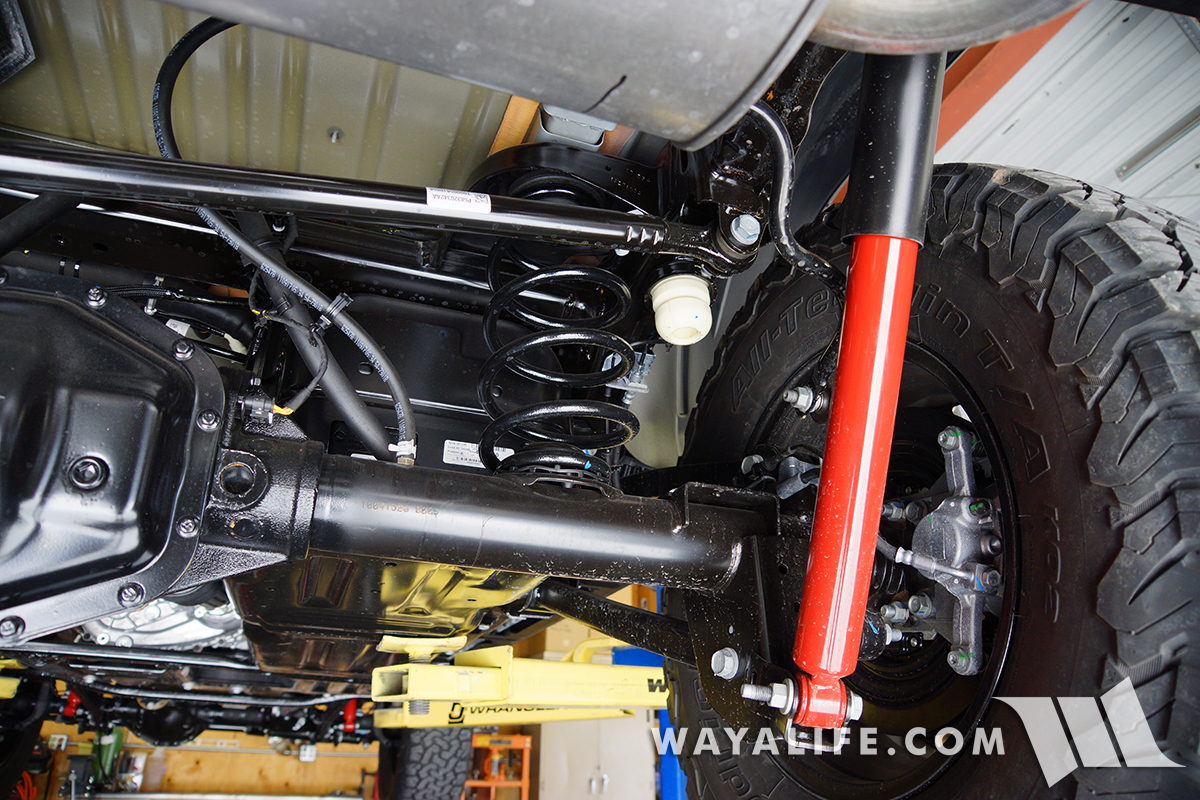
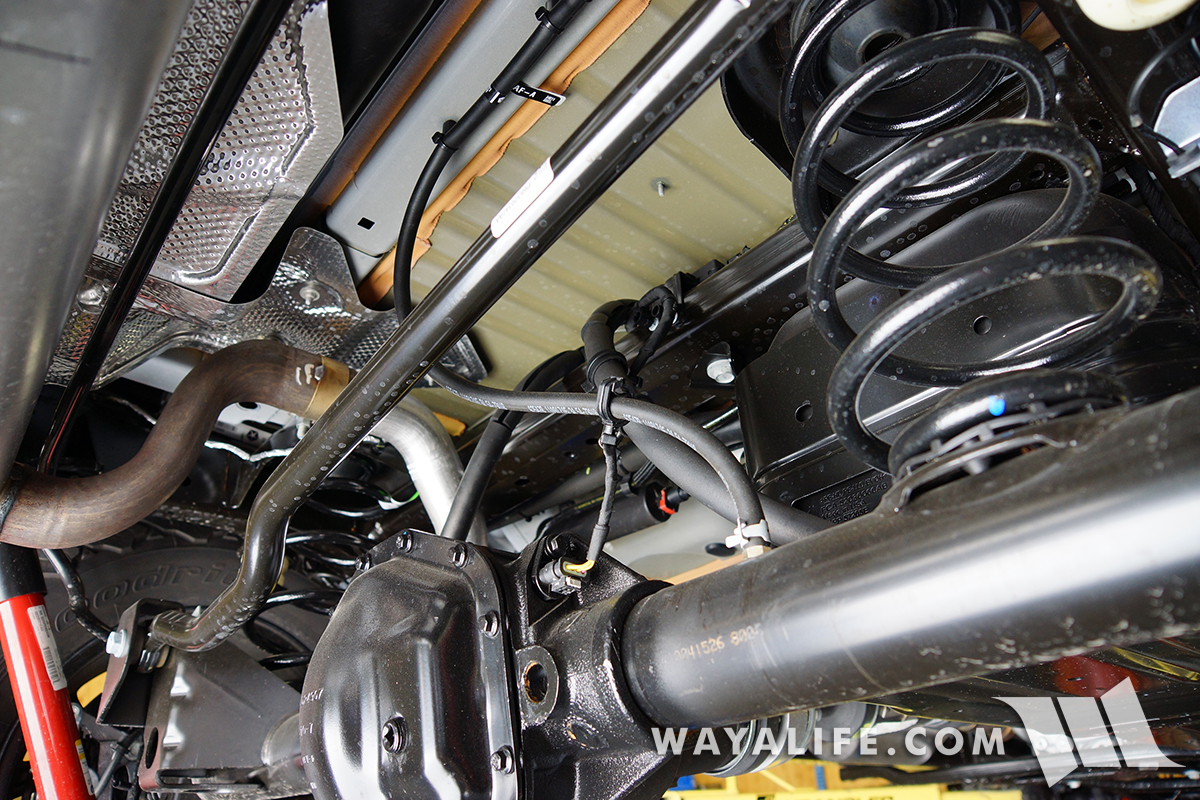
A view looking across the length of the JL Wrangler rear track bar. As you can see, it's bigger, beefier and shaped differently than the old JK.
And, this is the driver side so that you can see the bigger, beefier and raised axle side track bar mount.
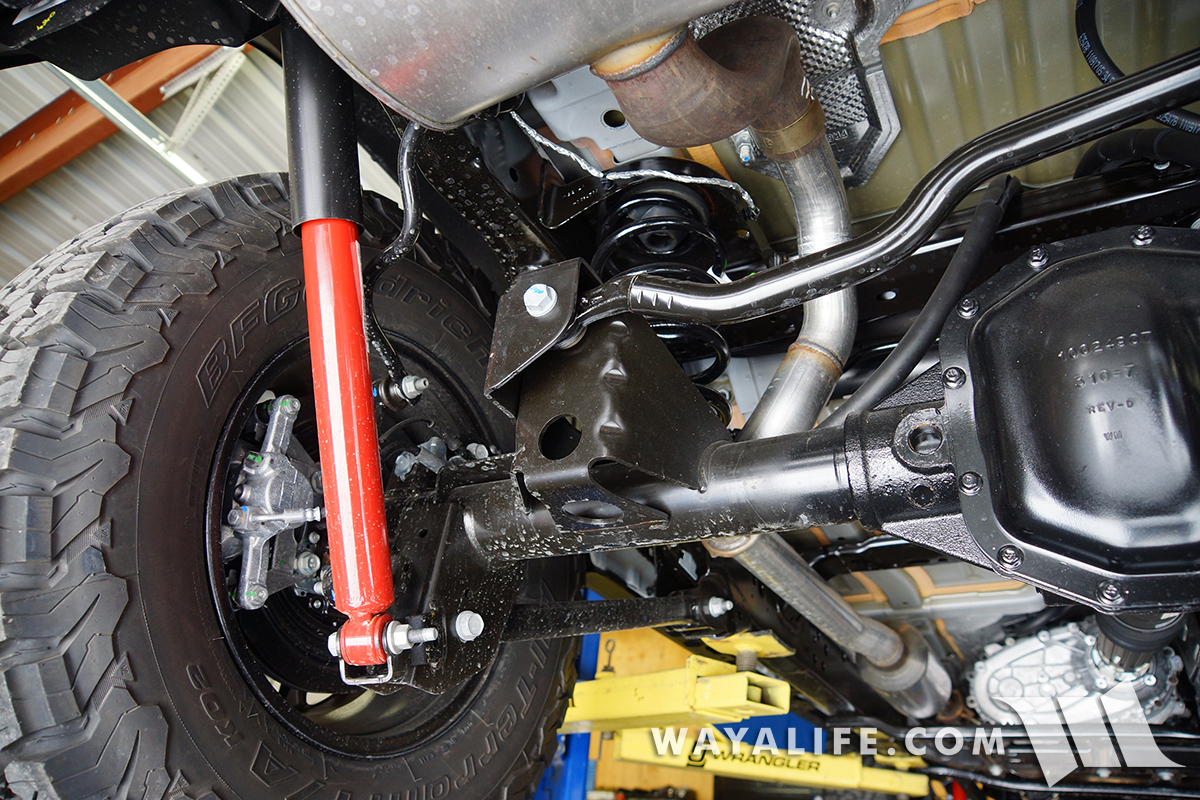
3/4 shot of the rear from the driver side.
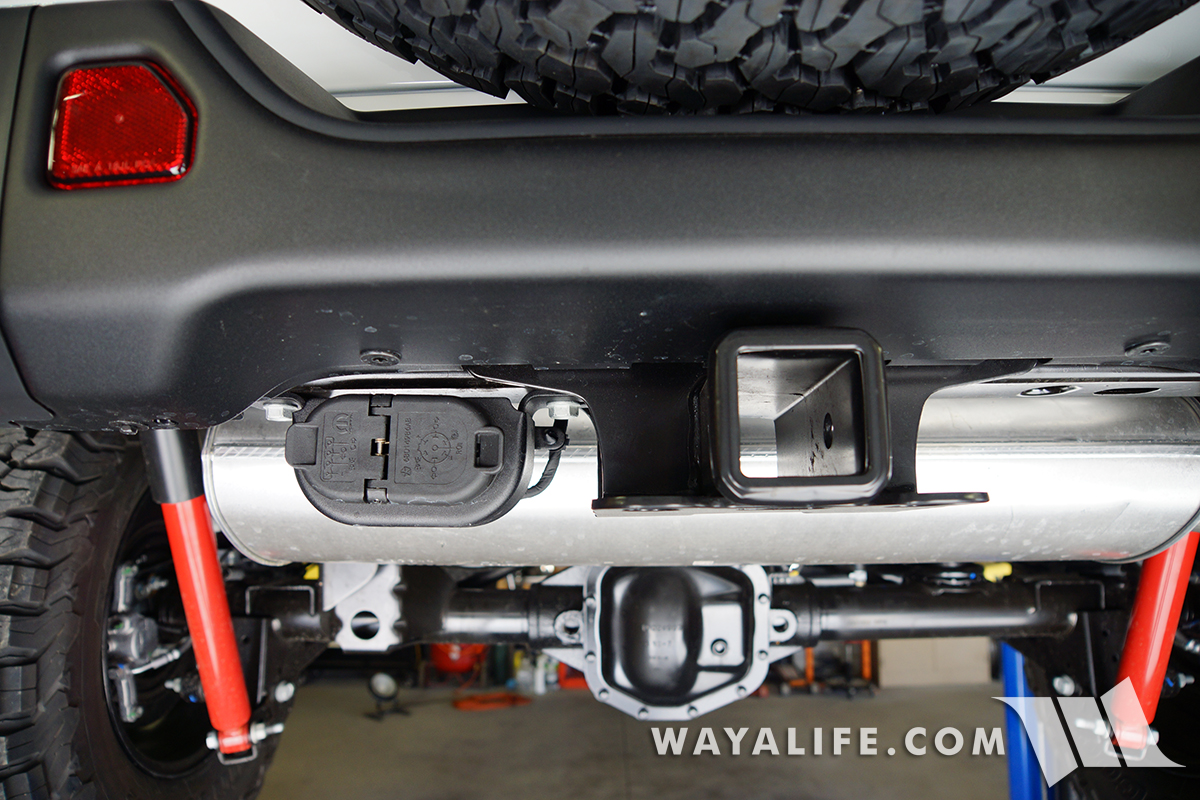
We ordered our JL Wrangler with the tow package and taking a step back, you can see what the hitch receiver looks like mounted under the rear bumper.
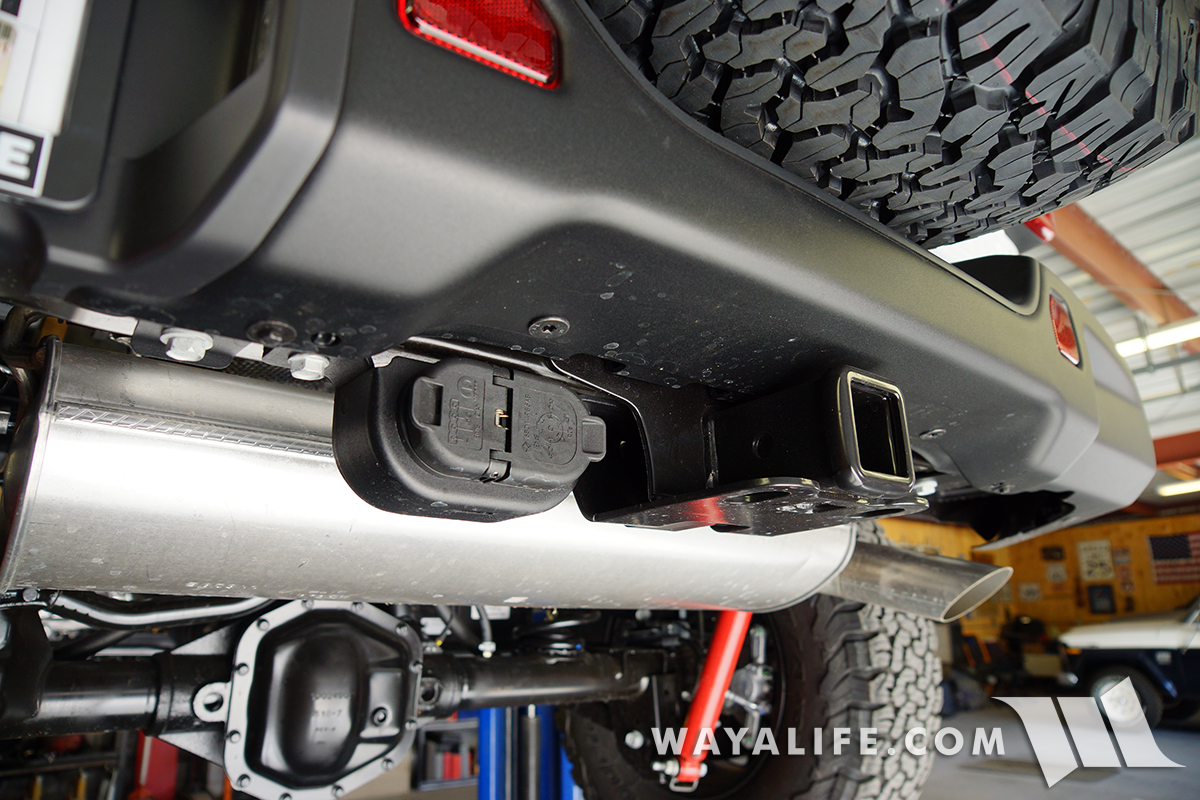
Here you can see that unlike the JK before, the JL Wrangler tow package comes with a weatherproof, standard 7-Pole and 4-Pole Trailer Connector Socket.
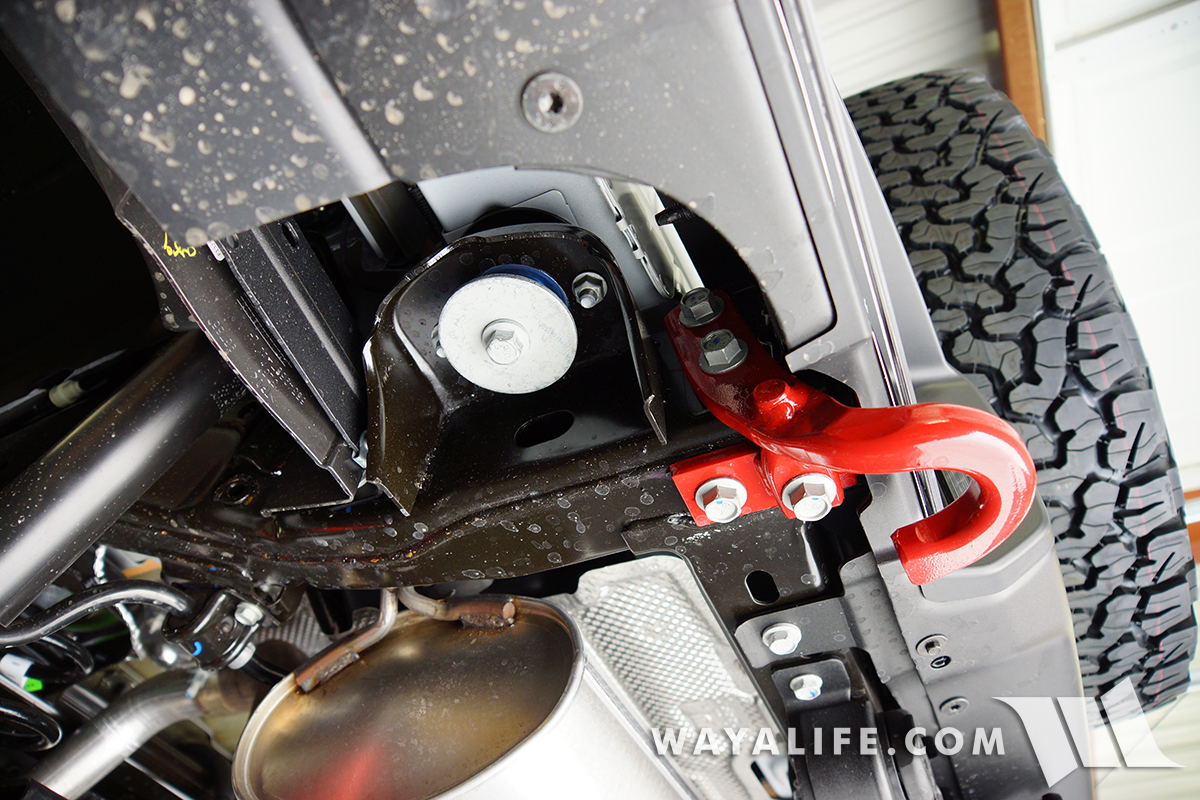
Being that we do have a Rubicon, it did come with a nice red J-hook style tow hook mounted on the driver side frame rail.
MIDDLE
This is a shot looking forward at the belly of the JL Wrangler from the rear axle. As you will see, the EVAP canister - also known as, the 'rock target', has been relocated out of the way and up behind the passenger side rear fender liner.
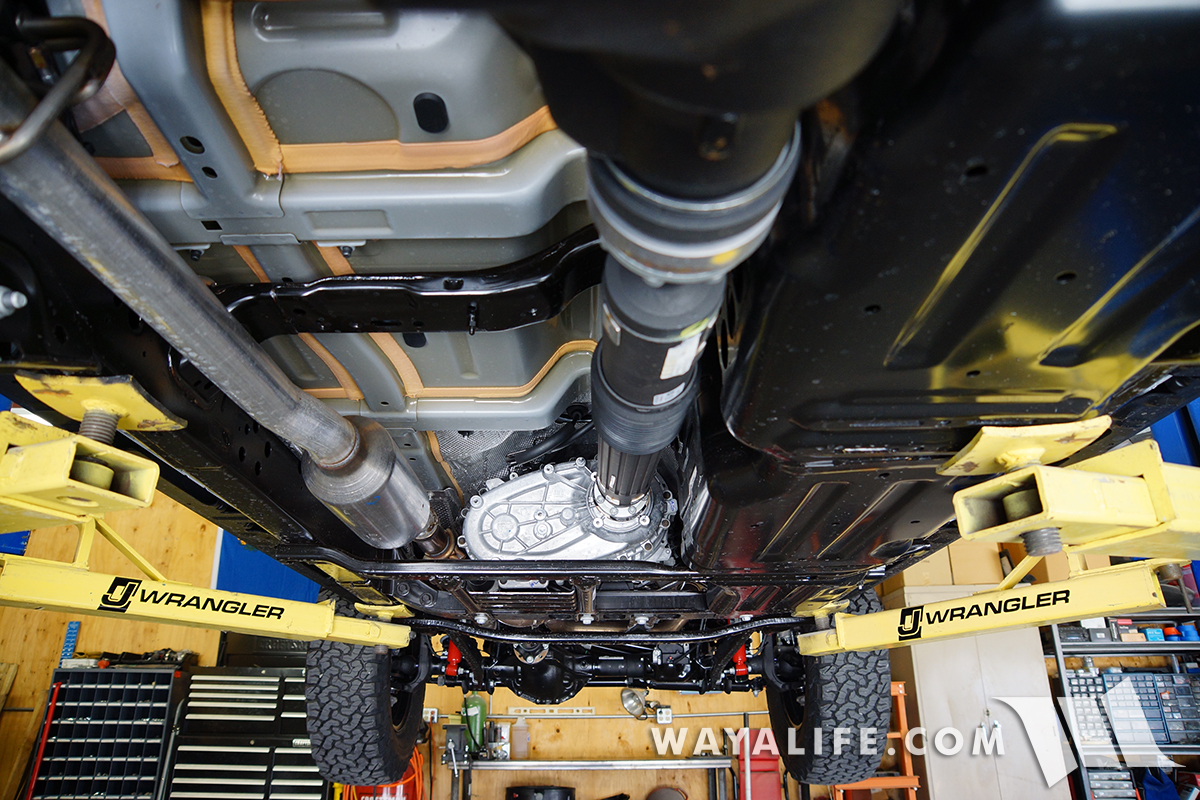
As you can see, the JL Wrangler exhaust system still utilizes a resonator and the rear drive shaft is still an rzeppa design, just like the old JK.
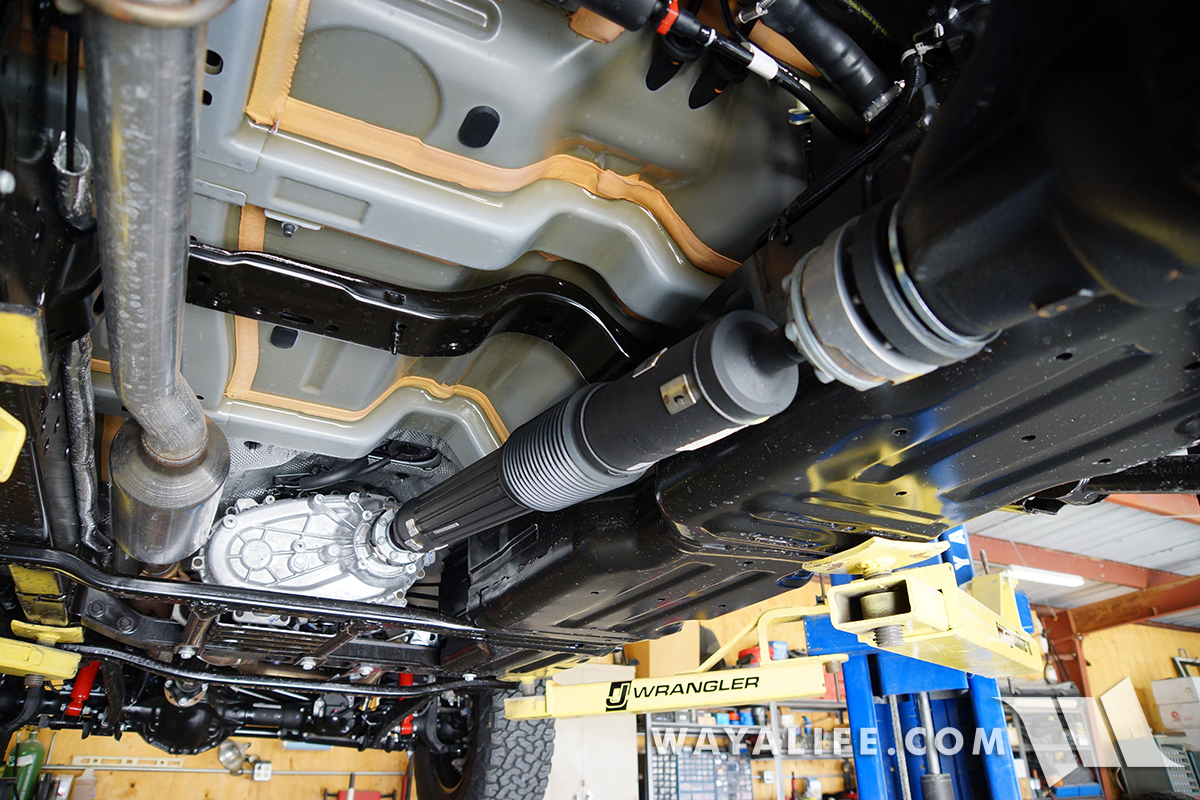
Shot of the rzeppa CV joint at the standard cut, Dana M220 pinion. As you can see, the CV boot retainer is now flared.
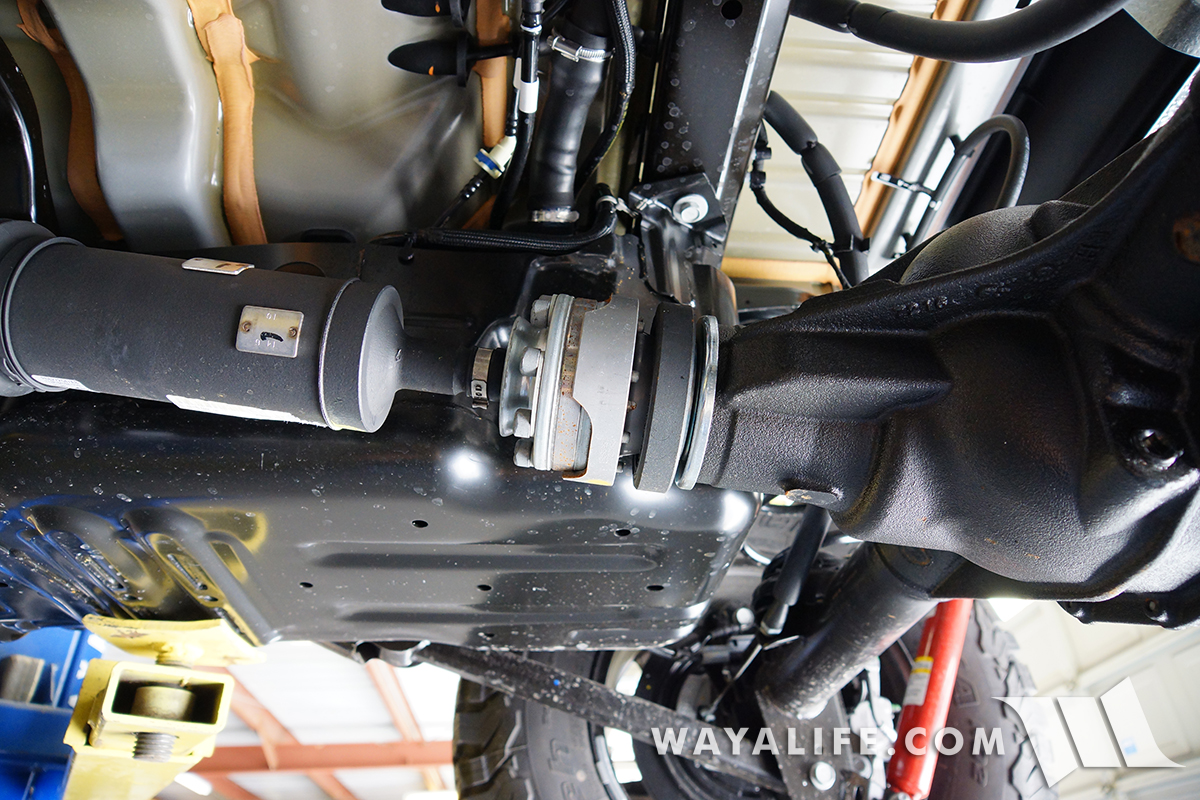
Although the housing has been redesigned, Rubicon model JL Wranglers still have an NV241OR Rock-Track transfer case.
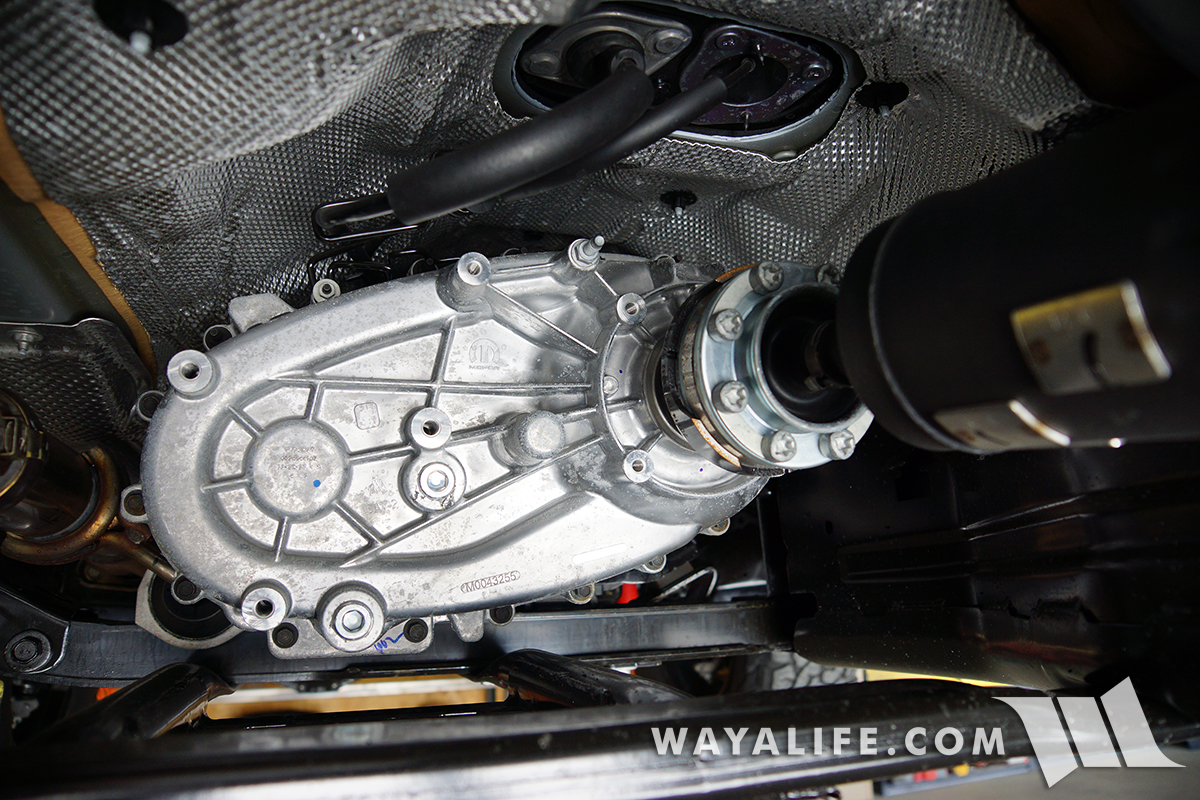
Shot of the rzeppa CV joint at the transfer case output shaft.
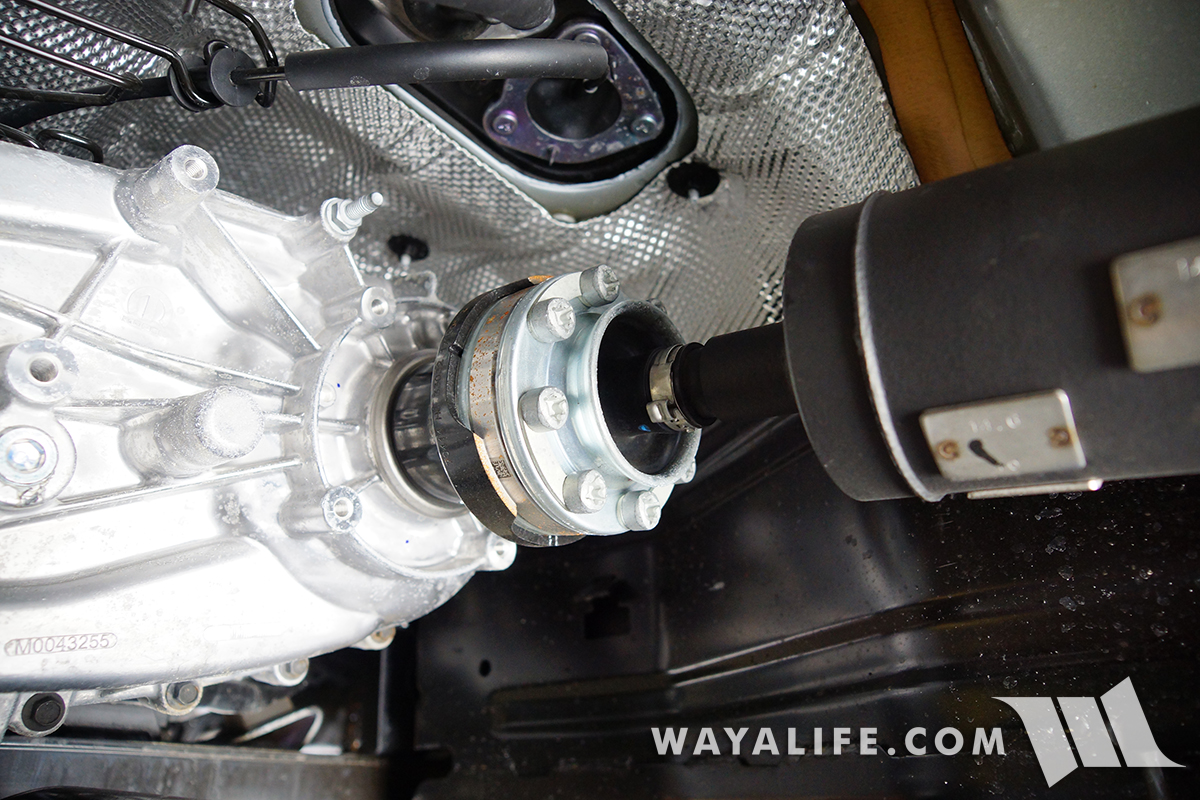
Here are a few shots that show what the JL Wrangler transfer case skid plate now looks like.
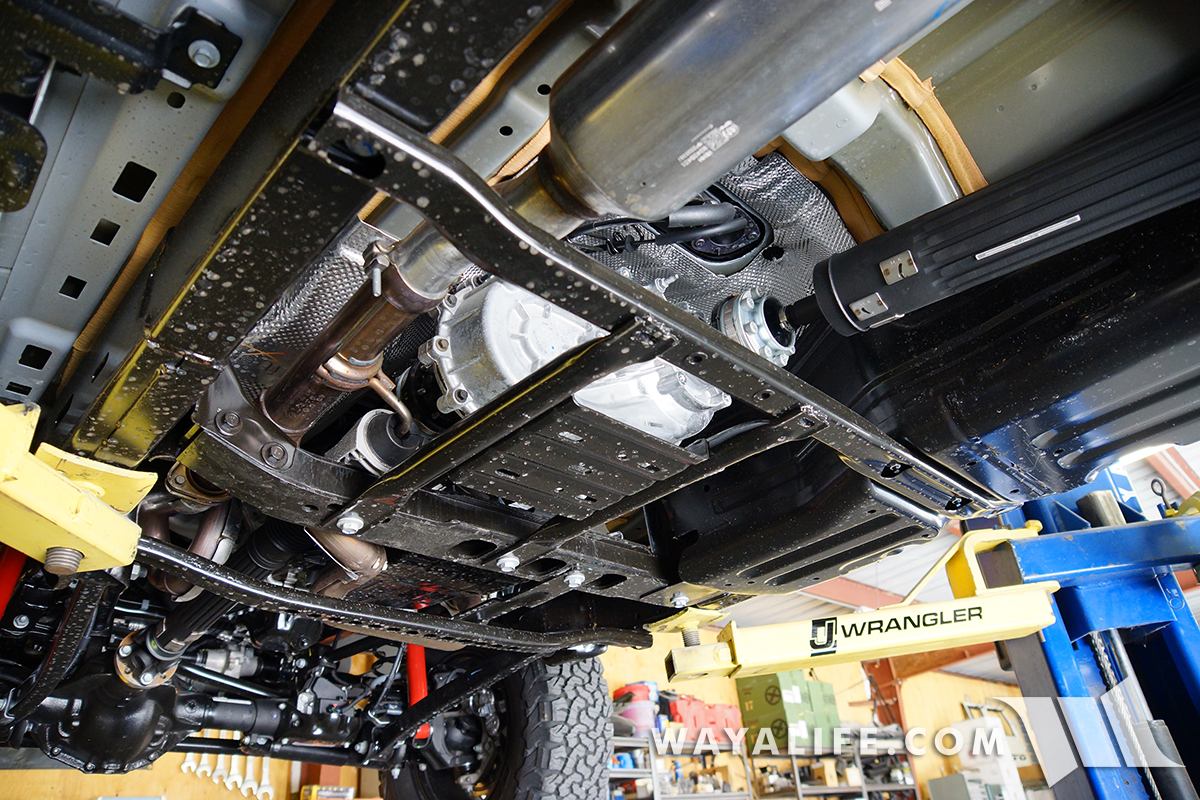
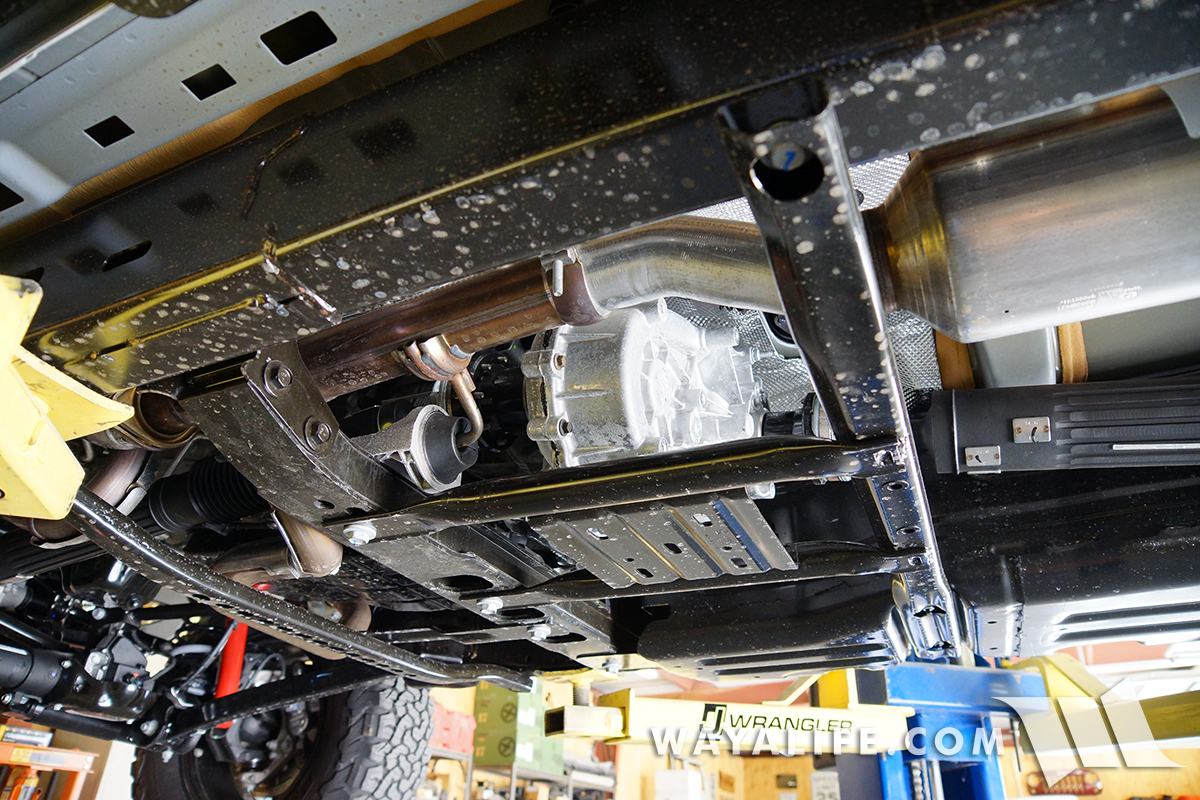
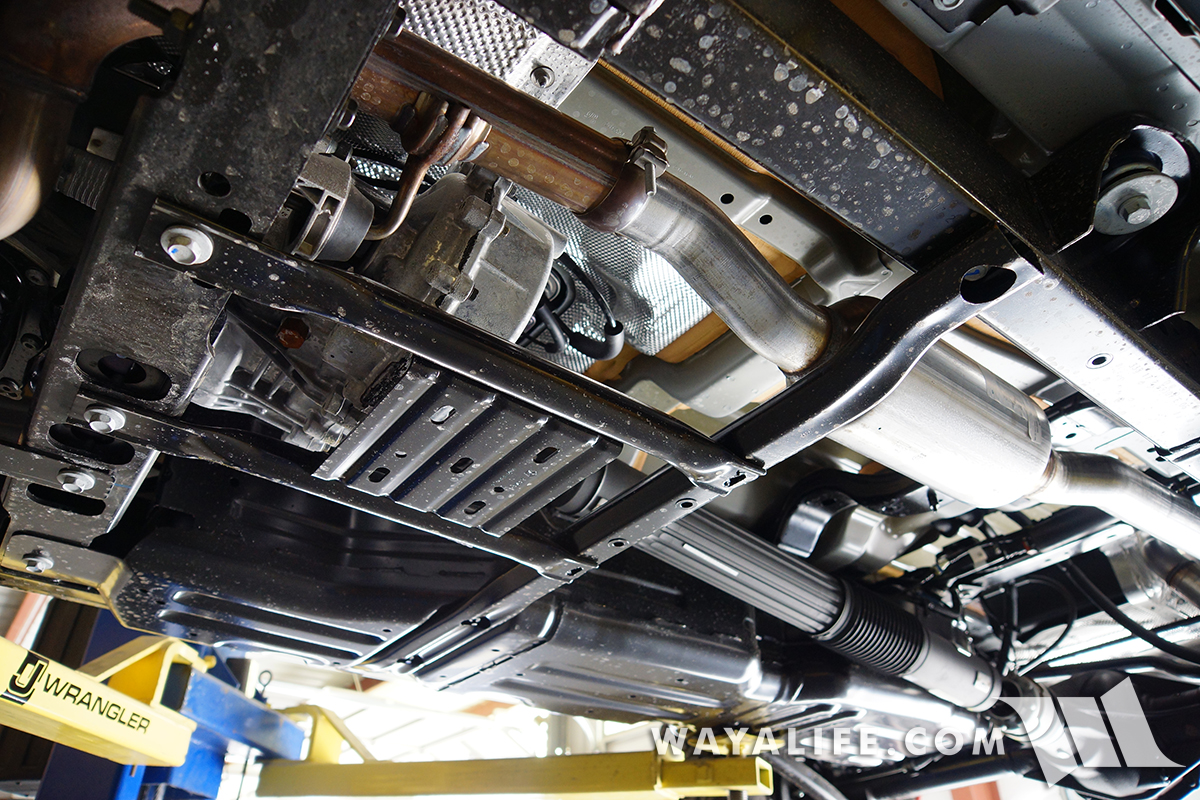
A few more shots of the transfer case skid plate being that it really takes a beating.
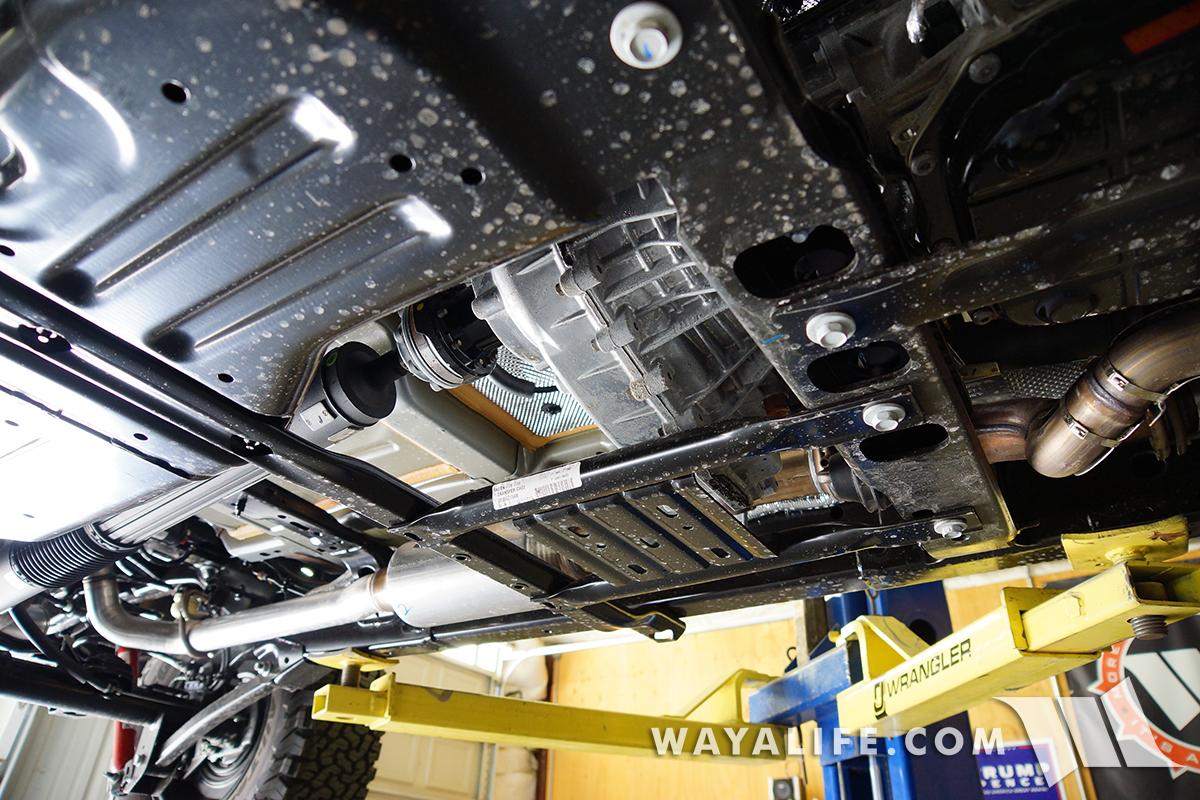
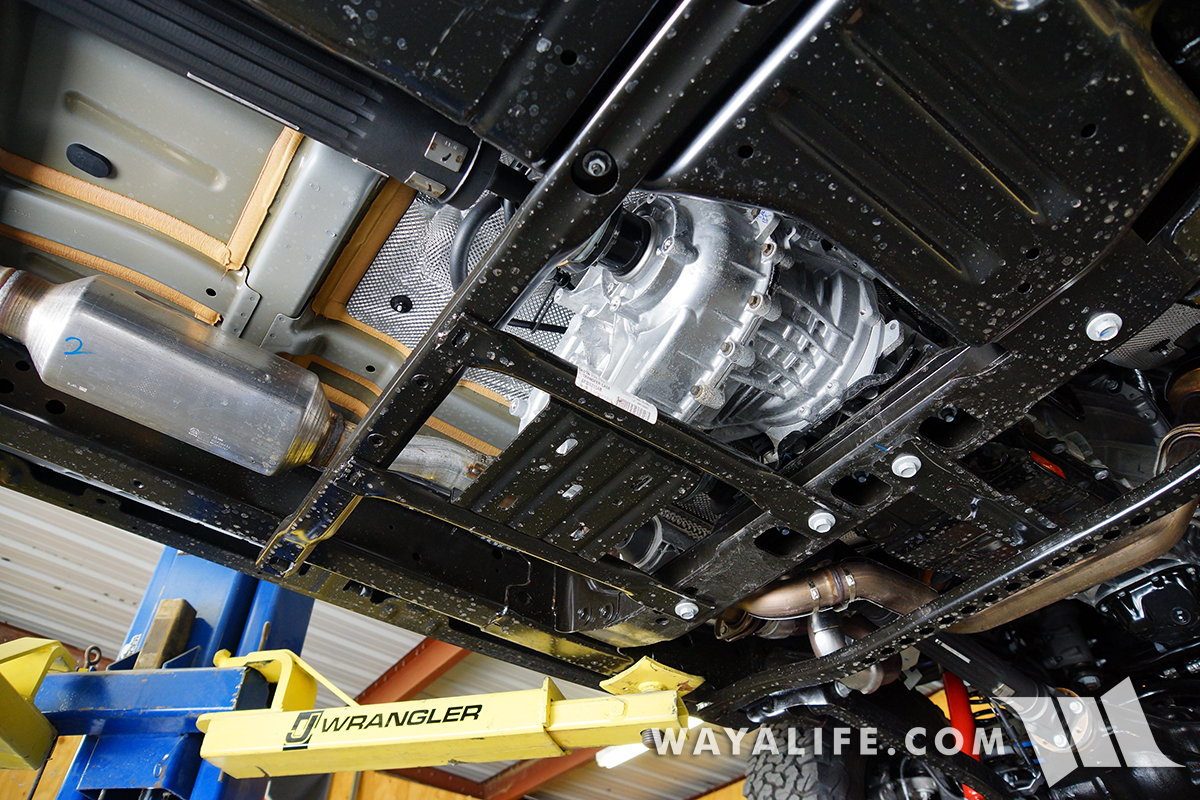
Even more than the transfer case skid, the gas tank skid plate is without question that takes the brunt of all abuse out on the trail. While the factory skids are still serving their purpose on our 2 JK's, they are beat to all hell and it's nice to see that Jeep has redesigned this skid to have more structural embossing and ribbing to help reinforce it.
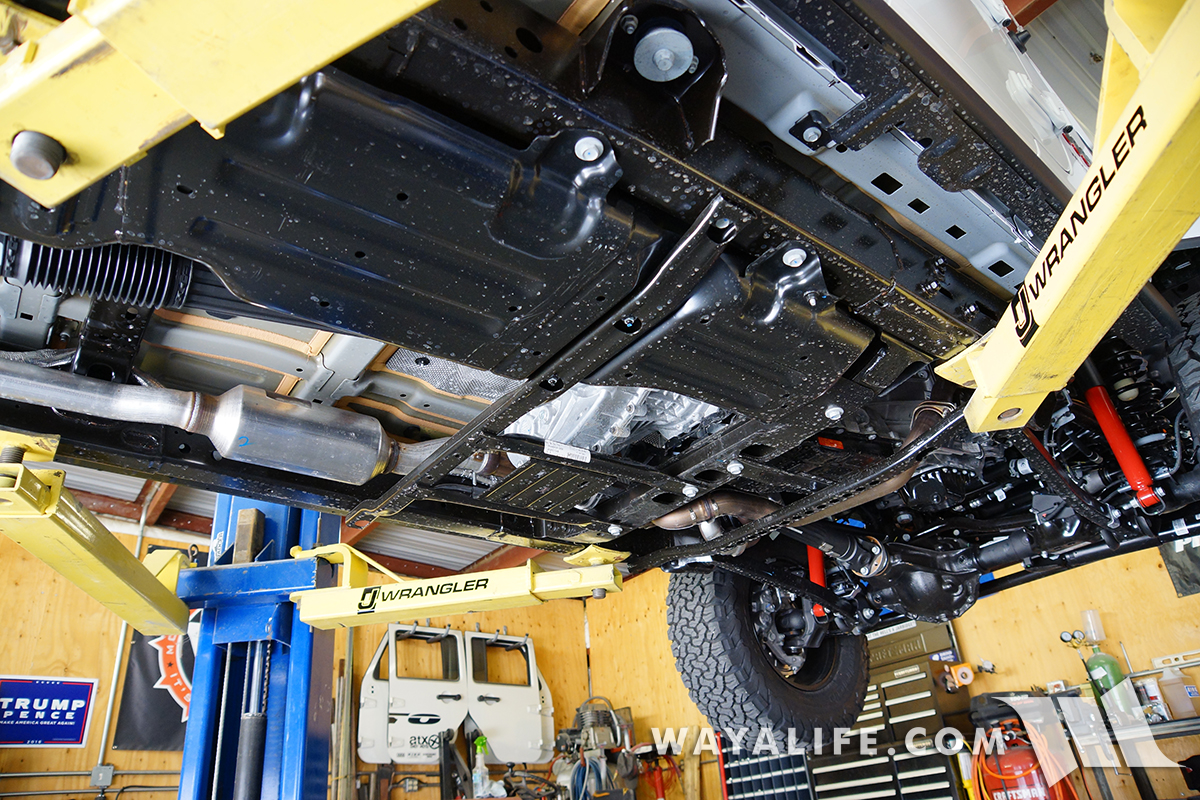
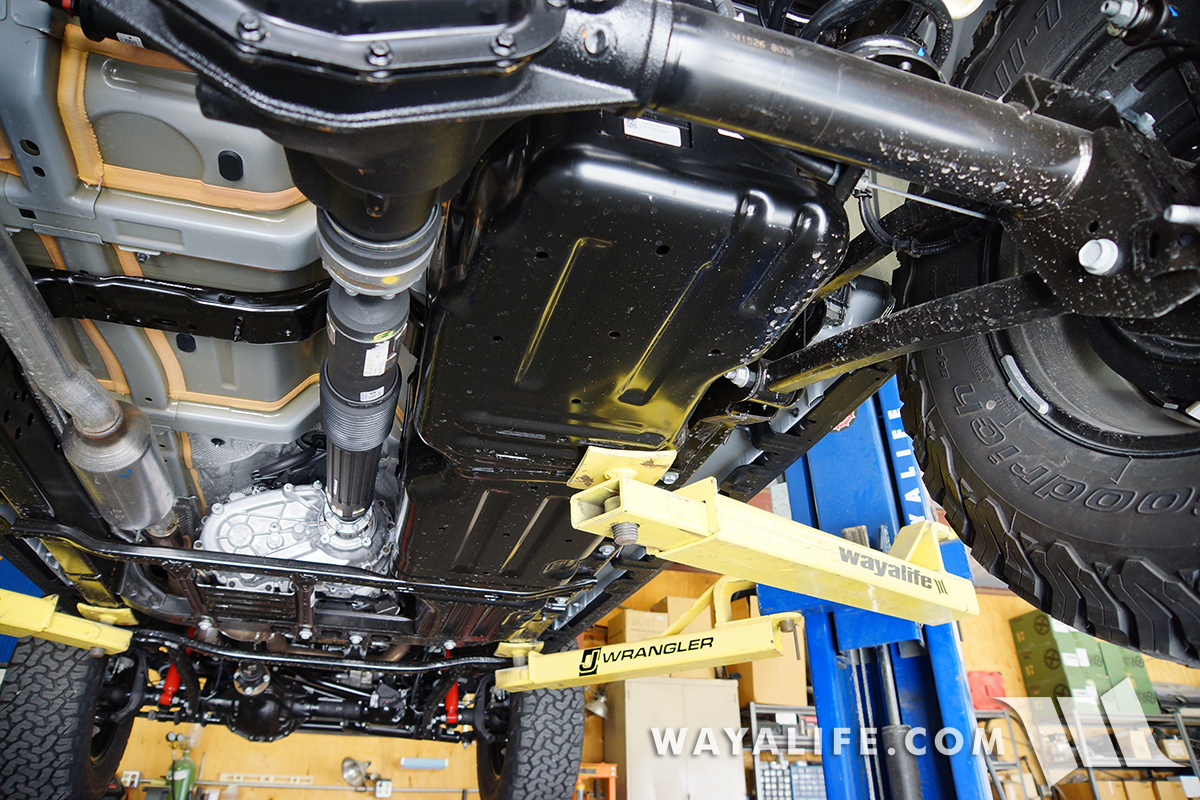
View from the middle of the JL Wrangler looking back toward the Dana M220 rear axle.
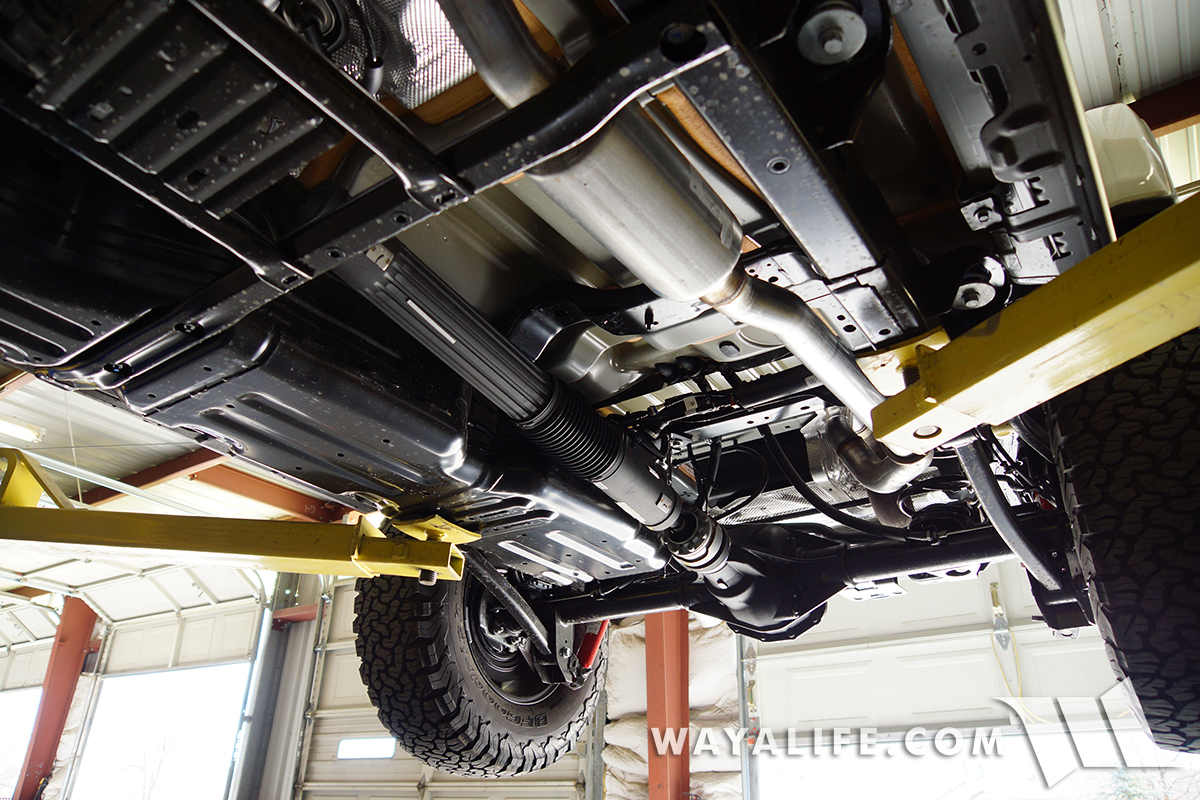
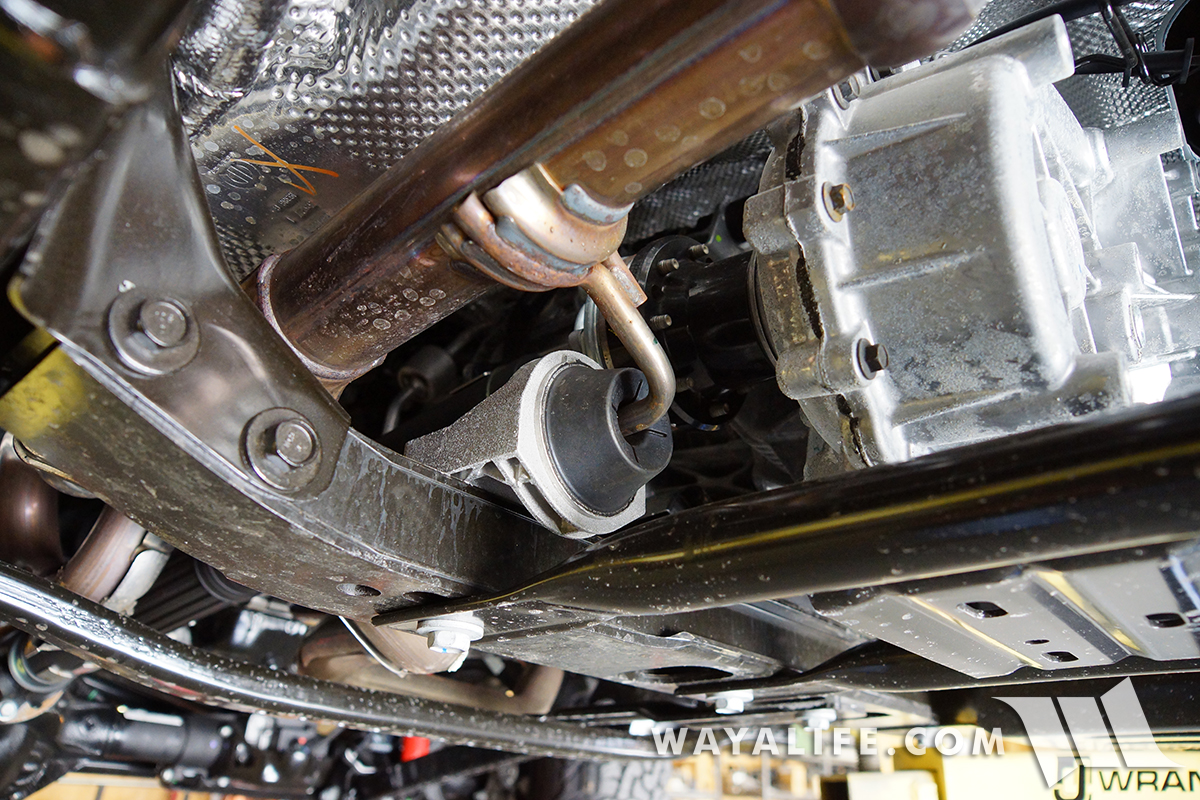
Being that we ordered our JL Wrangler with the new 8-Speed ZF automatic transmission, it came with a skid bar to help protect the sump pan. You can see it here in this pic along with the exhaust loop and redesigned exhaust cross over that allows the front drive shaft to have a greater amount of droop without tearing the slip shaft boot.
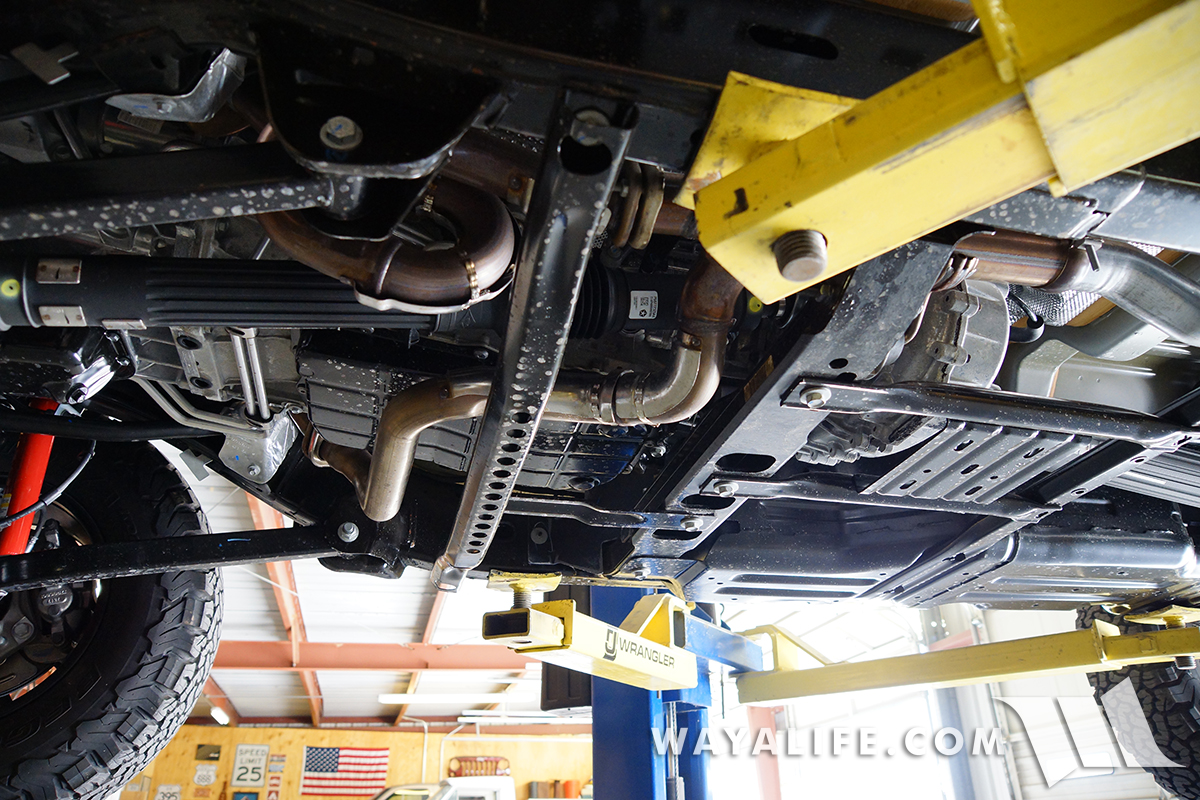
Another shot of the JL Wrangler transmission skid bar from the other side.
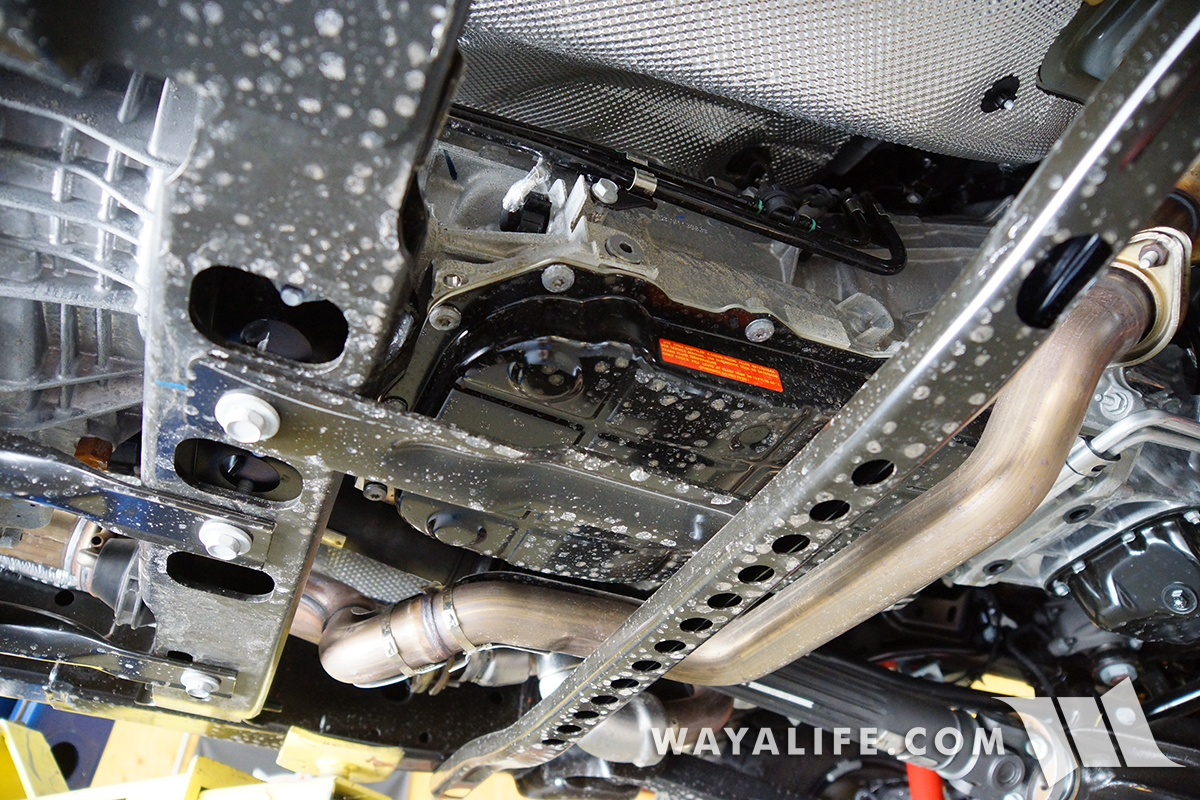
A closer shot of the JL Wrangler exhaust loop from the other side.
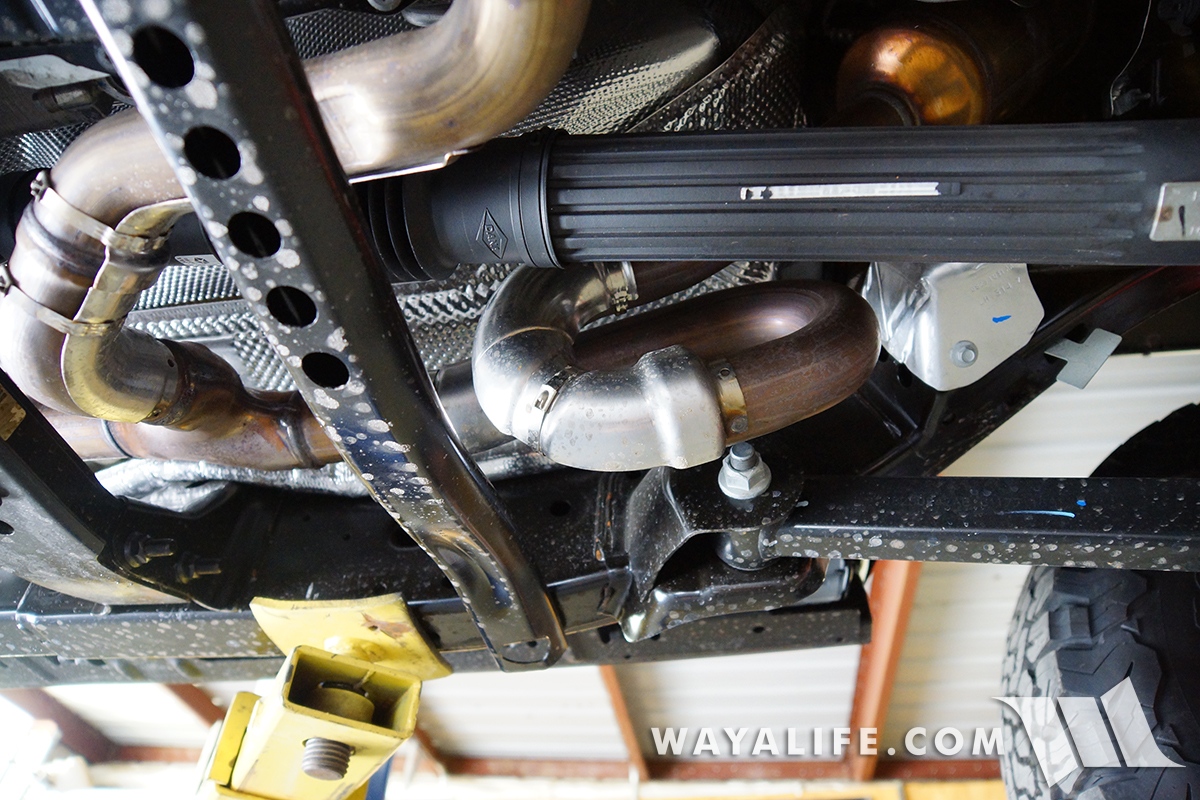
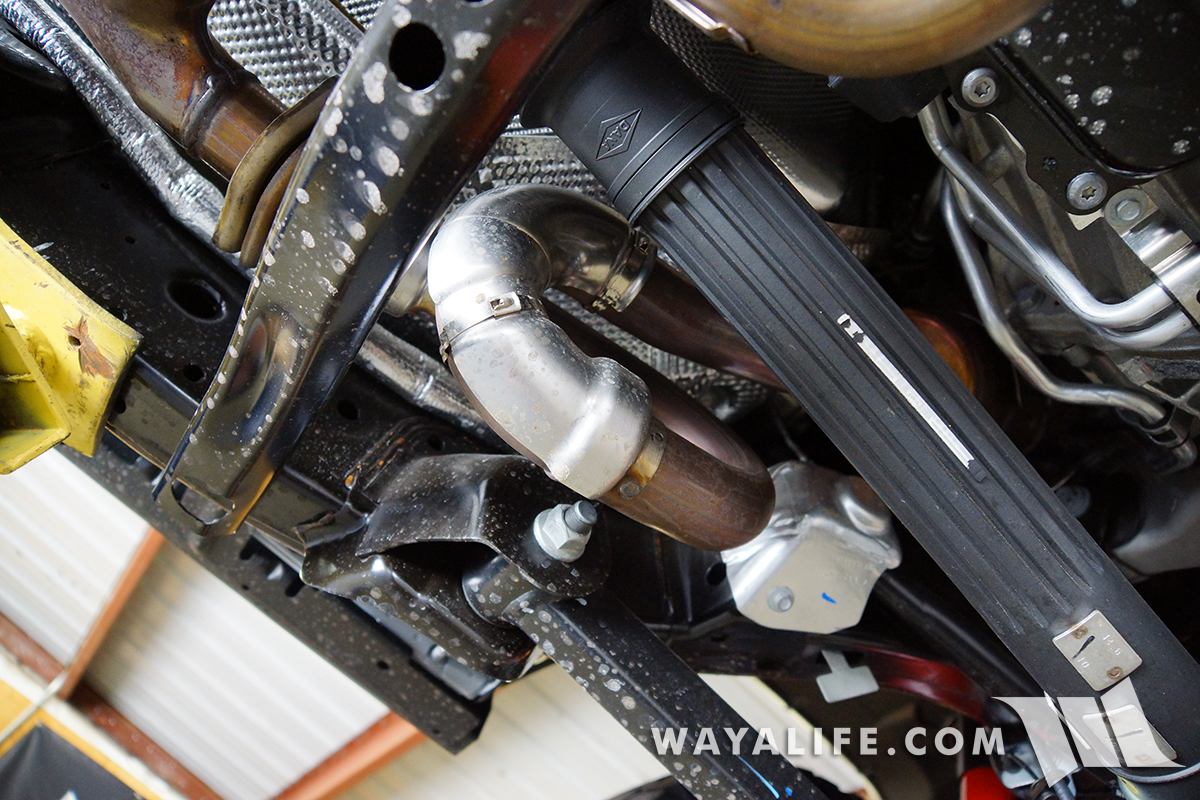
Just beyond the transmission cross member and exhaust hanger, you can just see the front drive shaft output shaft. As you can see, it is still an rzeppa CV just like on the JK.
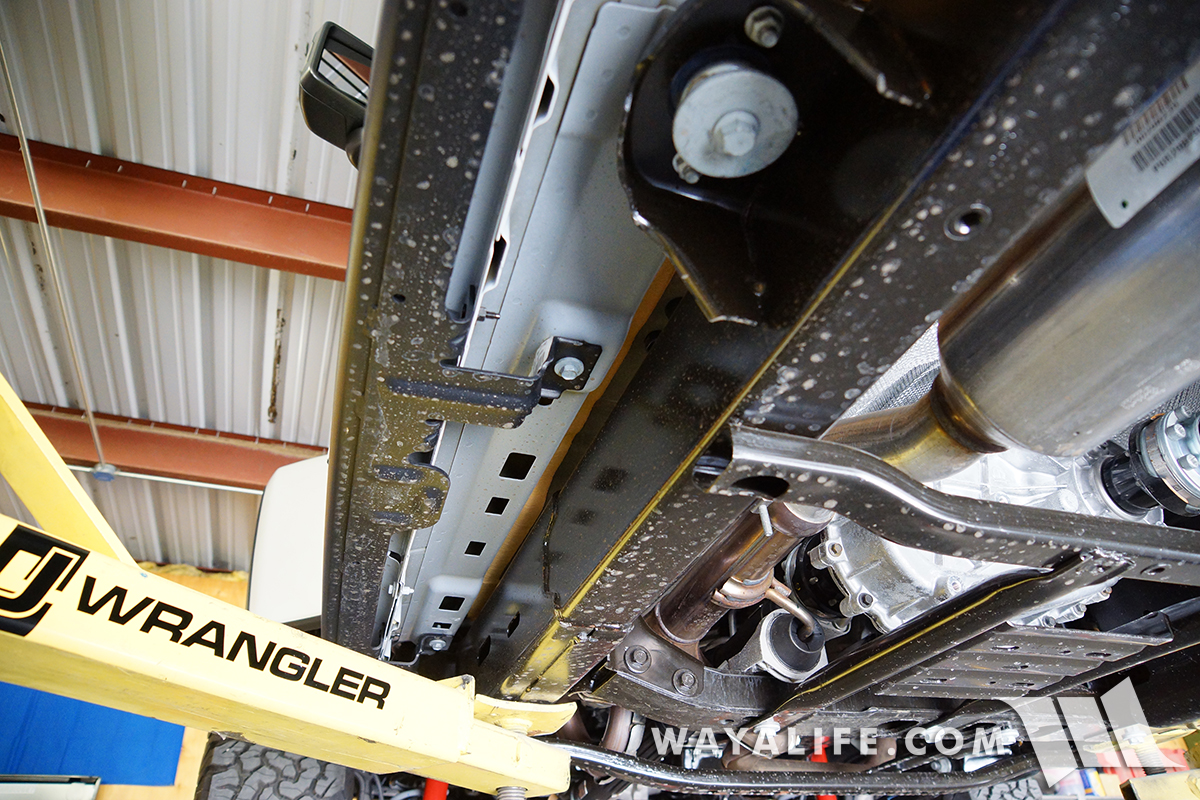
Looking toward the outside edge of the JL Wrangler, you can see the Rubicon rocker sliders are still mounted to the pinch seam and to the bottom of the tub.
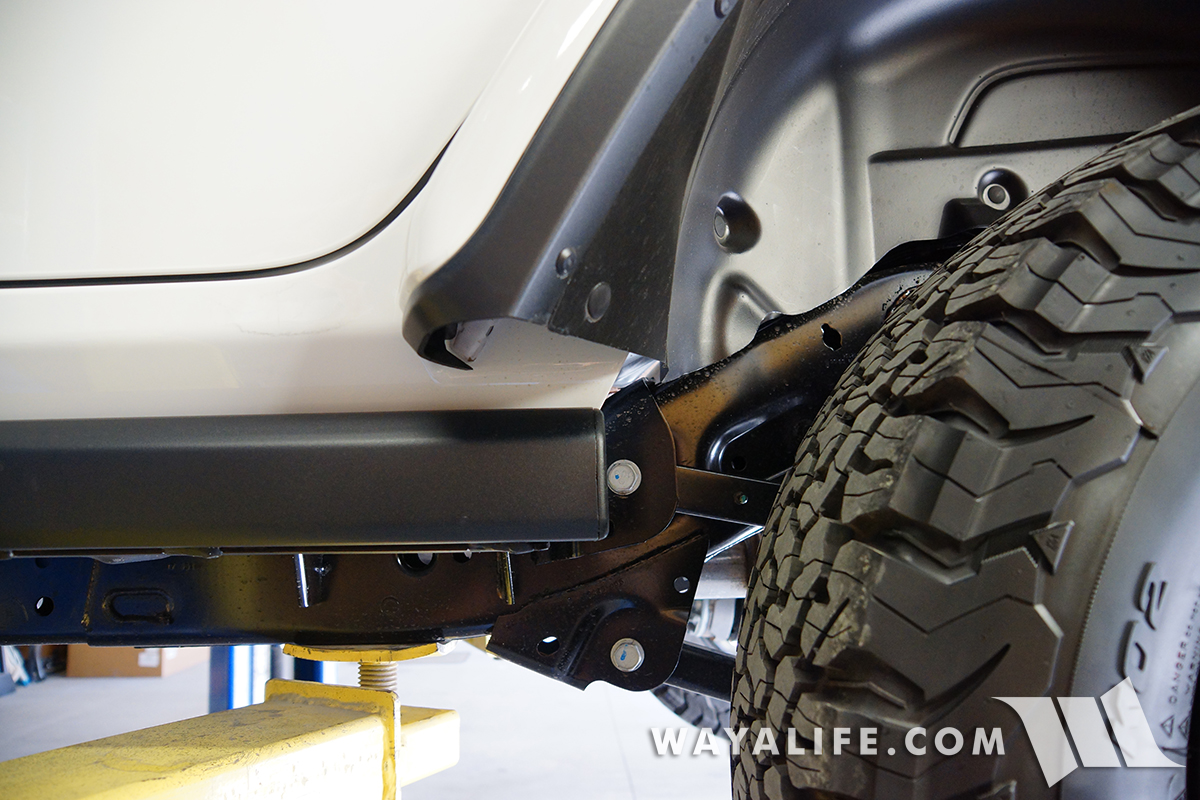
Stepping out from under the JL Wrangler, you can see that the rear fender wells come with pinch seams that have already been trimmed or angled back so that bigger tires can be run without making contact with them.
FRONT END
Once again, just like the JK, the JL Wrangler front drive shaft utilizes a u-joint bolted up to a pinion flange on the Dana M210 front axle.
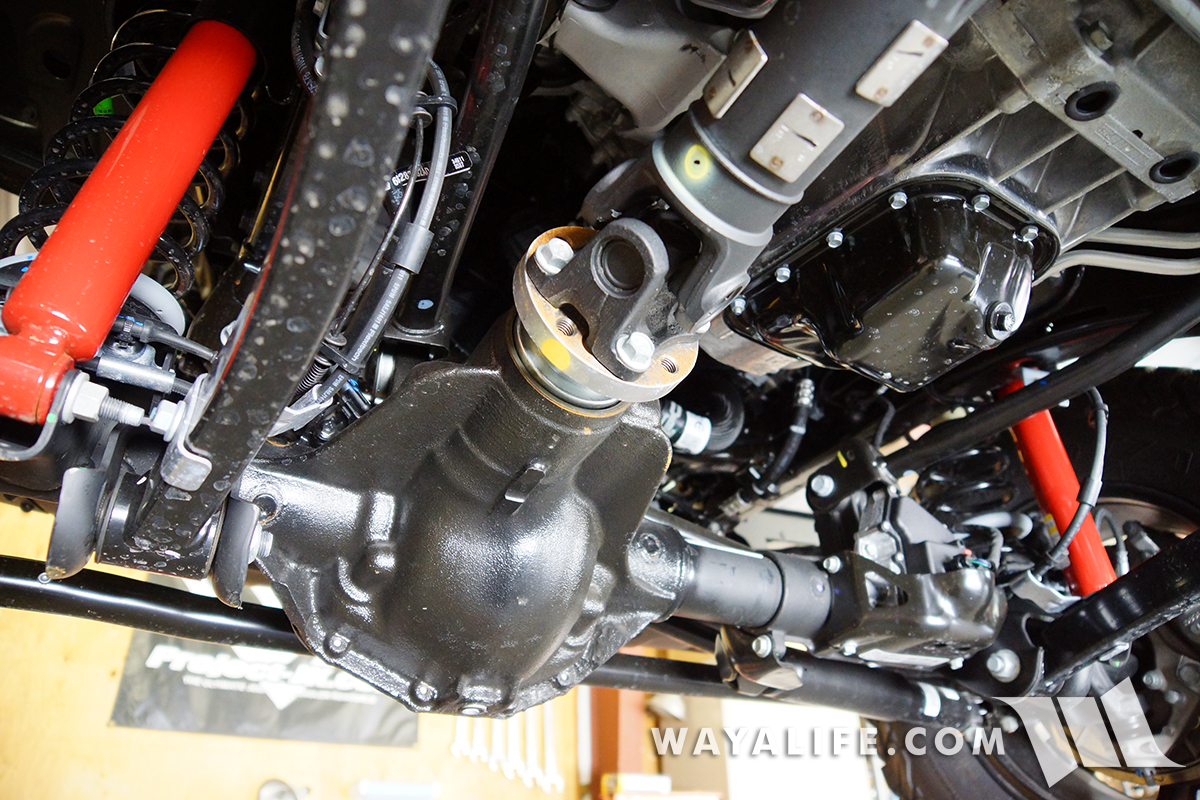
Here you can see that the Dana M210 is a high pinion axle and that the amount of caster it has allow the front drive shaft to almost be in line with the pinion even at a full droop.
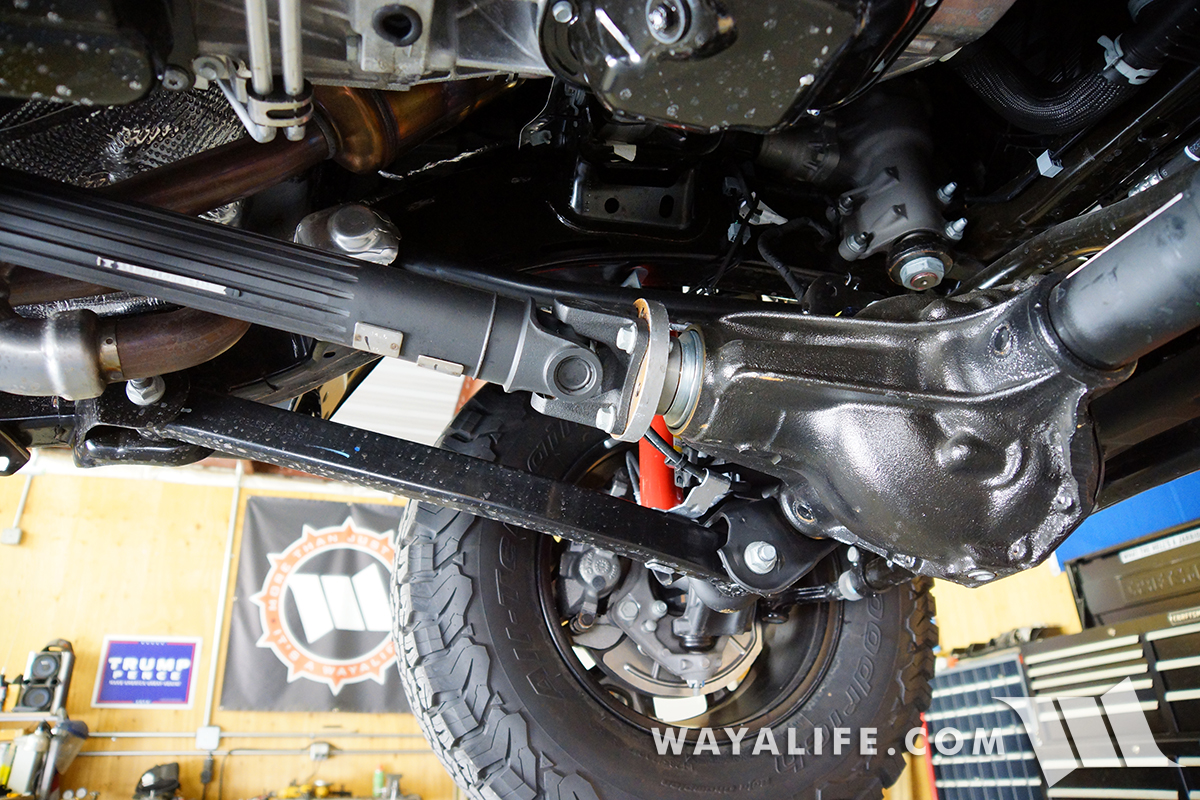
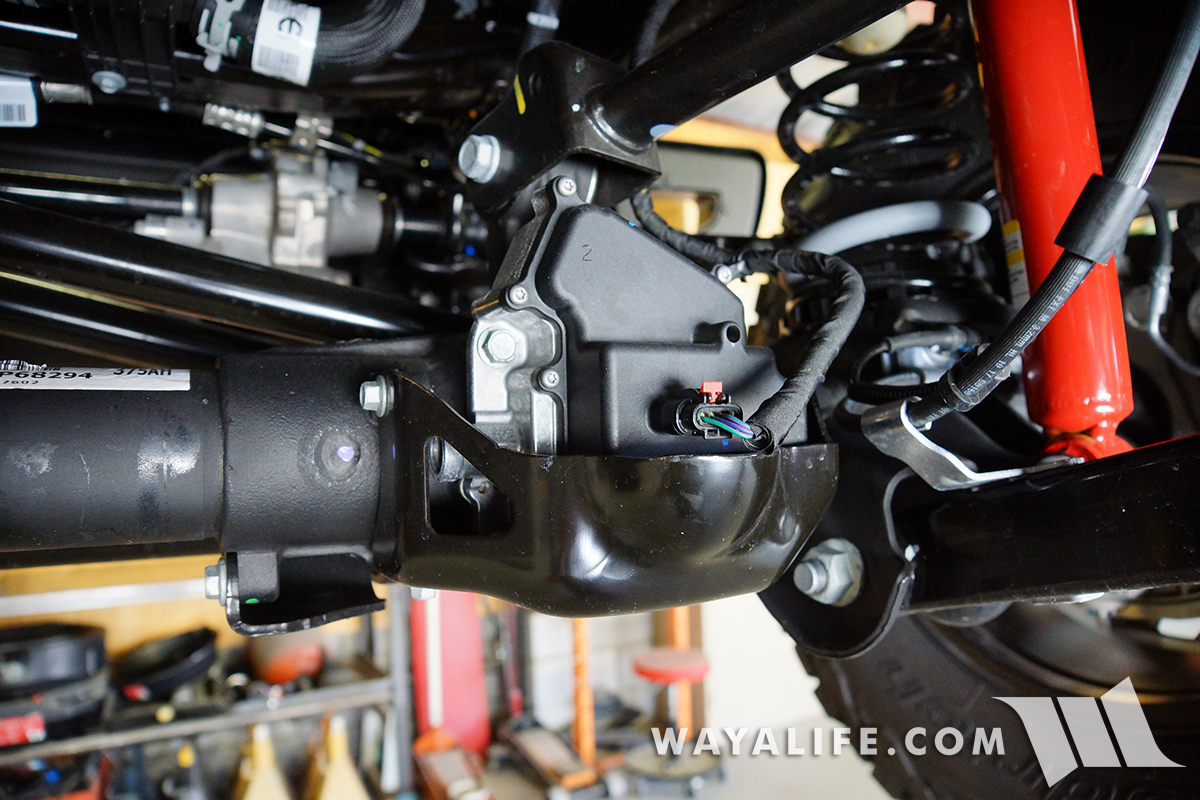
Here are a few shots of what a lot of people are still unsure of on the JL Wrangler - the FAD or, front axle disconnect motor.
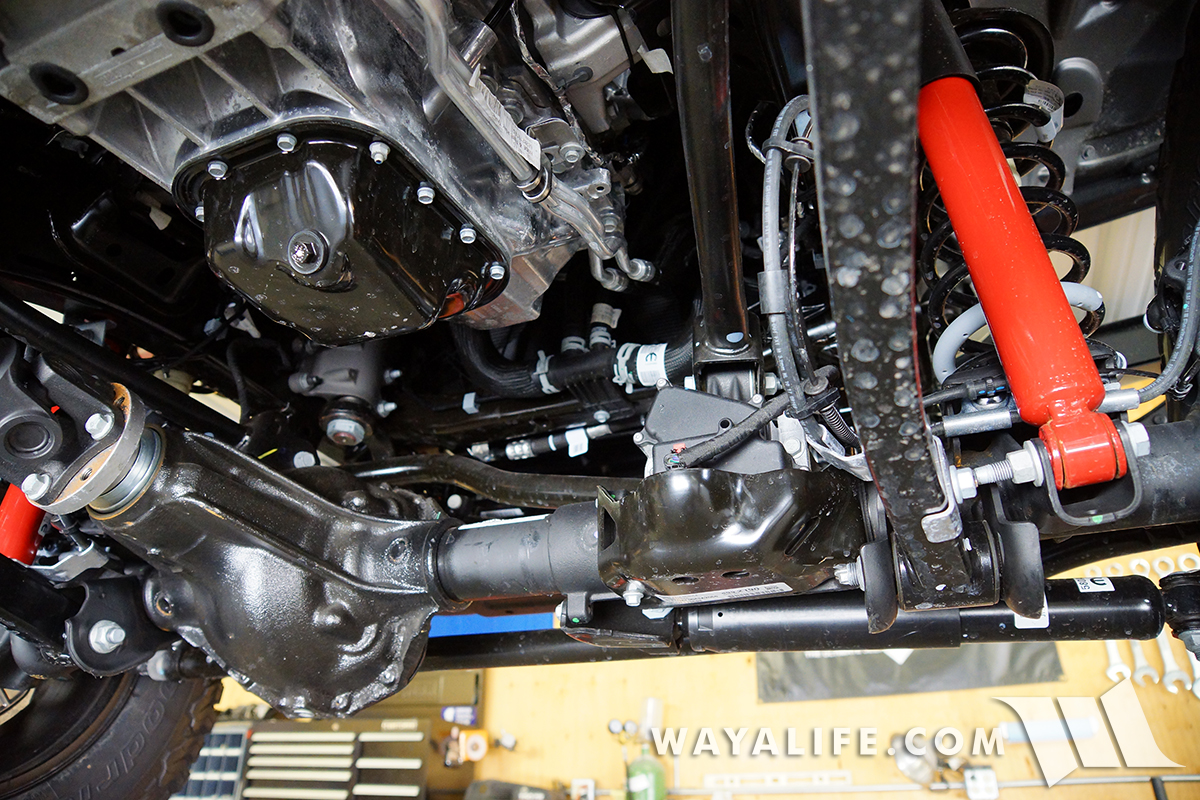
Designed to disconnect the front axle when driving in 2WD, the FAD was incorporated into the design of the Dana M210 front axle to help improve fuel economy.
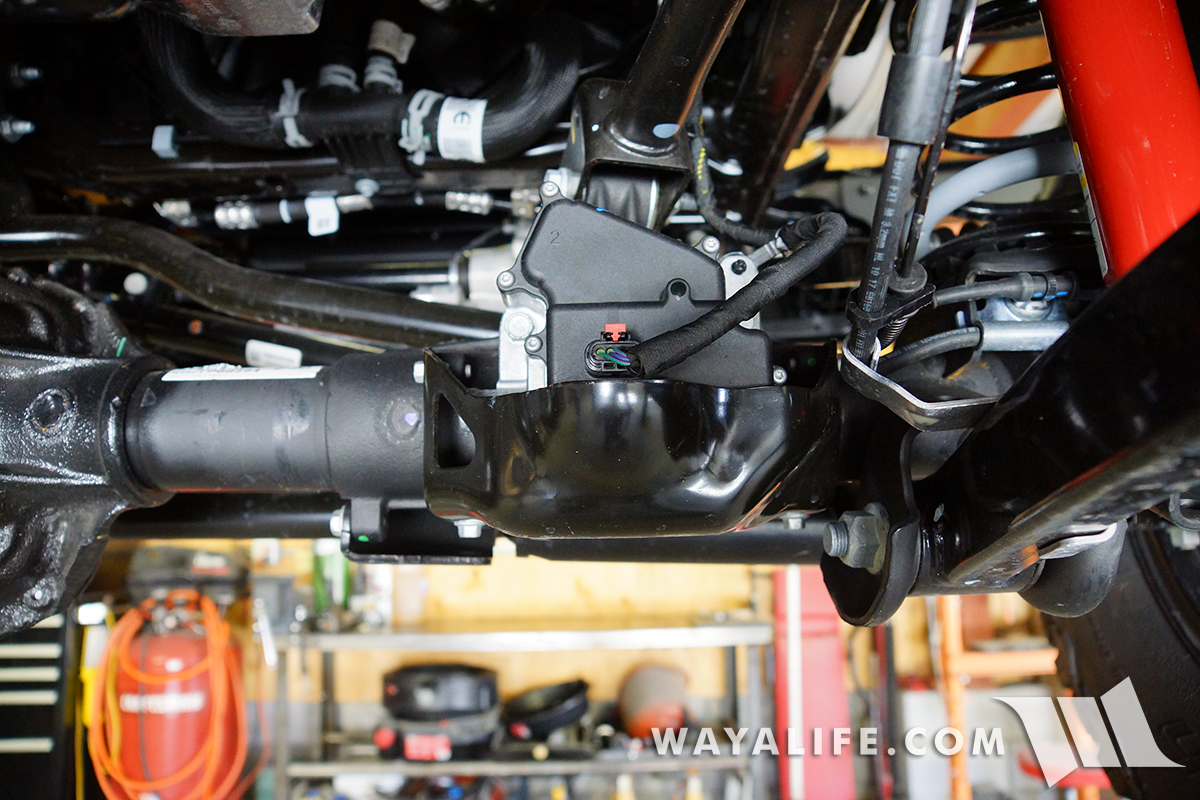
The fact that it has its own skid plate indicates to me that the FAD needs to be protected. Fortunately, it is an electric motor as opposed to the old school vacuum CAD's of yesteryear and hopefully, it'll hold up to water better than the electronic sway bar disconnect.
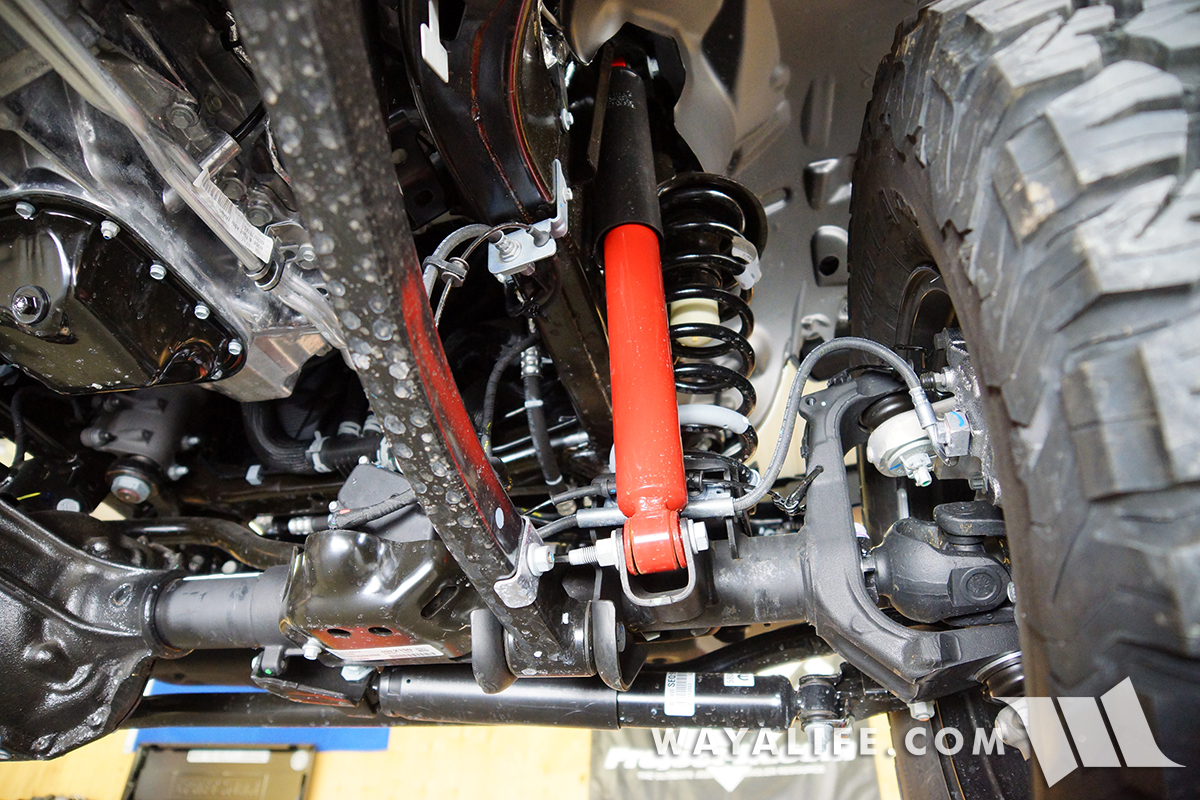
Moving over the passenger side front wheel, you can get a good look at the JL Wrangler lower control arm, red Rubicon shock which is not secured to the frame using a through bolt instead of a stud, the coil beyond it and the new beefed up Dana M210 end forging or what most people refer to as the "axle C".
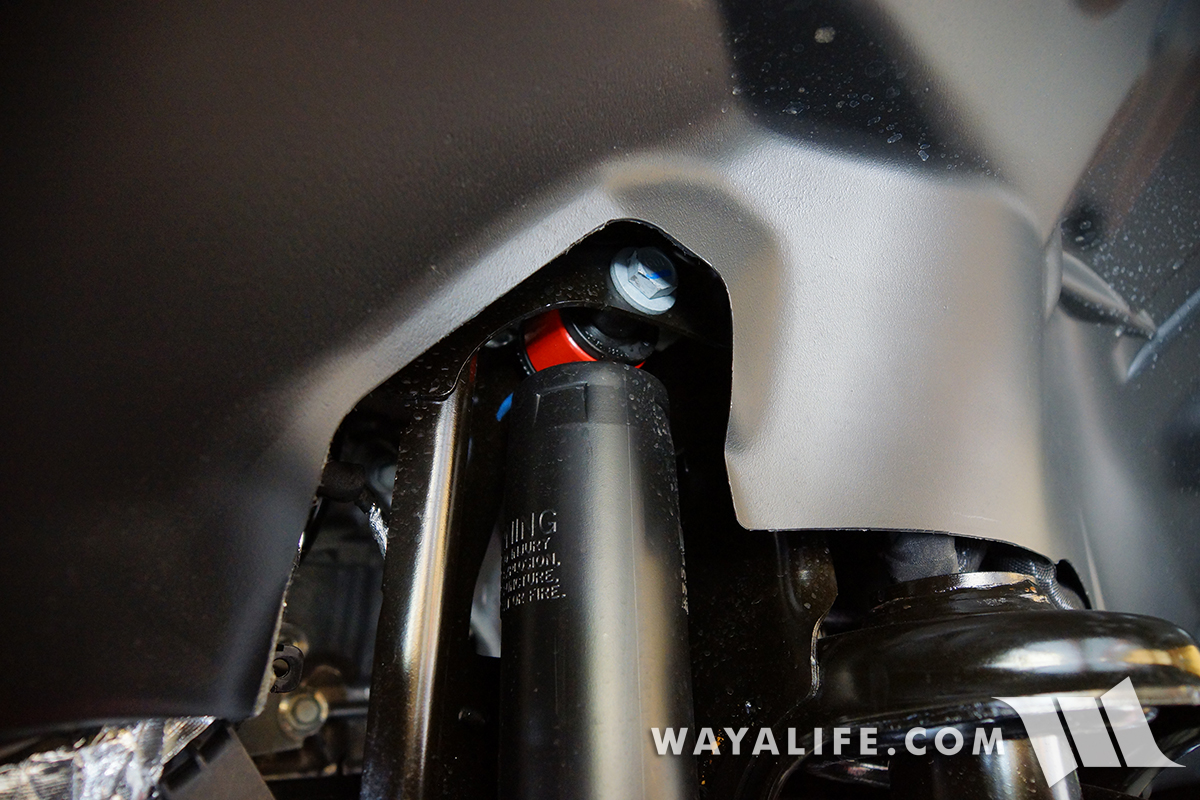
Here's a better shot of the JL Wrangler front shock upper frame mount with through bolt.
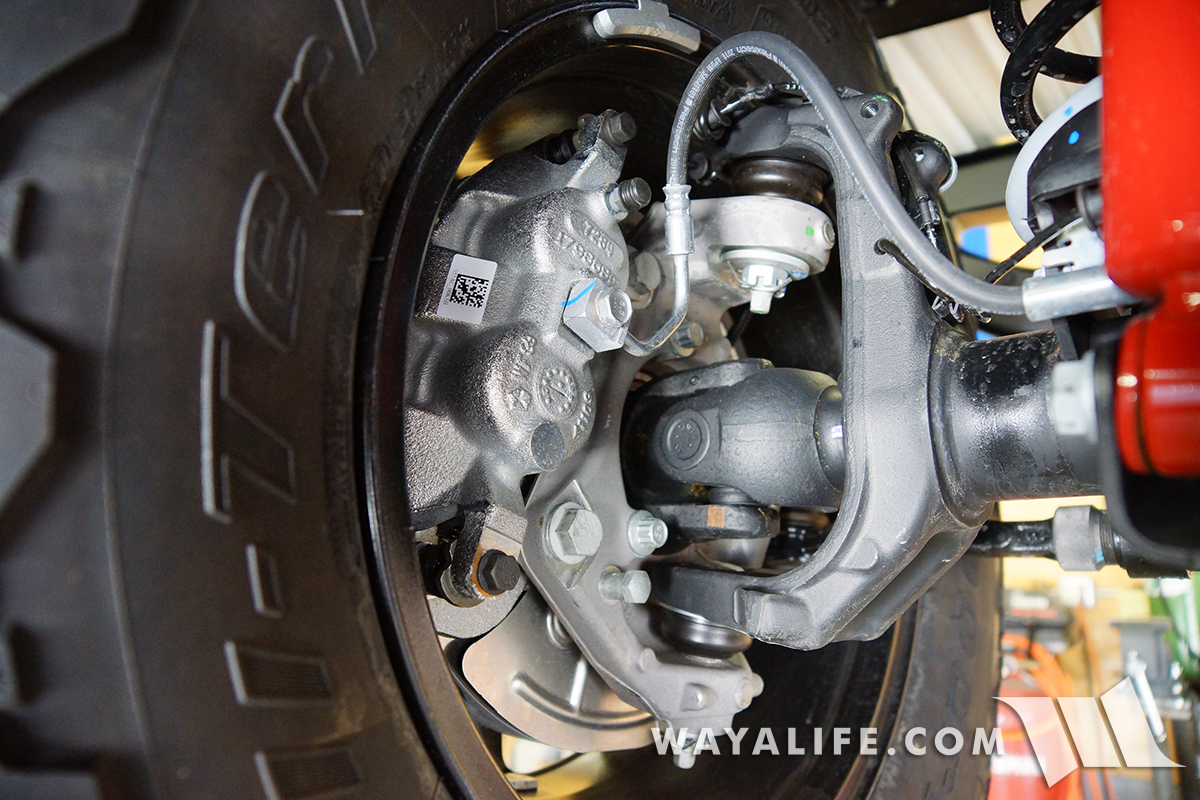
A 3/4 view of the passenger side axle C, the new Dama M210 aluminum knuckle, ball joints, axle shaft u-joint and all new 2-piston brake caliper.
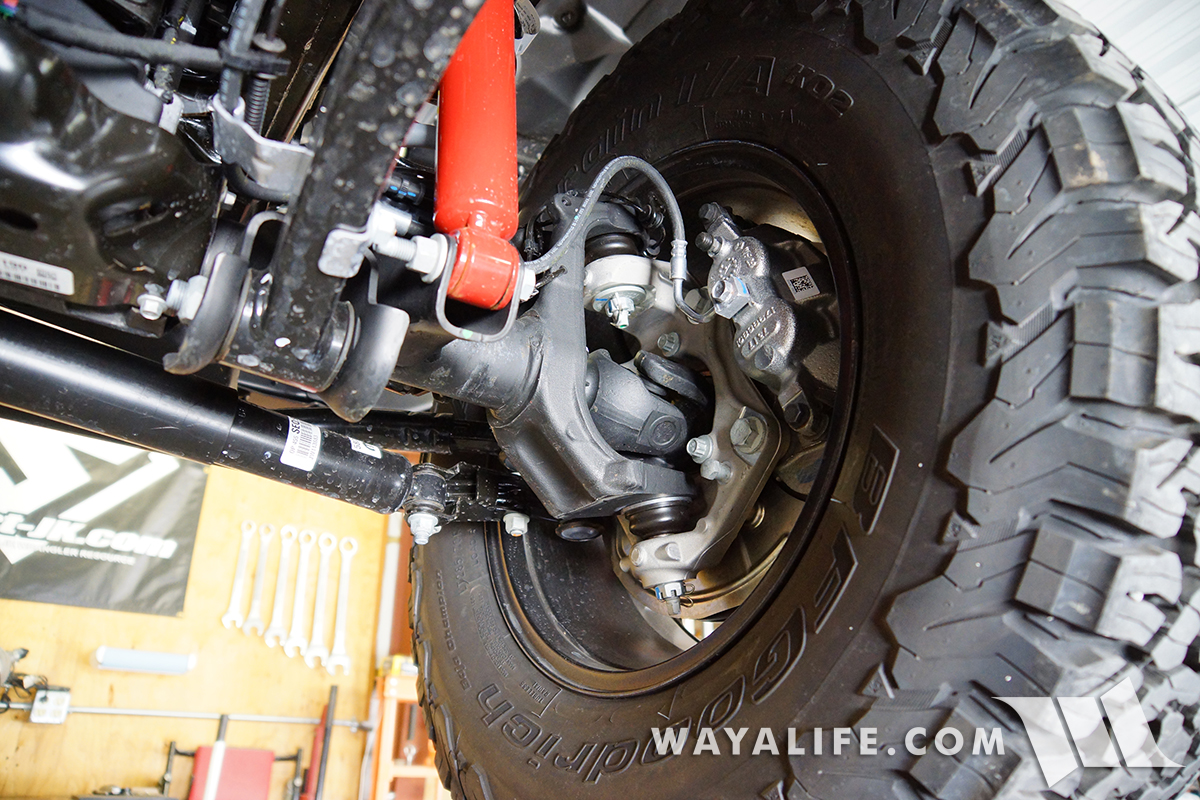
A closer view of the 2-piston brake on the driver side.
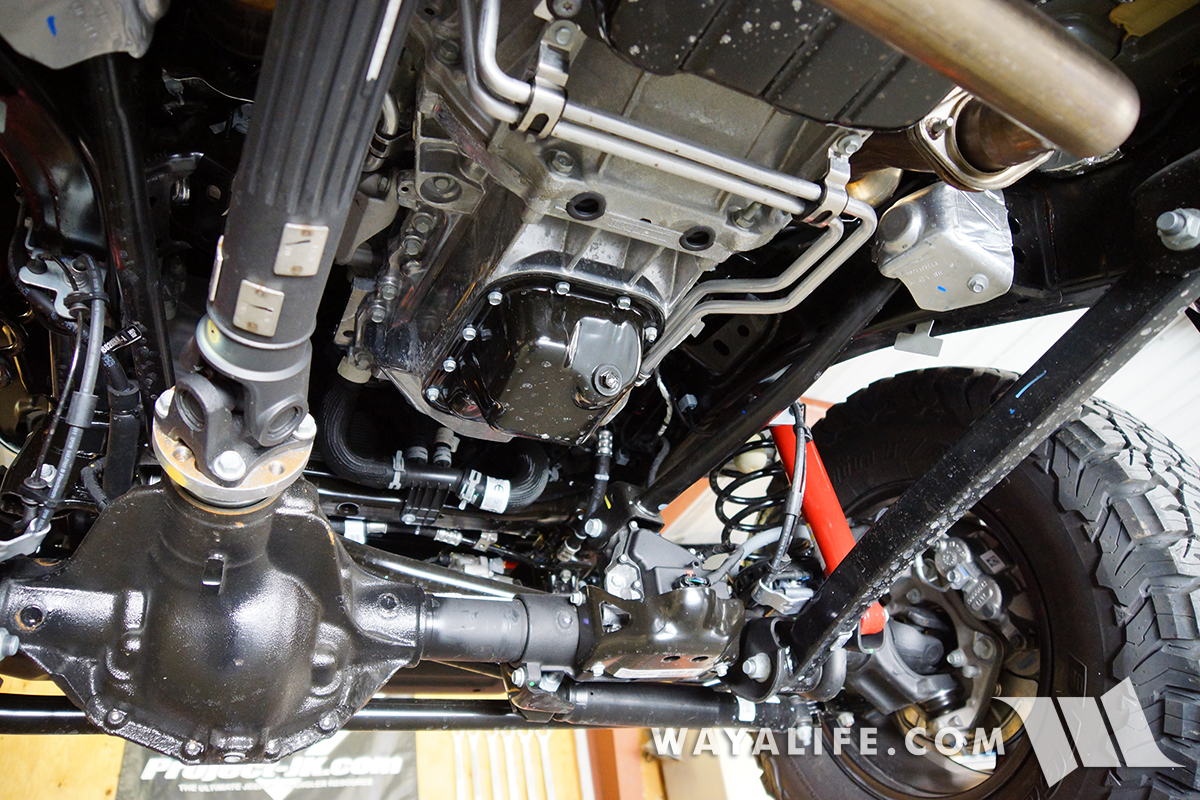
Looking up at a JL Wrangler, 3.6L V6 Pentastar Engine. As you can see, it looks completely different from a 3.6L in a JK and the oil pan is even more out of the way and smaller too!
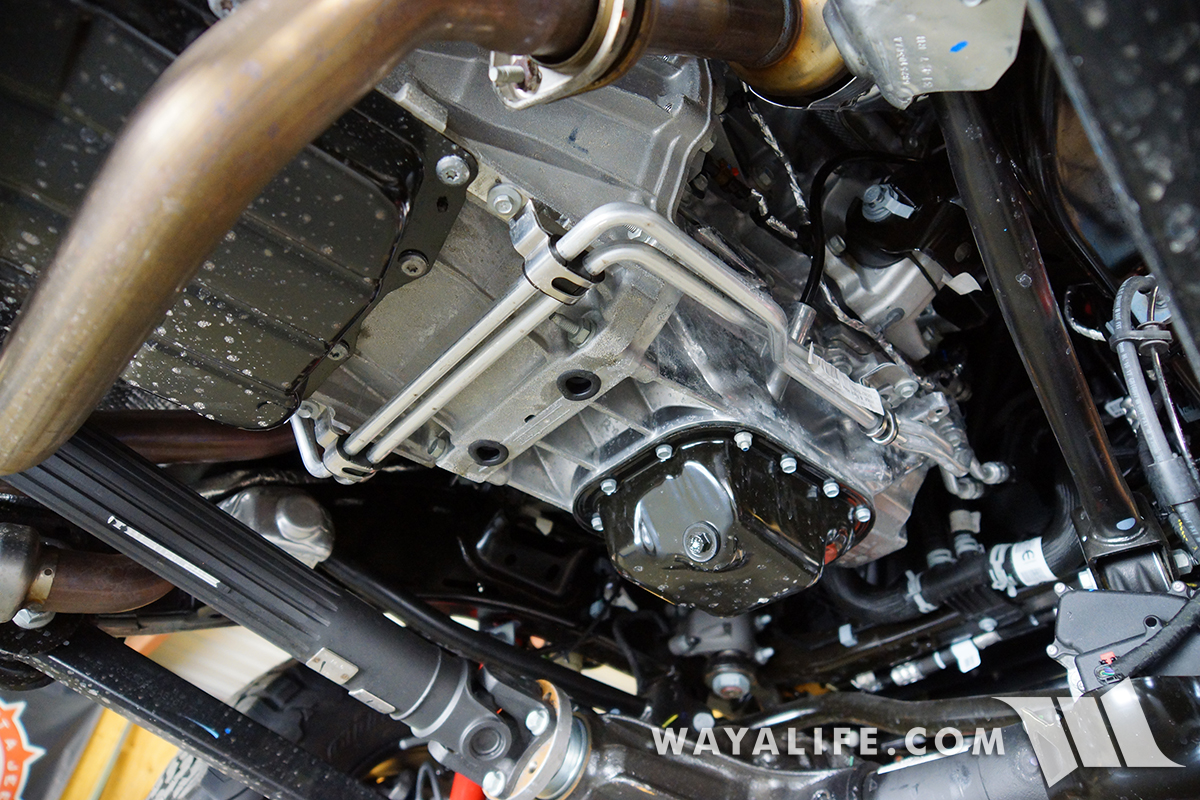
More than the tiny oil pan, the reason why I'd want to install some kind of armor here is to protect the transmission cooler lines from renegade branches and roots on the trail.
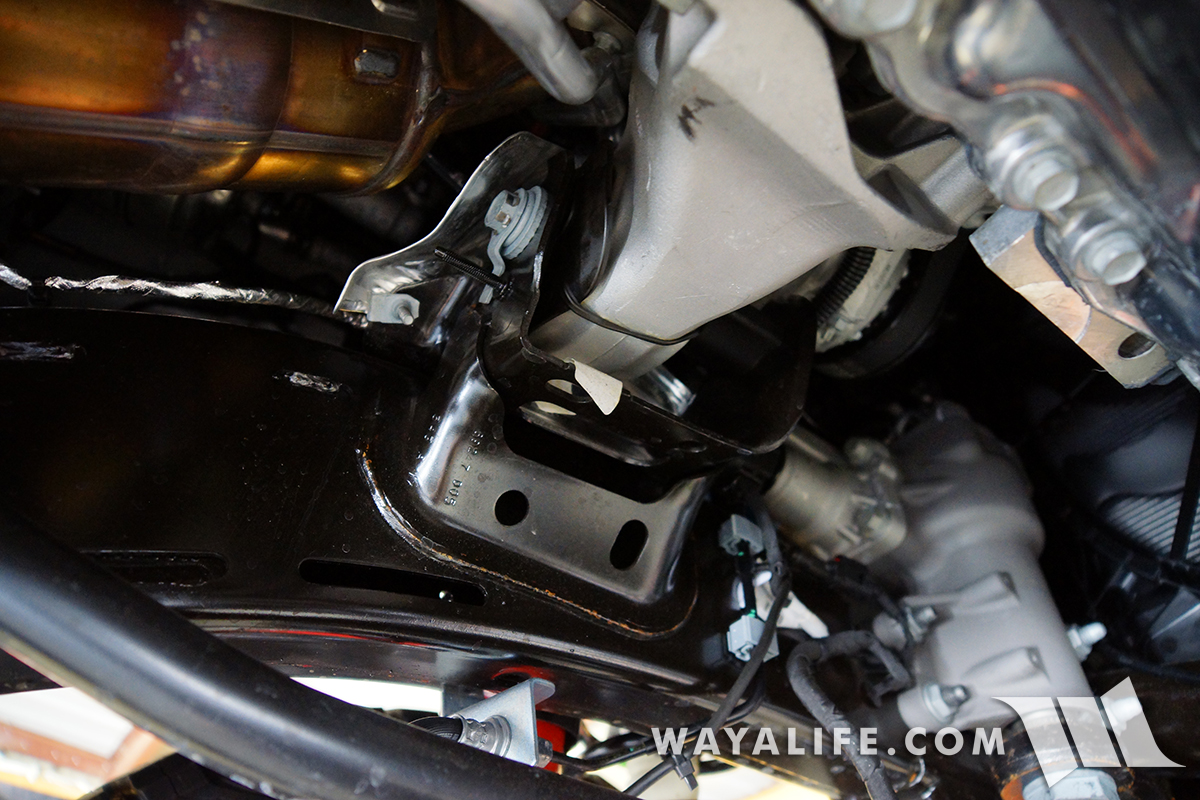
Here's a shot of the motor mount.
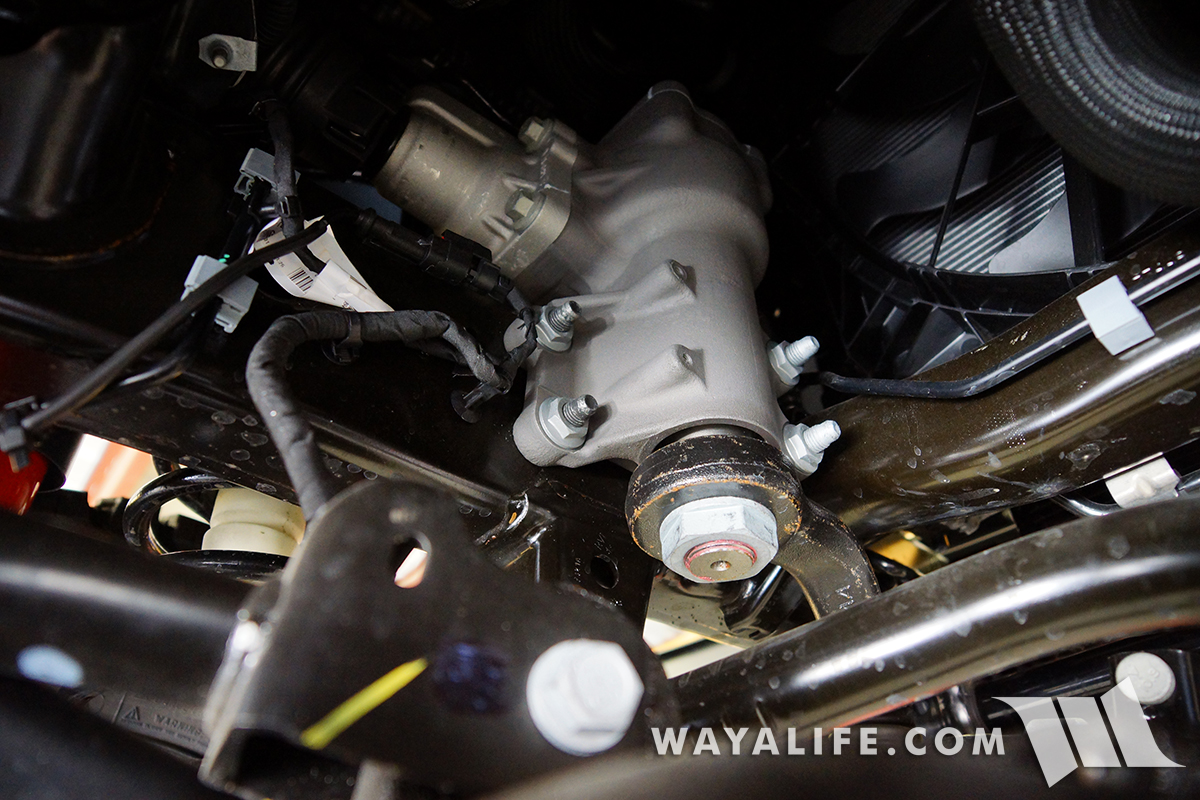
The JL Wrangler comes with an all new steering box and it is now made out of aluminum.
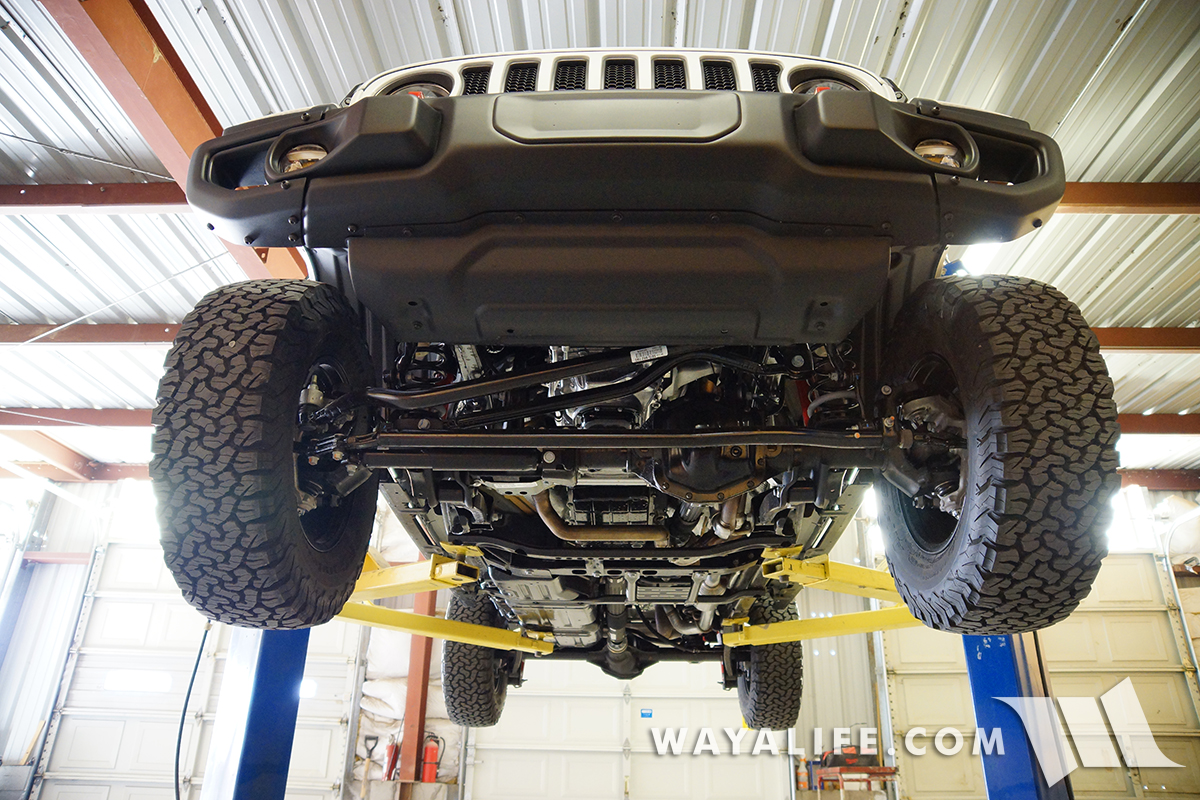
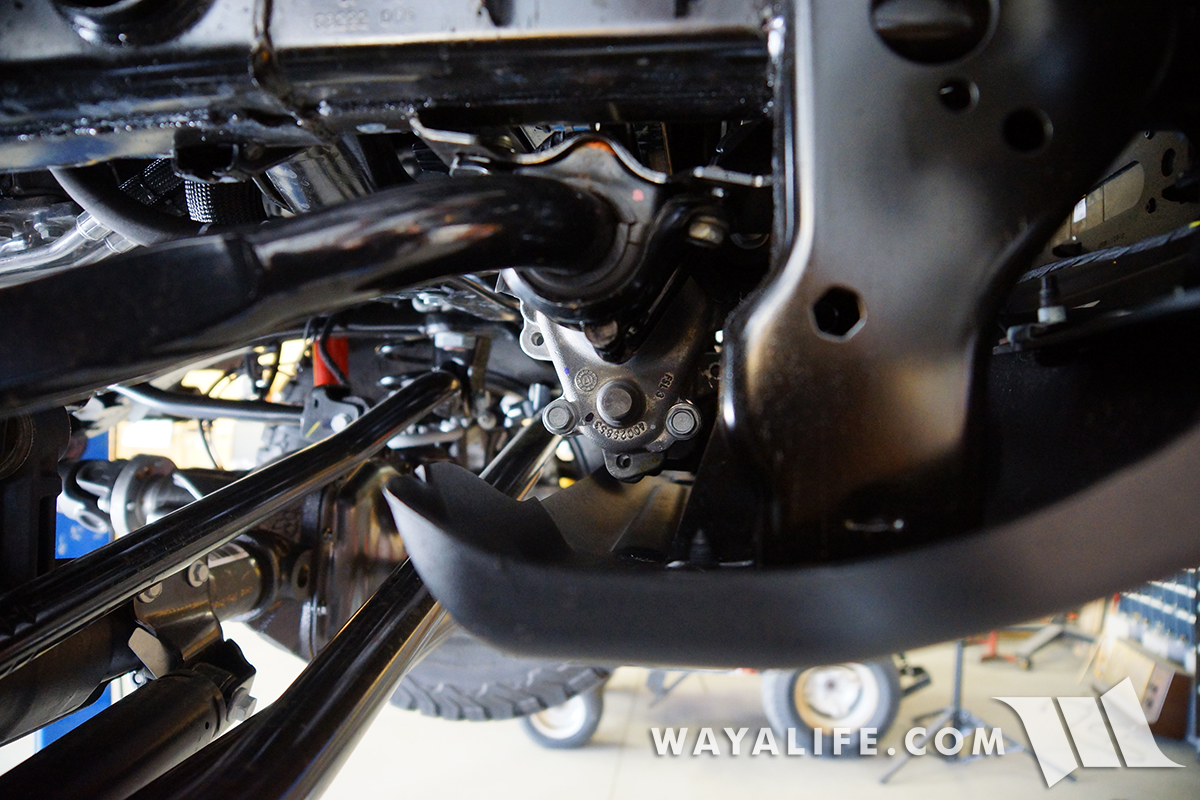
Going way up front, you can see the Rubicon electric sway bar disconnect sitting just above the air dam skid plate.
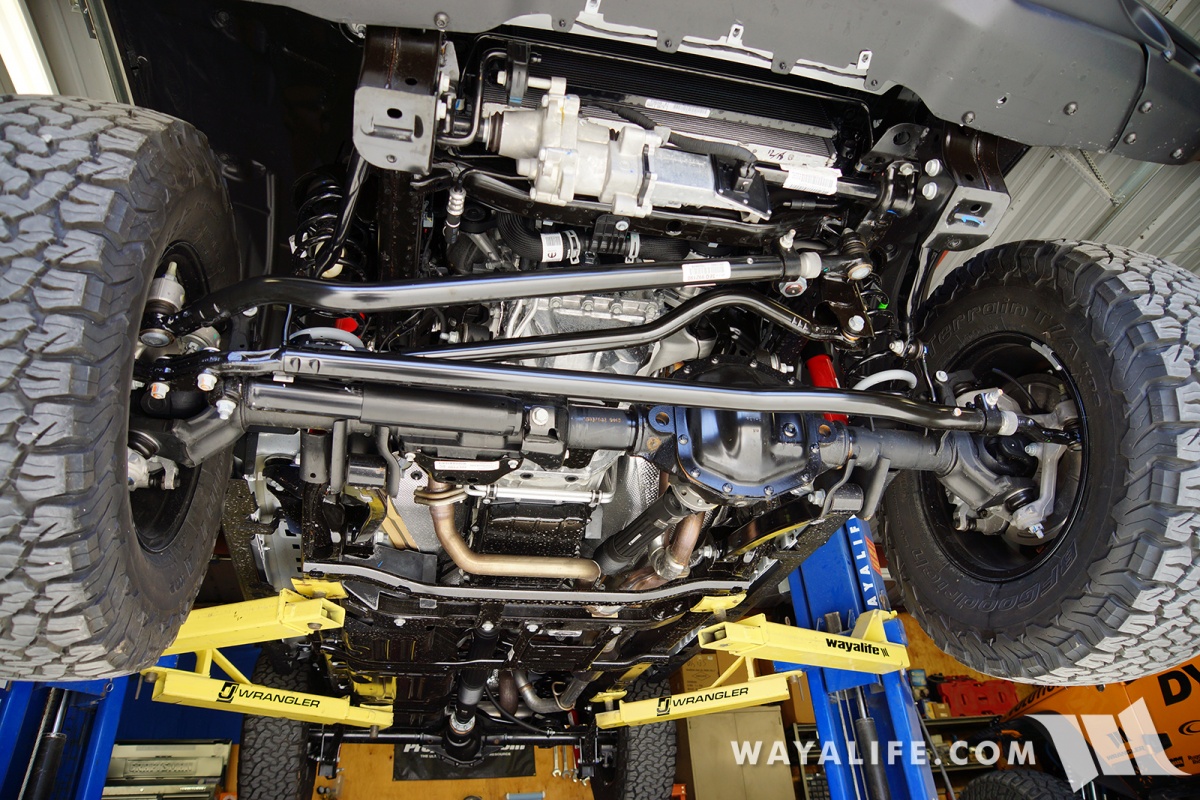
To help get better lighting on everything, turned our JL Wrangler Rubicon around so that it was pointing toward the garage door. Also, to help get a better look at all the steering components, I went ahead and removed the air dam skid plate. Here's a few shots of what it looks like up front without it.
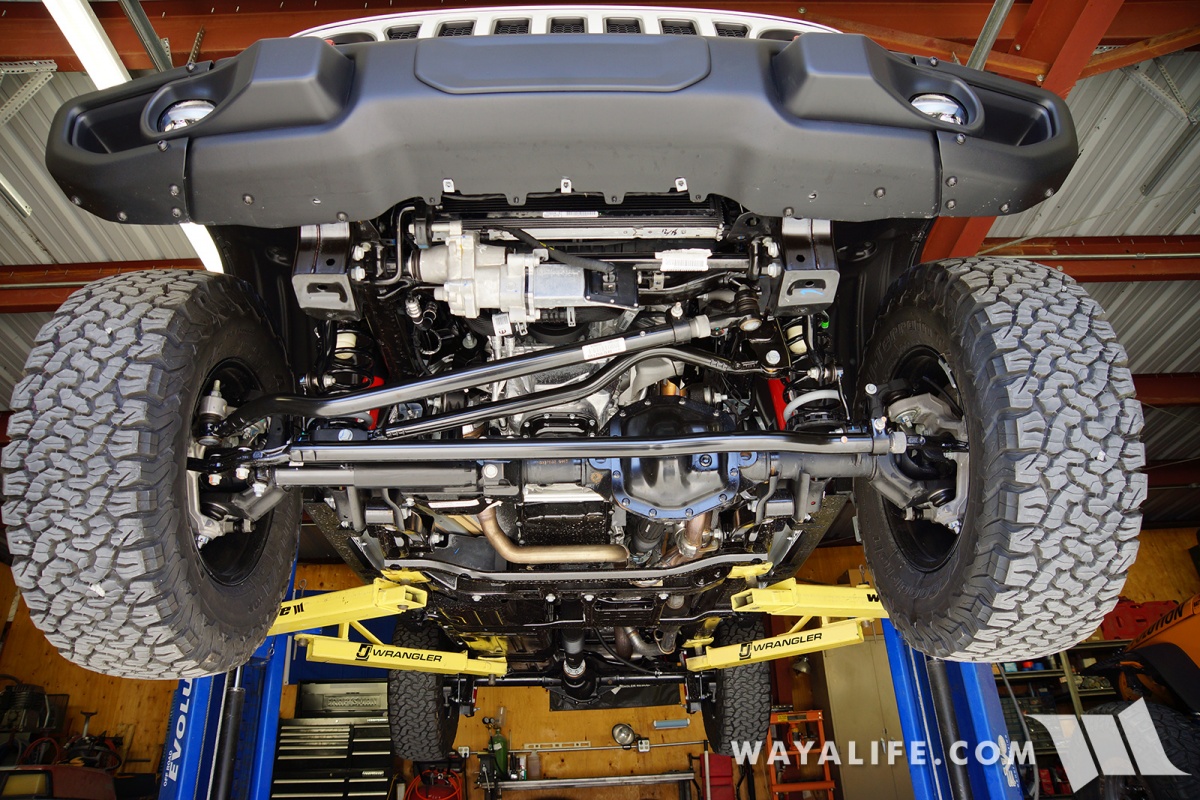
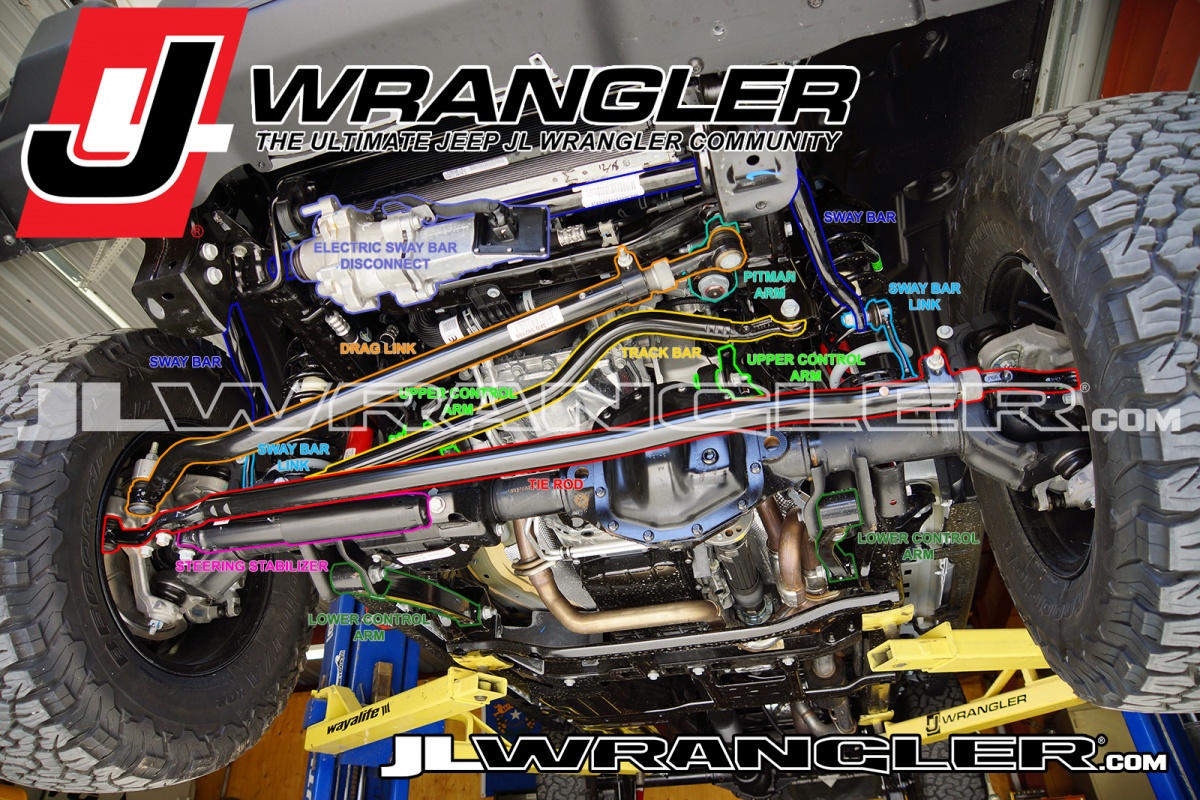
With the air dam skid removed, you can get a clear shot of the electric sway bar disconnect motor, the sway bar itself, the sway bar end links, the pitman arm, drag link, track bar, tie-rod, steering stabilizer, axle C's, knuckles and of course, the all new Dana M210 front axle. You can even see how the front drive shaft now has a clear path downward.
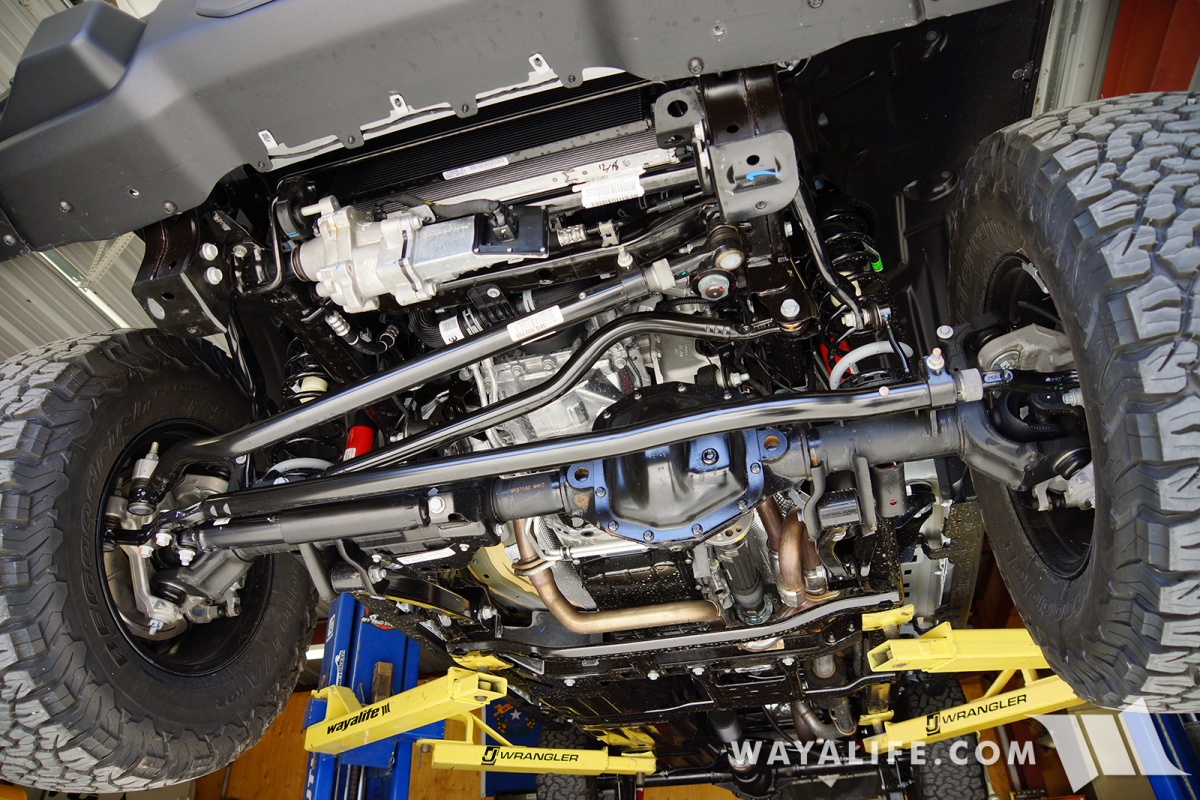
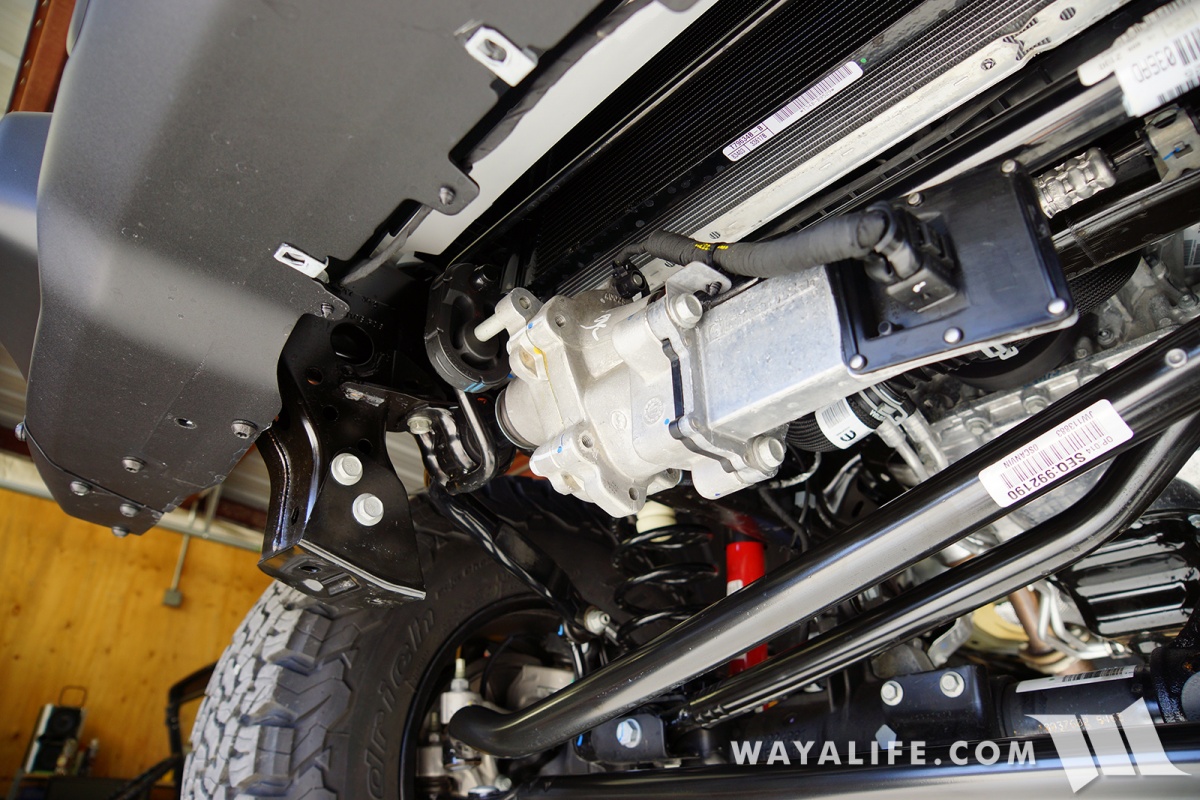
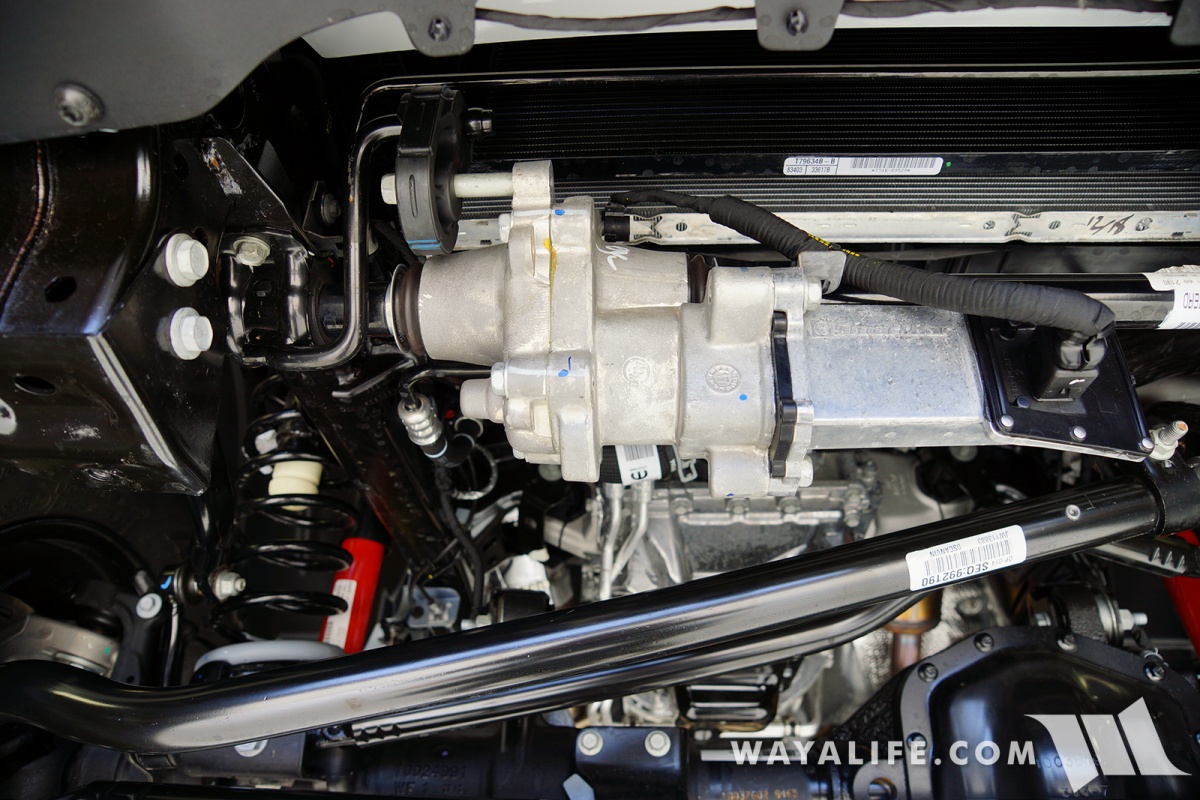
Close up look at the electric sway bar disconnect motor.
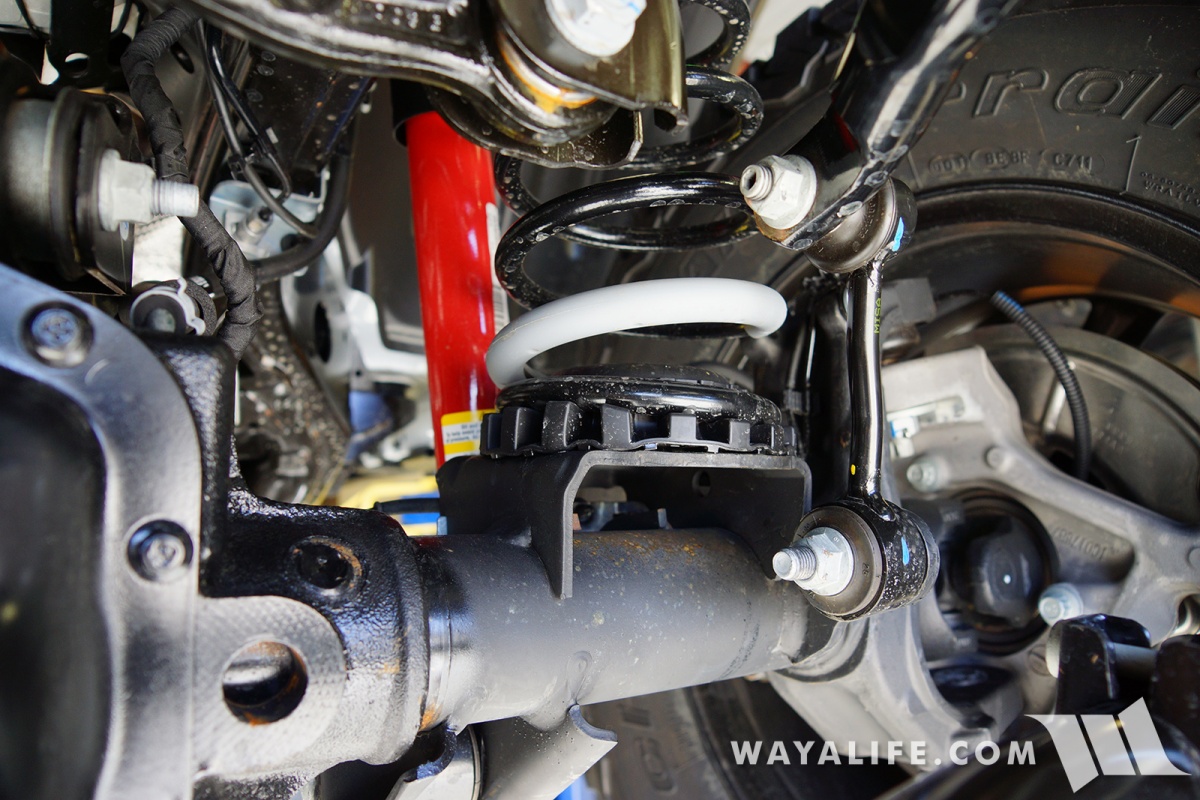
Close up look at the driver side coil and sway bar link. Notice how the lower spring perch now comes with an isolator that's indexed for the coil.
Here's a closer look at the new JL Wrangler tie-rod end with adjuster on the driver side.
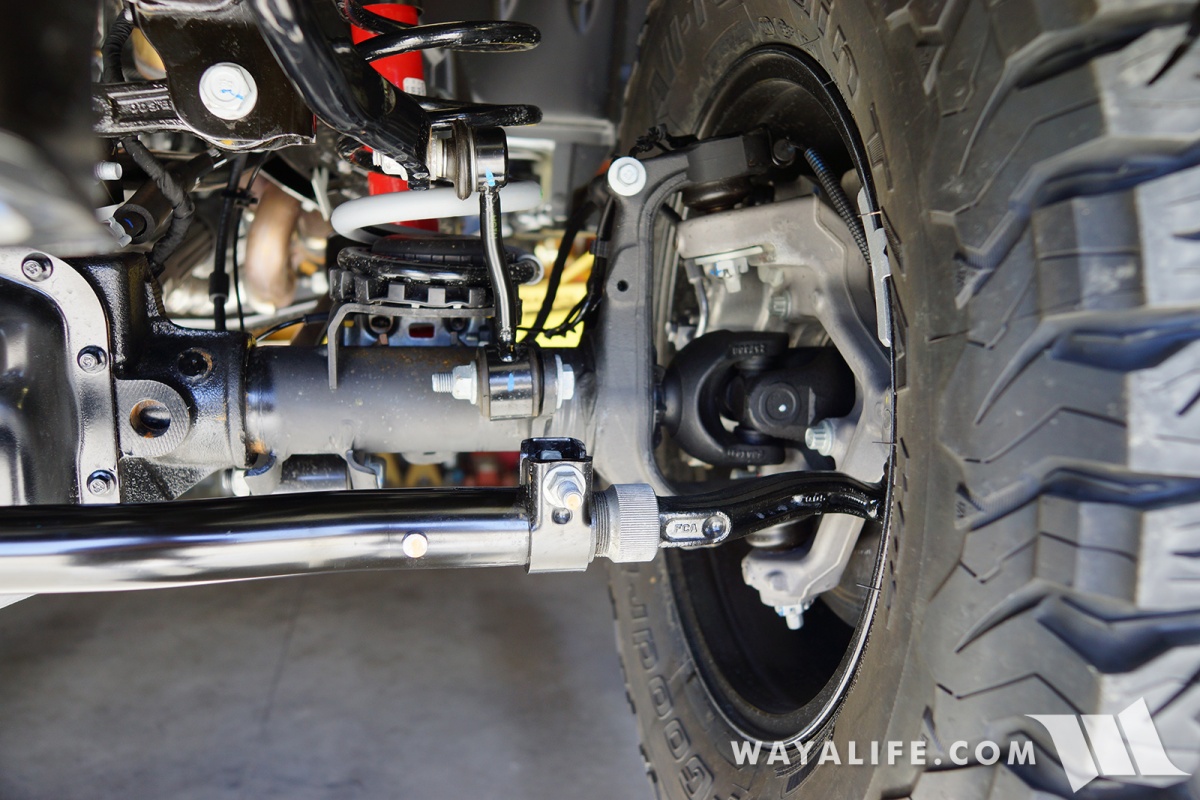
View of the driver side steering knuckle with the lower ball joint in view.
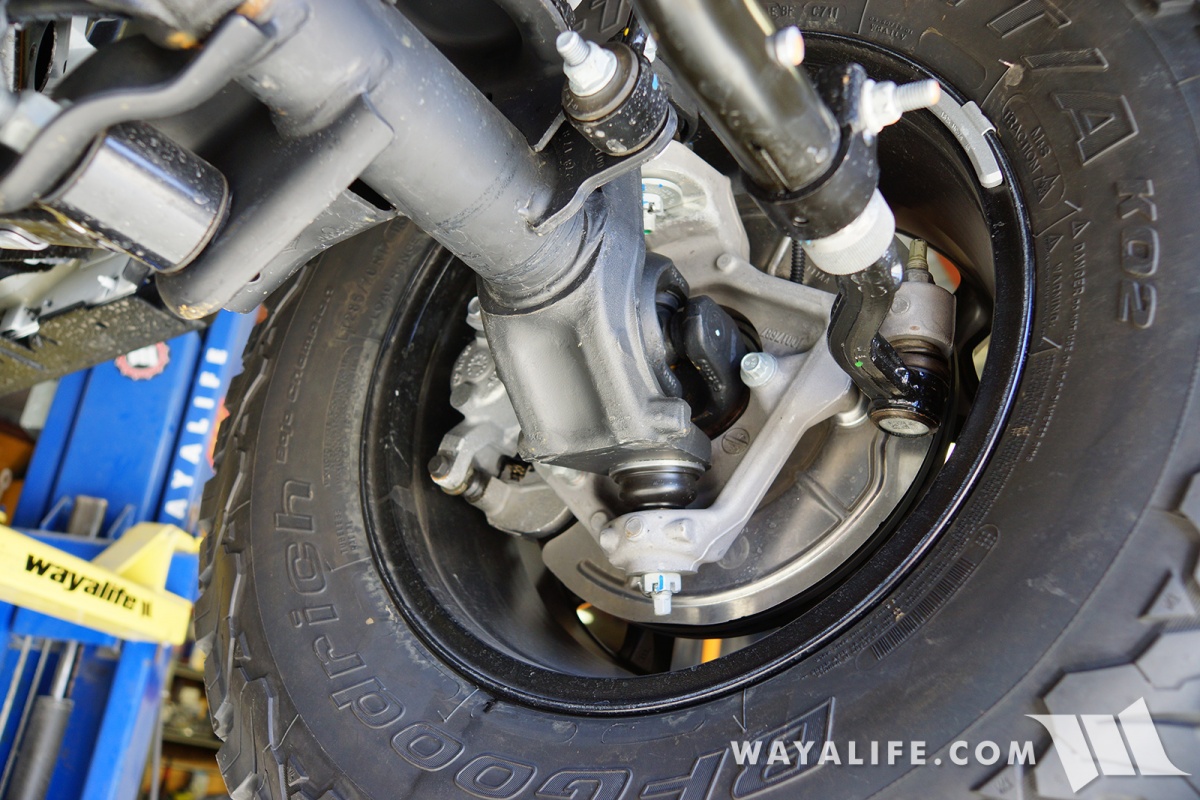
On the passenger side, you can see the all new beefy tube designed drag link with forged ends tying into the knuckle just above the tie-rod.
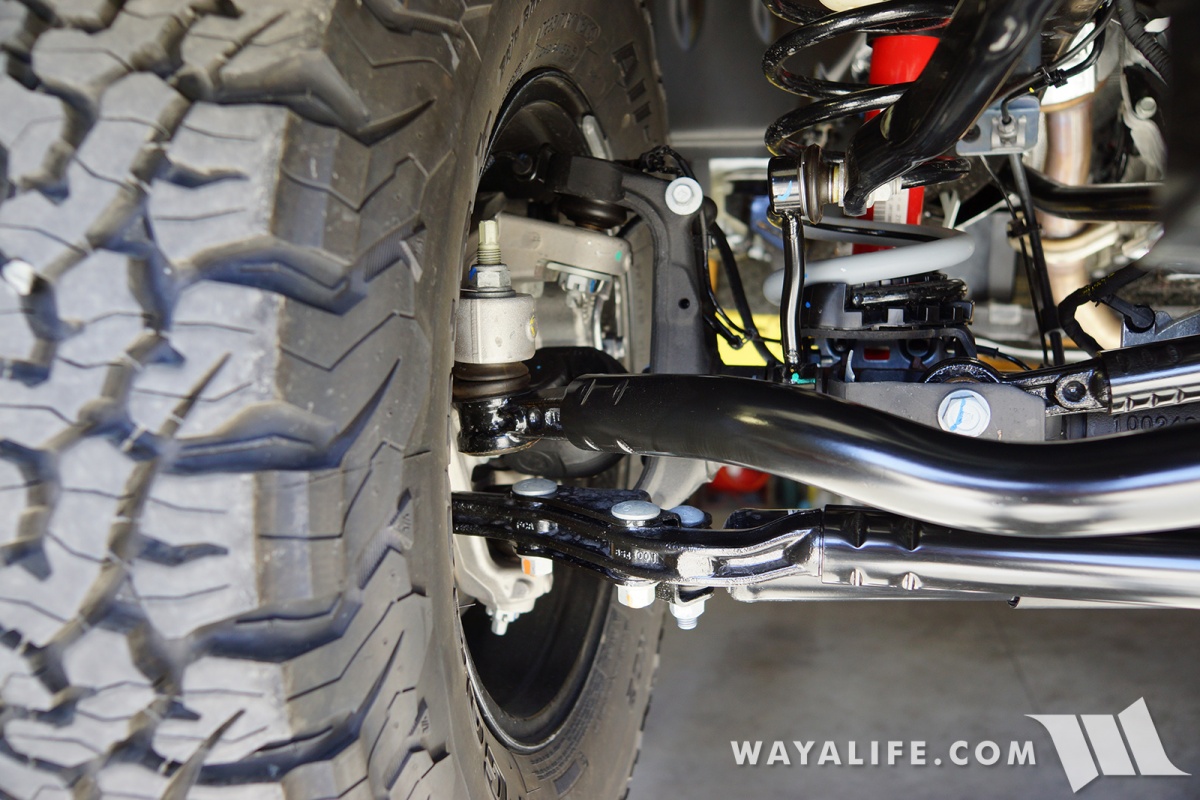
A look at the passenger side coil. Again, notice how it has an indexed lower spring perch isolator.
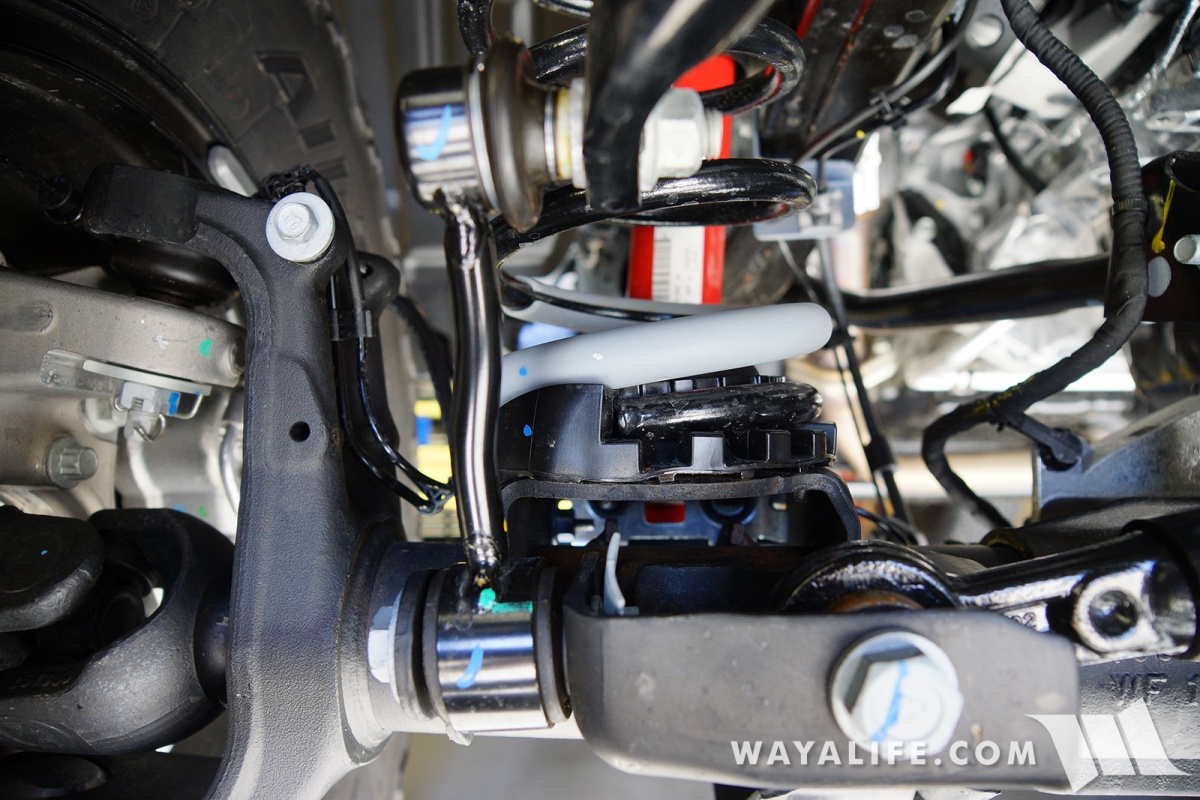
The steering stablizer is still mounted low and is exposed to damage but the way it's mounted up has been improved. As you can see, it is now mounted on the axle just past the FAD unit and is secured to the passenger side steering knuckle right at the tie-rod end.
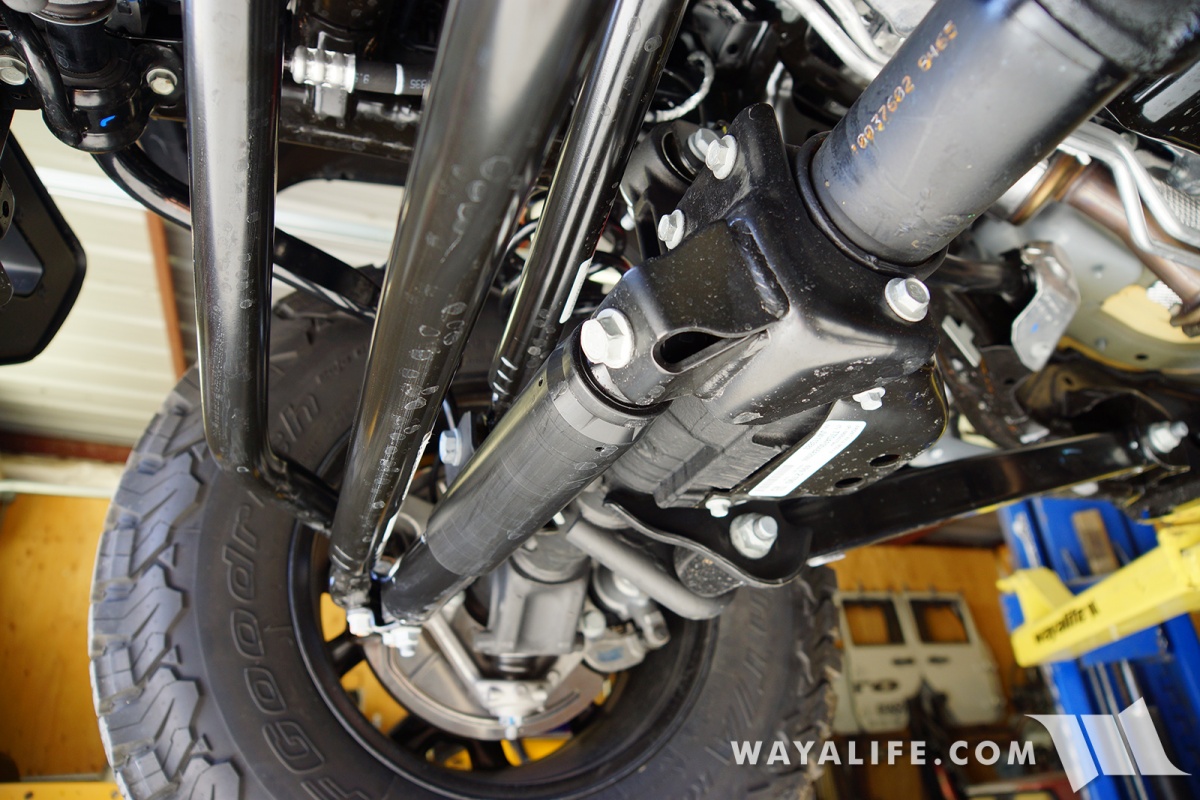
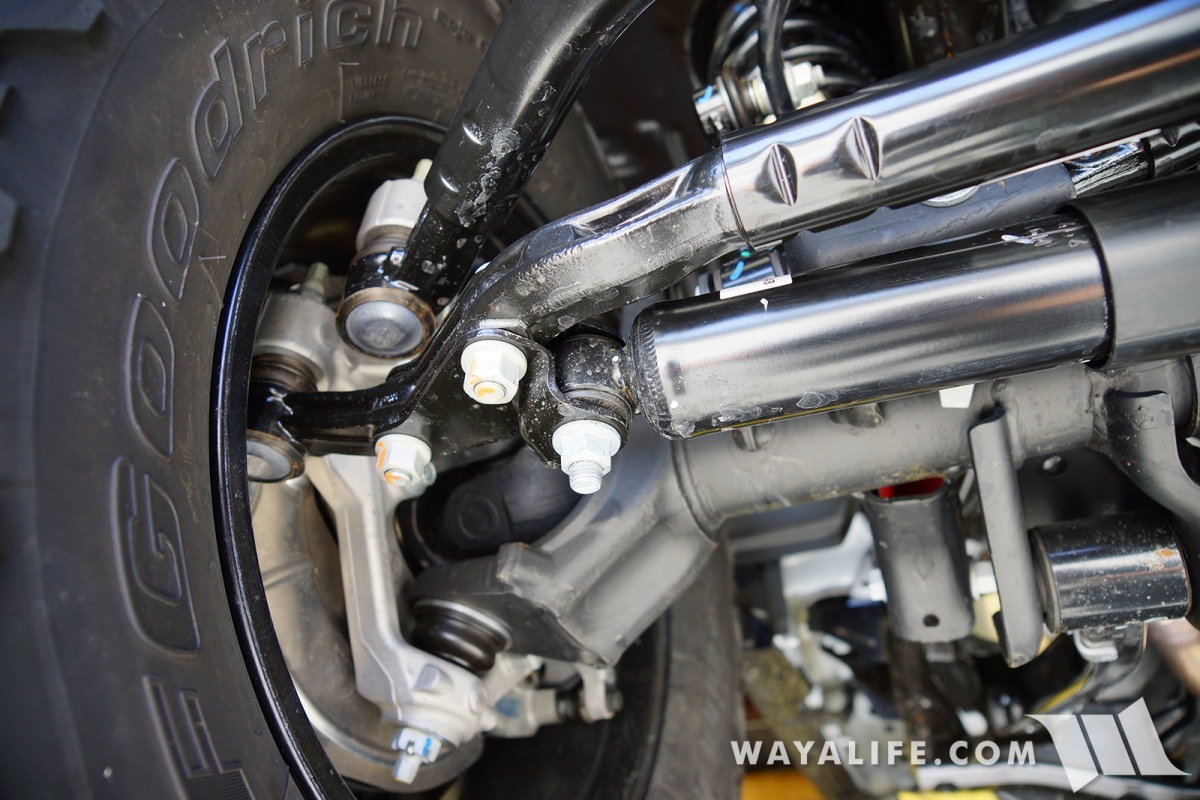
DIAGRAM OF SUSPENSION & STEERING COMPONENTS
For those of you who are new to Jeeps or working on one with coils and a 4-link suspension system, I have created the following color coded diagram to help you identify most of what you'll be working with on a JL Wrangler when installing a lift or making adjustments to your steering and alignment.
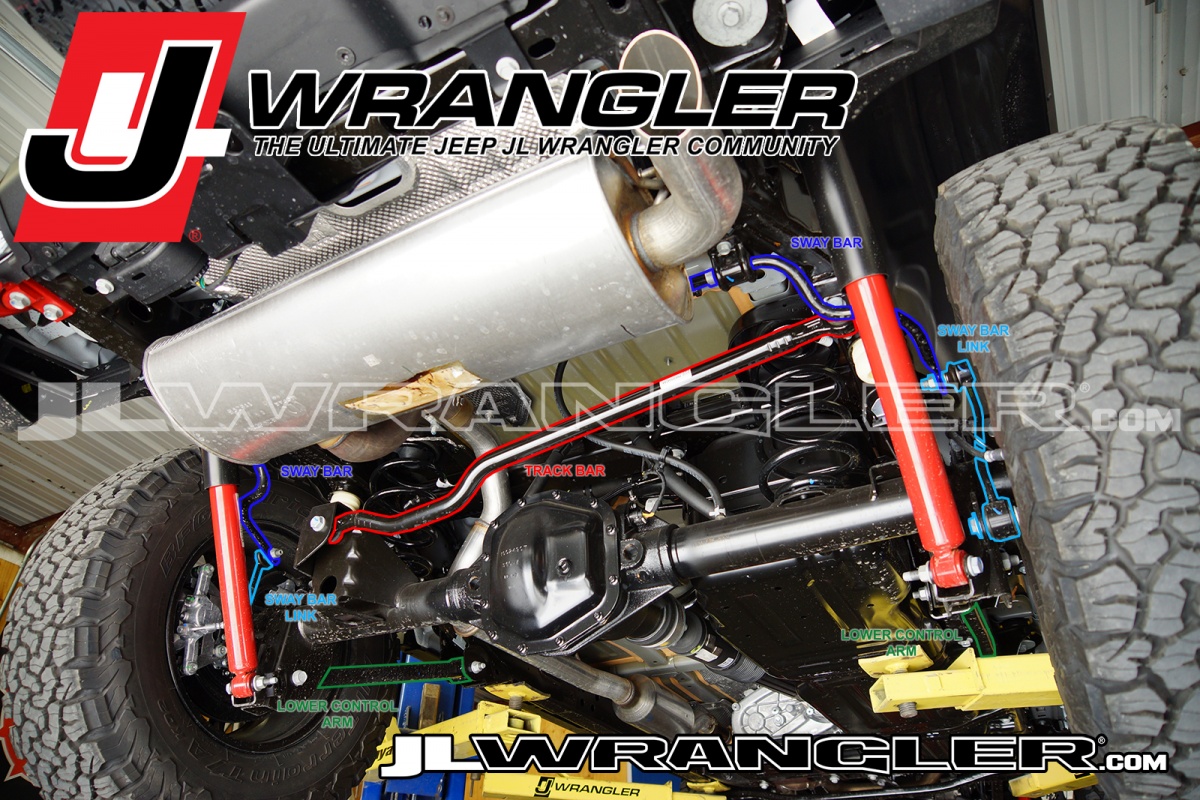
There's a lot less you need to work with in the rear but this diagram outlines some of the components you will be working with there.
I hope the photos and information I've provided in this post is helpful to you. Please let me know if you have any questions.
One of the first things that Cindy and I did soon after bringing home our brand new, Jeep JL Wrangler Rubicon Unlimited, was rack it up so that we could get a good look at everything underneath and while everything was still clean. Certainly, it's a lot easier to photograph and handle things like suspension and steering components, when dirt and mud isn't falling in your face. For those of you who are interested, these are the pics we took and hopefully, they'll give you a better idea of what you can expect to find, under a JL Wrangler.
Going up...


REAR END
Okay, these first set of shots are all from the rear end and document in detail, some of components you'll most likely be working with there when lifting your JL Wrangler. First up, a total overview.

A couple of shots that give you a better look at the JL Wrangler muffler and its all new Dana M220 rear axle.

A side shot of the muffler.

While similar to a Dana 44, the shape of the Dana M200 is definitely new and unique to it.

This passenger side 3/4 shot of the rear end shows how the rear shocks are now mounted on the outside of the frame rails. A nice improvement over the JK setup.

It's a little hard to see but here's a closer shot of where the shock is mounted on the frame rail. Nice thing is, it now uses a through bolt instead of a bar pin.

Here's a closer look at the passenger side rear coil, track bar frame mount, bump stop, shock and sway bar.

A view looking across the length of the JL Wrangler rear track bar. As you can see, it's bigger, beefier and shaped differently than the old JK.

And, this is the driver side so that you can see the bigger, beefier and raised axle side track bar mount.

3/4 shot of the rear from the driver side.

We ordered our JL Wrangler with the tow package and taking a step back, you can see what the hitch receiver looks like mounted under the rear bumper.

Here you can see that unlike the JK before, the JL Wrangler tow package comes with a weatherproof, standard 7-Pole and 4-Pole Trailer Connector Socket.

Being that we do have a Rubicon, it did come with a nice red J-hook style tow hook mounted on the driver side frame rail.

MIDDLE
This is a shot looking forward at the belly of the JL Wrangler from the rear axle. As you will see, the EVAP canister - also known as, the 'rock target', has been relocated out of the way and up behind the passenger side rear fender liner.

As you can see, the JL Wrangler exhaust system still utilizes a resonator and the rear drive shaft is still an rzeppa design, just like the old JK.

Shot of the rzeppa CV joint at the standard cut, Dana M220 pinion. As you can see, the CV boot retainer is now flared.

Although the housing has been redesigned, Rubicon model JL Wranglers still have an NV241OR Rock-Track transfer case.

Shot of the rzeppa CV joint at the transfer case output shaft.

Here are a few shots that show what the JL Wrangler transfer case skid plate now looks like.


A few more shots of the transfer case skid plate being that it really takes a beating.


Even more than the transfer case skid, the gas tank skid plate is without question that takes the brunt of all abuse out on the trail. While the factory skids are still serving their purpose on our 2 JK's, they are beat to all hell and it's nice to see that Jeep has redesigned this skid to have more structural embossing and ribbing to help reinforce it.


View from the middle of the JL Wrangler looking back toward the Dana M220 rear axle.

Being that we ordered our JL Wrangler with the new 8-Speed ZF automatic transmission, it came with a skid bar to help protect the sump pan. You can see it here in this pic along with the exhaust loop and redesigned exhaust cross over that allows the front drive shaft to have a greater amount of droop without tearing the slip shaft boot.

Another shot of the JL Wrangler transmission skid bar from the other side.

A closer shot of the JL Wrangler exhaust loop from the other side.


Just beyond the transmission cross member and exhaust hanger, you can just see the front drive shaft output shaft. As you can see, it is still an rzeppa CV just like on the JK.

Looking toward the outside edge of the JL Wrangler, you can see the Rubicon rocker sliders are still mounted to the pinch seam and to the bottom of the tub.

Stepping out from under the JL Wrangler, you can see that the rear fender wells come with pinch seams that have already been trimmed or angled back so that bigger tires can be run without making contact with them.

FRONT END
Once again, just like the JK, the JL Wrangler front drive shaft utilizes a u-joint bolted up to a pinion flange on the Dana M210 front axle.

Here you can see that the Dana M210 is a high pinion axle and that the amount of caster it has allow the front drive shaft to almost be in line with the pinion even at a full droop.

Here are a few shots of what a lot of people are still unsure of on the JL Wrangler - the FAD or, front axle disconnect motor.

Designed to disconnect the front axle when driving in 2WD, the FAD was incorporated into the design of the Dana M210 front axle to help improve fuel economy.

The fact that it has its own skid plate indicates to me that the FAD needs to be protected. Fortunately, it is an electric motor as opposed to the old school vacuum CAD's of yesteryear and hopefully, it'll hold up to water better than the electronic sway bar disconnect.

Moving over the passenger side front wheel, you can get a good look at the JL Wrangler lower control arm, red Rubicon shock which is not secured to the frame using a through bolt instead of a stud, the coil beyond it and the new beefed up Dana M210 end forging or what most people refer to as the "axle C".

Here's a better shot of the JL Wrangler front shock upper frame mount with through bolt.

A 3/4 view of the passenger side axle C, the new Dama M210 aluminum knuckle, ball joints, axle shaft u-joint and all new 2-piston brake caliper.

A closer view of the 2-piston brake on the driver side.

Looking up at a JL Wrangler, 3.6L V6 Pentastar Engine. As you can see, it looks completely different from a 3.6L in a JK and the oil pan is even more out of the way and smaller too!

More than the tiny oil pan, the reason why I'd want to install some kind of armor here is to protect the transmission cooler lines from renegade branches and roots on the trail.

Here's a shot of the motor mount.

The JL Wrangler comes with an all new steering box and it is now made out of aluminum.

Going way up front, you can see the Rubicon electric sway bar disconnect sitting just above the air dam skid plate.

To help get better lighting on everything, turned our JL Wrangler Rubicon around so that it was pointing toward the garage door. Also, to help get a better look at all the steering components, I went ahead and removed the air dam skid plate. Here's a few shots of what it looks like up front without it.

With the air dam skid removed, you can get a clear shot of the electric sway bar disconnect motor, the sway bar itself, the sway bar end links, the pitman arm, drag link, track bar, tie-rod, steering stabilizer, axle C's, knuckles and of course, the all new Dana M210 front axle. You can even see how the front drive shaft now has a clear path downward.


Close up look at the electric sway bar disconnect motor.


Close up look at the driver side coil and sway bar link. Notice how the lower spring perch now comes with an isolator that's indexed for the coil.

Here's a closer look at the new JL Wrangler tie-rod end with adjuster on the driver side.

View of the driver side steering knuckle with the lower ball joint in view.

On the passenger side, you can see the all new beefy tube designed drag link with forged ends tying into the knuckle just above the tie-rod.

A look at the passenger side coil. Again, notice how it has an indexed lower spring perch isolator.

The steering stablizer is still mounted low and is exposed to damage but the way it's mounted up has been improved. As you can see, it is now mounted on the axle just past the FAD unit and is secured to the passenger side steering knuckle right at the tie-rod end.


DIAGRAM OF SUSPENSION & STEERING COMPONENTS
For those of you who are new to Jeeps or working on one with coils and a 4-link suspension system, I have created the following color coded diagram to help you identify most of what you'll be working with on a JL Wrangler when installing a lift or making adjustments to your steering and alignment.

There's a lot less you need to work with in the rear but this diagram outlines some of the components you will be working with there.

I hope the photos and information I've provided in this post is helpful to you. Please let me know if you have any questions.
