SoupierPuppy
New member
Swapping suspension (Sport -> Rubicon)
Hello fellow Wayalifers!
As you can see by the post count I am a new(ish) member on the forum and I would like to start one of many write-ups to follow.
Recently I was able to purchase a set of Rubicon suspension from a fellow Wayalifer for a steal. I didnt find much in the way of specifically swapping out the stock suspension for Rubicon parts so I figured I would make this write up for those looking to take the plunge as well.
Time required:
2-3 hours with some breaks for a beer or two in the middle.
To start with here are the tools you will need (The tools I used at least):
High Torque Impact Driver
10mm socket
18mm socket
5/8 socket
5/8 wrench
18mm wrench
Crescent wrench (or a double of previous wrenches)
Floor Jack and jack stands
Stock supplied scissor jack as a helper tool
0. Pre-Wrenching safety measures:
To start make sure your car is in park and is chalked in place (dont place the Ebrake as this will make life difficult later as we had found).
I would also recommend washing the underside of the jeep a few hours before doing this install. We found out the hard way that road dust will come off and get in your eyes and mouth and nose. Do yourselves a favor and learn from my mistake. Even if you washed it right after the last time you played, WASH IT AGAIN.
Now on to the important parts
We started with front side and the directions are as follows...
1. Shock removal
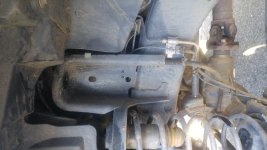
Once the car is safely secured lift the tire off the ground and remove it by pulling off the 5 lug nuts. With the tire out of the way you can reach the front shock. On top there is a 5/8 nut. It is a bit hard to get to since its difficult to see and there is a bunch of plastic fender flare lining in the way. In the picture below you can see where the hole is for the post (Shock is removed for clarity of position). Using a ratcheting 5/8 wrench and a crescent wrench (or another 5/8) to keep the shock itself from twisting, carefully undo the nut on the top of the shock. Be careful when pulling off the shock as there is a bushing and large washer that might fall and be difficult to locate. Try your best to keep them in line with the hole to make installing the new shock easier. When installing the new shock the order of parts goes: shock->washer->bushing->frame->bushing->washer->nut. The bottom washer will have a small protrusion from the top that slides into place on the mounting bracket and allows for a tight fit when the top bushing is placed.
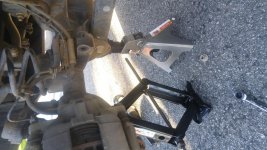
Next, using and 18mm socket and wrench, remove the bottom mount from the shock
2. Brakeline Bracket removal (Optional if super brave. Danger of tearing line if not removed)
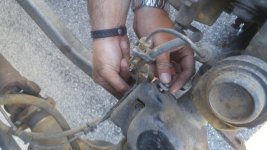
Once the shock is removed, I highly recommend removing the small brake line bracket that was located near the bottom of the shock mounting bracket. it uses a 10mm head on one side and a pressure fit on the other side. Removing this will let the axle droop farther safely.
3. Swaybar endlink removal
Now use the scissor jack under the knuckle to help adjust the tension on the swaybar endlinks as these will be the only thing left holding up the axle. Using an 18mm socket and wrench undo the swaybar endlinks from the axle side and swing them up and out of the way.
4. Spring removal
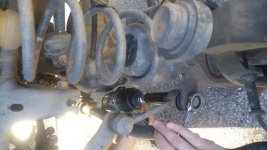
With that done and a little brute force, the spring should come right out. This was fairly easy as the axle was able to droop far enough out of the way to slide the spring away freely. The spring isolators may or may not come off, if they do catch them and put them on top of the new springs.
Putting the new spring in took quite a bit more force and the help of some friends to help droop the axle just a little more. With the new spring in, rotate it until the bottom of the spring aligns with the groove in the axle.
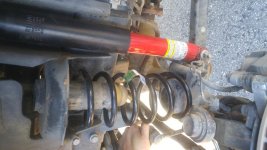
Now reverse the process with your new Rubicon shocks in place of the old sport shocks. I recommend putting the swaybar endlink back on first using the scissor jack as a helper again. This also happened to keep the bottom shock mount aligned well when the top was installed. When you are finished you should end up looking like this
5. E-Brake removal (Rear-only)
The rear is a similar process with the small caveat of having to remove the E-brake line. The E-brake can be detached from the small clips on the knuckle where the bumpstop hits at full stuff. It takes a bit of wiggling to get it out and is much easier when the E-brake is off.
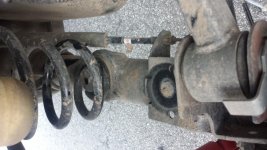
The process in the rear is exactly the same so follow steps 1-5.
Congrats! You now have pretty red Rubicon suspension installed! Go for a test drive around the block a few times and after that check all of the bolts for tightness (for safety sake).
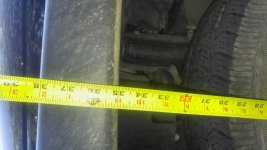
In case anyone was wondering I took some before and after measurements (Ground to fender) to see how much lift I was actually getting
Before:
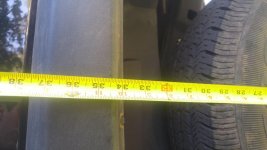
After:
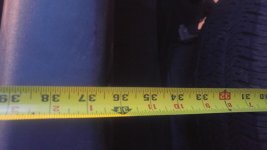
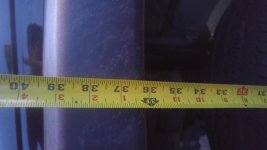
As you can see I ended up with about 1.25" in front (35->36.25) and 2.25 in the rear (34->36.25). Oddly enough my front was high with the stock suspension and luckily I am now all leveled out.
Good Luck and happy wrenching!!!
Hello fellow Wayalifers!
As you can see by the post count I am a new(ish) member on the forum and I would like to start one of many write-ups to follow.
Recently I was able to purchase a set of Rubicon suspension from a fellow Wayalifer for a steal. I didnt find much in the way of specifically swapping out the stock suspension for Rubicon parts so I figured I would make this write up for those looking to take the plunge as well.
Time required:
2-3 hours with some breaks for a beer or two in the middle.
To start with here are the tools you will need (The tools I used at least):
High Torque Impact Driver
10mm socket
18mm socket
5/8 socket
5/8 wrench
18mm wrench
Crescent wrench (or a double of previous wrenches)
Floor Jack and jack stands
Stock supplied scissor jack as a helper tool
0. Pre-Wrenching safety measures:
To start make sure your car is in park and is chalked in place (dont place the Ebrake as this will make life difficult later as we had found).
I would also recommend washing the underside of the jeep a few hours before doing this install. We found out the hard way that road dust will come off and get in your eyes and mouth and nose. Do yourselves a favor and learn from my mistake. Even if you washed it right after the last time you played, WASH IT AGAIN.
Now on to the important parts
We started with front side and the directions are as follows...
1. Shock removal
Once the car is safely secured lift the tire off the ground and remove it by pulling off the 5 lug nuts. With the tire out of the way you can reach the front shock. On top there is a 5/8 nut. It is a bit hard to get to since its difficult to see and there is a bunch of plastic fender flare lining in the way. In the picture below you can see where the hole is for the post (Shock is removed for clarity of position). Using a ratcheting 5/8 wrench and a crescent wrench (or another 5/8) to keep the shock itself from twisting, carefully undo the nut on the top of the shock. Be careful when pulling off the shock as there is a bushing and large washer that might fall and be difficult to locate. Try your best to keep them in line with the hole to make installing the new shock easier. When installing the new shock the order of parts goes: shock->washer->bushing->frame->bushing->washer->nut. The bottom washer will have a small protrusion from the top that slides into place on the mounting bracket and allows for a tight fit when the top bushing is placed.

Next, using and 18mm socket and wrench, remove the bottom mount from the shock

2. Brakeline Bracket removal (Optional if super brave. Danger of tearing line if not removed)
Once the shock is removed, I highly recommend removing the small brake line bracket that was located near the bottom of the shock mounting bracket. it uses a 10mm head on one side and a pressure fit on the other side. Removing this will let the axle droop farther safely.

3. Swaybar endlink removal
Now use the scissor jack under the knuckle to help adjust the tension on the swaybar endlinks as these will be the only thing left holding up the axle. Using an 18mm socket and wrench undo the swaybar endlinks from the axle side and swing them up and out of the way.

4. Spring removal
With that done and a little brute force, the spring should come right out. This was fairly easy as the axle was able to droop far enough out of the way to slide the spring away freely. The spring isolators may or may not come off, if they do catch them and put them on top of the new springs.
Putting the new spring in took quite a bit more force and the help of some friends to help droop the axle just a little more. With the new spring in, rotate it until the bottom of the spring aligns with the groove in the axle.
Now reverse the process with your new Rubicon shocks in place of the old sport shocks. I recommend putting the swaybar endlink back on first using the scissor jack as a helper again. This also happened to keep the bottom shock mount aligned well when the top was installed. When you are finished you should end up looking like this

5. E-Brake removal (Rear-only)
The rear is a similar process with the small caveat of having to remove the E-brake line. The E-brake can be detached from the small clips on the knuckle where the bumpstop hits at full stuff. It takes a bit of wiggling to get it out and is much easier when the E-brake is off.

The process in the rear is exactly the same so follow steps 1-5.
Congrats! You now have pretty red Rubicon suspension installed! Go for a test drive around the block a few times and after that check all of the bolts for tightness (for safety sake).
In case anyone was wondering I took some before and after measurements (Ground to fender) to see how much lift I was actually getting
Before:


After:


As you can see I ended up with about 1.25" in front (35->36.25) and 2.25 in the rear (34->36.25). Oddly enough my front was high with the stock suspension and luckily I am now all leveled out.
Good Luck and happy wrenching!!!
Last edited:
