You are using an out of date browser. It may not display this or other websites correctly.
You should upgrade or use an alternative browser.
You should upgrade or use an alternative browser.
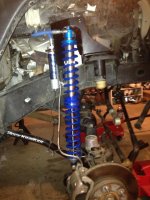
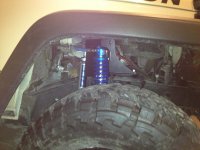
Evo bolt on coilover install
- Thread starter Atch
- Start date
MTG
Caught the Bug
This guy at JKF didn't think it was so simple. 
This post cracked me up.
This post cracked me up.
Nwapache said:Lured by the marketing tag line of "bolt on" I enlisted some semi pro help on the form of Nwbronco and tackled this install over the weekend,
I quickly came to realize that "bolt on" means no welding required. If you are reading this in anticipation of following in my footsteps, don't. Run, don't walk to your nearest 4x4 shop and pay them whatever they ask, to do this install for you.
If I haven't discouraged you... You're crazier than I am. First, my kit came with no instructions. When I called the unnamed shop I purchased them from in Silverdale Washington, a guy we'll call "David" (not his real name) laughed and said he didn't think the kit came with instructions. The little bell in the back of my head that rings when something bad is going to happen started dinging softly.
Evo was able to email over a guide, which I stuffed into the box and ignored. Install day arrives, and I motor down to Olympia. I'm playing the role of helper to a driveway guru on things jeep. My confidence level rose as I come around the corner and count no less than 5 JK's parked in front of the house...
Kit gets unboxed and laid out, not too intimidating. Dead sexy coilovers, check. 2 big brackets, two little brackets, new brake lines, new end links, and a bag of bolts, all check, and awaayyyy we go.
Step one: remove wheels, easy except my beadlocks and tires are 168lbs apiece
Step two: remove existing springs and shocks, not too bad.
Step three: test fit and align shock tower plate and mark holes for drilling big assed holes. Sure, this is straight forward... More on this later.
Step four:: test fit big bracket and start trimming plastic ribs until bracket mounts flush... Hahaha are you kidding me? Between the cutting wheel, and diamond grinder I munched off a few pounds of plastic off the passenger side. Almost including my battery! After a couple hours of playing plastic surgeon, we got it flush.
Step five: align holes from step three and install 6? Bolts. Ummm okay, only problem is the bolt holes in step 3 don't match up with squat. Time to drill more holes. Install bolts? Really? How the F are we supposed to get our fat monkey hands and tools behind those suckers to torque them down? Add a couple more hours to the goat rodeo.
Step 6: cut lower shock mount bracket and install new lower bracket. This was probably the easiest step, except the part where you don't really know how much to cut off and the instructions are totally worthless.
Step 7: mix and repeat on the other side. Being the smart fellows that we are (actually, bob was the smart one, I just look good) we figure the 7 hours we invested on one side would pay dividends on the second. We were right, it went much smoother ... Smoother being a relative term because our fat monkey hands didn't shrink much to torque those mother loving bus down.
Step 7: install coilovers, sweet! Now we are getting to the money shot. Mind you, the sun has set, and frost is now covering everything, we've ( and by we I mean bob) been working at this for 8+ hours. Frostbite and hypothermia are real concerns. So, there we are, two bolts on each side, easy right? Hahaha, the top bolt is way up in it and you have to do hand yoga to get it in there. This would have been challenging, except...oh yeah, those lite tube thingies are spacers and you have to put one one each side. Add 1 hour!
Step 8: brake lines , fortunately mine are already sexy, so we skipped this.
Step 9: remove end links and replace with supplied. Looks easy enough , but I can't understand why Evo didn't spend 10 minutes and insert the bushings prior to shipment. Wth? I don't have enough to do?! I gotta slap those little wankers into place? So, there we are, standing around looking at each other going "gosh those things are long" yup, 13" give or take. 10+ hours into it, core temp at 92 degrees, and I said "well, they put em in the kit, we should use em". On they go, wheels on, lower the jeep and.... Wait a minute, I don't think the sway bar should be up that high! About 30 degrees above level. Up goes the jeep, off come the Louisville sluggers , and on goes the previously installed 10 inchers.
Step 10: turn on the seat heaters, drive home and pass out.
I was fortunate, the height was even money for my lift, and I didn't have to monkey with alignment,castor, or nothing.
In Evo's defense, the instruction sheet tells you not to do this job yourself. It's not technically challenging if you've played with a few lift kits, but the PITA factor is really high. Your shop will earn every penny they charge you.
MTG
Caught the Bug
Atch said:Yeah I was just reading that thread. I'm hoping him and his expert friend had no clue what they were doing otherwise I may be in for a long evening of swearing!
I took it more of perhaps the wrong expectations. I figured it might take me 3 days to do a lift having never done one and I built 5 days into my schedule. It only took Sharkey and I 1.5 and I was happy.
Last edited:
piginajeep
The Original Smartass
It's proof not everyone should work on their jeep.
piginajeep
The Original Smartass
I installed it in under 8 hours by myself. It can only go on one way. It's one of the easiest suspension kits I've installed.
10x easier than a long arm kit
10x easier than a long arm kit
GCM 2
New member
It's proof not everyone should work on their jeep.
I read that guys thread on JKF that MTG mentioned, and even though it was a comedy filled first post, your statement above is exactly what I was thinking :doh:
10frank9
Web Wheeler
I installed it in under 8 hours by myself. It can only go on one way. It's one of the easiest suspension kits I've installed.
10x easier than a long arm kit
This gives me confidence since this is now in my build list. Perhaps if I'm lucky I can enlist the help of my expert friends
Atch
New member
This gives me confidence since this is now in my build list. Perhaps if I'm lucky I can enlist the help of my expert friendshint. Overtime here I come.
Yeah, I'd have to agree with you. Having a background in assembly and having installed several lifts I think it should be a fairly simple install.
It's proof not everyone should work on their jeep.
I read that guys thread on JKF that MTG mentioned, and even though it was a comedy filled first post, your statement above is exactly what I was thinking :doh:
I'm with these guys, not everyone should be working on their own Jeep. There's no shame in it but, it is true.
OverlanderJK
Resident Smartass
This guy at JKF didn't think it was so simple.
This post cracked me up.
haha I was dying when I was reading that post! :cheesy:
StrizzyChris
New member
He may be hillarious, but I hope this doesnt discourage people from doing this system. So many people have different mechanical skills and capabilities.
yeah, expert is in the eye of the beholder. It may be that the "expert" might know how to rotate tires correctly :cheesy:
I would say the opposite....I think everyone should work on their own Jeep. The only thing they shouldnt be allowed to do is perform write-ups :grayno:
I'm hoping him and his expert friend had no clue what they were doing
yeah, expert is in the eye of the beholder. It may be that the "expert" might know how to rotate tires correctly :cheesy:
It's proof not everyone should work on their jeep.
I'm with these guys, not everyone should be working on their own Jeep. There's no shame in it but, it is true.
I would say the opposite....I think everyone should work on their own Jeep. The only thing they shouldnt be allowed to do is perform write-ups :grayno:
RanchoRubi
Active Member
I'm expecting to receive both front & rear coilovers this week. Does anybody have any pointers or links to installation of this kit? Or is this kit a pretty simple install?
The kit is relatively easy, but the instructions from Evo are abbreviated. Go to JKF, there's an extension set of step by step pictures done by Mechengineer2 that are priceless in terms of some key steps. I referenced them as well. I have had mine now for 3 months and don't know why I waited so long. Good Luck.
The kit is relatively easy, but the instructions from Evo are abbreviated. Go to JKF, there's an extension set of step by step pictures done by Mechengineer2 that are priceless in terms of some key steps. I referenced them as well. I have had mine now for 3 months and don't know why I waited so long. Good Luck.
lol...by chance i went to look at this thread early this morning for some pics, it has a ton of em. great thread:rock:
Atch
New member
The kit is relatively easy, but the instructions from Evo are abbreviated. Go to JKF, there's an extension set of step by step pictures done by Mechengineer2 that are priceless in terms of some key steps. I referenced them as well. I have had mine now for 3 months and don't know why I waited so long. Good Luck.
Thx the pics should be a great guide!
Here is the link
http://www.jk-forum.com/jk-show-tell-33/evo-bolt-coilover-photos-248326/
Atch
New member
Very nice! Its always great to take on an install on your own and then standing back to admire your own work.:thumb:
Thx, my jeep has been all me except for the welding of the EVO sliders, so I take A LOT of pride in her


