Electrical wiring from battery to trunk

slowfox

New member
Hello gents!

I am planning on running electrical from the main battery to the trunk. I need this for two purposes, one run will feed my ARB Twin Compressor which is to be relocated in the storage caddy in the trunk, and second run would be used as input for a Redarc Redvision system (BMS/Smart Fuse Distribution) which will be taking care of charging a secondary 100Ah battery and will output to all my camp gear.

My idea is to run a 5ft AWG1 SGX wire from the main battery to the passenger side under the hood where I will place two 3 way split distribution blocks for both +/-, fused for the positive only. From there I will run two runs of +/- AWG4 wire to the trunk, one of which will feed the air compressor and the other the Redarc system. The third split off the AWG1 wire under the hood I will use to feed inside the cab for a radio install and to power an ARB Linx.

I want to plan for the install and I tend to prefer the cables being run through the firewall and along the cab under the plastic trims. Diameter of those AWG4 cables is 0.331" and since I never ran a cable along that route I would appreciate any input, suggestions and information that you might have!

Please share your experience!

:ninja::coffee:
 
It makes it way easier if you don't have any bends or kinks. Even a slight kink makes that stuff a bitch to pull. I've done it on a couple of Jeeps and I zip tie it as I go so it's safely routed where it won't rub on metal or other wires. The other thing I've done is at any location where it could move slightly and touch metal, I make damn sure the ground cable is the one near the metal vs the hot wire. If for any reason, it has to touch metal, I've used that anti-freeze pipe foam they sell at home depot and zip tie it around the cable to provide some spacing in those areas.

As far as under the plastic trims, plan it out first because some of that trim is tight and if you run the wire under there and then put the trim back, it will bulge if there's not enough space underneath.

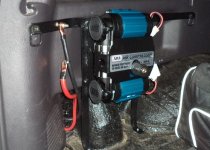
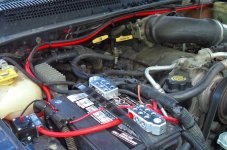
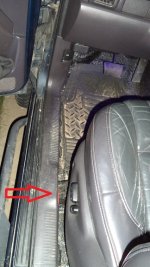
Here's some pics I did on my WJ (and also a twin ARB in the back), so you can see just how big the wiring is compared to the Jeep.

DSC03681.JPG

DSC03659.JPG

DSC03657.JPG
 
Last edited:
It makes it way easier if you don't have any bends or kinks. Even a slight kink makes that stuff a bitch to pull. I've done it on a couple of Jeeps and I zip tie it as I go so it's safely routed where it won't rub on metal or other wires. The other thing I've done is at any location where it could move slightly and touch metal, I make damn sure the ground cable is the one near the metal vs the hot wire. If for any reason, it has to touch metal, I've used that anti-freeze pipe foam they sell at home depot and zip tie it around the cable to provide some spacing in those areas.

Yeah that makes I will make a very clean install under the hood, what concerns me most is in the cab.

As far as under the plastic trims, plan it out first because some of that trim is tight and if you run the wire under there and then put the trim back, it will bulge if there's not enough space underneath.

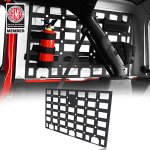
Exactly, I almost feel like I have to dismantle everything so before I can understand where I can route those wires through. Another thing is a good location to place the Redarc Redvision boxes, I was thinking of some sort of mount behind the rear window like this mount on which I can potentially mount the goodies, this way I wont lose much space, but it might be difficult place to access especially after I install the Goose Gear slide and the fridge. So still exploring options for that.
 
I did it on my Gladiator as well and ran it along the frame underneath. I really couldn't find an easy spot to get it through the firewall.
 
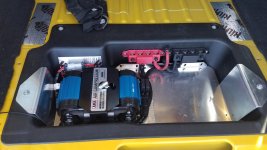
If you follow the factory wiring harness along the top of passenger side frame and over the fuel tank it will be plenty protected, I wrapped my 2 AWG cables in expandable PET braiding (Amazon stuff) and then a layer of "Gator skin" on top of that. I also wrapped in heat tape where you follow the frame rail up by the Cat. This puts you into the engine bay right below the battery area (how convenient). Gator skin is a bit pricey but gives excellent protection, it's actually the closest thing I've found to the Kevlar (or Aramid/ Nomex) stuff we on military aircraft. Avoid pinch points and sharp edges in the rear axle area, tie the cable up well, and it'll last as long as running it through the cab. You can get into the tub using waterproof cable glands. Makes for a nice clean install. I went with 2 AWG cable and mounted BUS bars in the tub to give myself some overhead for future accessories, all fed by a waterproof 100 AMP Blue Sea circuit breaker at the battery side. I now have a rear aux fuse panel connected to the BUS bars as well, for misc lights and other what nots. Your Jeep, your choice, just throwing out some other options. Prepare to be shocked by how little protection the factory harnesses have on them underneath.

20210428_160335.jpg
 
Last edited:
If you follow the factory wiring harness along the top of passenger side frame and over the fuel tank it will be plenty protected, I wrapped my 2 AWG cables in expandable PET braiding (Amazon stuff) and then a layer of "Gator skin" on top of that. I also wrapped in heat tape where you follow the frame rail up by the Cat. This puts you into the engine bay right below the battery area (how convenient). Gator skin is a bit pricey but gives excellent protection, it's actually the closest thing I've found to the Kevlar (or Aramid/ Nomex) stuff we on military aircraft. Avoid pinch points and sharp edges in the rear axle area, tie the cable up well, and it'll last as long as running it through the cab. You can get into the tub using waterproof cable glands. Makes for a nice clean install. I went with 2 AWG cable and mounted BUS bars in the tub to give myself some overhead for future accessories, all fed by a waterproof 100 AMP Blue Sea circuit breaker at the battery side. I now have a rear aux fuse panel connected to the BUS bars as well, for misc lights and other what nots. Your Jeep, your choice, just throwing out some other options. Prepare to be shocked by how little protection the factory harnesses have on them underneath.

View attachment 373775

@JimLee that is definitely very clean install. Just underneath the battery in the engine bay sounds great and makes your cable run shorter I would assume. I like the way you ran the cables into the storage caddy and those glands must be more than enough to protect from elements if you were to make water crossings. How long did your 2AWG cable run end up being? Also I understand the PET braiding, but I don't really know what the gatorskin is. Is it some sort of rubber insulation wrapped on top of the PET?
 
@JimLee that is definitely very clean install. Just underneath the battery in the engine bay sounds great and makes your cable run shorter I would assume. I like the way you ran the cables into the storage caddy and those glands must be more than enough to protect from elements if you were to make water crossings. How long did your 2AWG cable run end up being? Also I understand the PET braiding, but I don't really know what the gatorskin is. Is it some sort of rubber insulation wrapped on top of the PET?
I ordered 2 20 ft lengths of 2 AWG cable https://www.amazon.com/gp/product/B01MUC9VT3/ref=ppx_yo_dt_b_asin_title_o05_s00?ie=UTF8&psc=1 , yes, the price has gone up significantly since then, you may be able to find a cheaper alternative elsewhere. I prefer "welding" cable for outside runs, it is very flexible and has a very tough jacket because its meant for dragging around a shop floor. I still have a few feet laying around my garage and have used a couple of chunks for other projects so I estimate about 15-16 feet used (buy more than you need, this is definitely cut once scenario). I didn't run the ground all the way to the engine bay, I grounded at the frame just outside the tub, found a very good ground at one of the muffler bracket mounts (same place I have my tailgate grounded to for by CB antenna ground plane). The gator skin is just another PET braiding with a much denser/thicker weave https://www.amazon.com/gp/product/B07VHSY6SM/ref=ppx_yo_dt_b_asin_title_o07_s00?ie=UTF8&th=1 I wish I could have used the stuff we use on aircraft, but that stuff is very hard to source commercially and the price will make your jaw drop, I think the gator skin (or gator wrap as Amazon calls it) is up to the task, I probably don't even need the layer of thinner PET braiding underneath, but I like to overkill if I can and the added weigh is negligible. Like I said, you are going to want to wrap with some heat tape as you follow the frame rail up into the engine bay behind the inner fender liner, you can see where they wrapped the factory harness in the same area by the passenger side cat, its only about 12-16 inches of heat tape which I sourced at a local auto parts store. The cable glands work great, they have a rubber segmented seal that tightens down on the cable as you tighten them up, I've been through water deeper than my tub and haven't gotten a drop inside, I didn't hang out in the water at that depth but I'm pretty confident in them https://www.amazon.com/gp/product/B07FP6TNHZ/ref=ppx_yo_dt_b_asin_title_o08_s00?ie=UTF8&th=1 and if I get into a situation where i'm worried about water getting into the tub I can cut all power to the rear of the Jeep at the CB located in the engine bay.

Let me know if you have any other questions, always happy to help fellow jeepers out.
That is great information @JimLee highly appreciated! 🥳

In the trunk I will also be running a battery charger that draws 50A in conjunction with the ARB Twin which is rated to 68.6A maximum load draw. So I did some calculations based on cable length and type and it looks like I have to run AWG 1/0 to account for 120A at 15ft. Probably that's an overkill given the compressor draws only 50.4A at normal load, and that it won't be used for long periods of time but probably better to have the reserve there, what do you think about that?
No problem! I've read many reports of people measuring the Amp draw on the ARB twin in more of 25-35 Amp range, but haven't measured mine (don't have a clamp on DC ammeter) . Each of the two compressors has a 40Amp Maxi fuse inline. That being said, I think you could squeak by as the chances of both of your devices running at max draw at the same time is probably low, but "what if" is definitely a factor for me when planning something like this safely. Also if you look at any ampacity chart (sounds like you may already have) you will notice that as temps go up the current carrying capacity of your conductor goes down, effectively reducing it to a lower size conductor. I personally would go with the larger size cable, when it comes to electrical I like to play in the "rules" and avoid the grey areas. I would also like to mention that if you are mounting in the tub you should probably think about remote locating your ARB air intakes to the rear cargo area where they can draw in cooler air, this will reduce any "heat soak" in the tub and reducing the temps of the compressors will lower the amperage draw.
 
Last edited:
No problem! I've read many reports of people measuring the Amp draw on the ARB twin in more of 25-35 Amp range, but haven't measured mine (don't have a clamp on DC ammeter) . Each of the two compressors has a 40Amp Maxi fuse inline. That being said, I think you could squeak by as the chances of both of your devices running at max draw at the same time is probably low, but "what if" is definitely a factor for me when planning something like this safely. Also if you look at any ampacity chart (sounds like you already have) you will notice that as temps go up the current carrying capacity of your conductor goes down, effectively reducing it to a lower size conductor. I personally would go with the larger size cable, when it comes to electrical I like to play in the "rules" and avoid the grey areas. I would also like to mention that if you are mounting in the tub you should probably think about remote locating your ARB air intakes to the rear cargo area where they can draw in cooler air, this will reduce any "heat soak" in the tub and reducing the temps of the compressors will lower the amperage draw.

Exactly, I've seen so many installations done the wrong way, and people having to deal with all sorts of issues by not sizing their installations properly, and unfortunately I've heard stories of fires caused by improper installations as well. This being said I am not willing to sacrifice in this department. AWG1/0 has an outer diameter of 0.526" and I intend on running both positive and negative to the battery, do you think such a thick cable and two of them wrapped in the gator skin would fit that same route you used properly?

I got the remote mounting bracket from ALL for the air intakes and I hope that would be fine, although I might end up mounting the high pressure air in a different spot eventually. I've seen some people mount it in the fuel door next to the fuel tank neck, but I will try the AAL location first to make my life easier ;)
I don't see a problem running both of those cables, wrapped, I didn't run into any real tight areas under there. I've got the AAL remote panel as well, works well, it's just a PITA to run those hoses and braided line under the trim. I got it, but I invented some new curse words in the process, lol.
 
I don't see a problem running both of those cables, wrapped, I didn't run into any real tight areas under there. I've got the AAL remote panel as well, works well, it's just a PITA to run those hoses and braided line under the trim. I got it, but I invented some new curse words in the process, lol.

That's exactly how I felt about it when I saw the tiny space there, I will be putting a Goose Gear platform on top down the road I hope those hoses and the braided line don't impede with the Goose Gear base :eek:
 
That's exactly how I felt about it when I saw the tiny space there, I will be putting a Goose Gear platform on top down the road I hope those hoses and the braided line don't impede with the Goose Gear base :eek:
I had to cut a small notch in the base runner (the piece that lifts it off the metal deck) of my GG deck plate to route the hoses through, easy peasy and completely hidden.
 
I had to cut a small notch in the base runner (the piece that lifts it off the metal deck) of my GG deck plate to route the hoses through, easy peasy and completely hidden.
I would assume the same way you can run two additional 4AWG cable through to the AAL remote bracket and have them nice and cleanly hidden?
 
I would assume the same way you can run two additional 4AWG cable through to the AAL remote bracket and have them nice and cleanly hidden?
Yea, but I have to warn you the implementation of that remote fuse panel is horrible. If I had to do it over I would have put the aux fuse panel in my tub. Thats two more large gauge cables you have to hide under the trim, i only used 6 AWG and it was a nightmare. The terminal lugs on the fuse panel itself aren't big enough to handle the lugs on the cable end of a large gauge cable. The holes in the remote panel are too small and too close to the fuse panel itself to run anything through without a sharp bend in the cable. The outboard side if the fuse box ends up too close to the hardtop rendering one whole side basically unusable because there's not enough clearance for the lugs of even a small gauge wire to come out of the box without a hard 90° turn. In all honesty it turns into a mess. If I ever have to get back in there im ripping that whole fuse box out, as a matter of fact I have my tailgate light run directly to my big BUS bars with an inline fuse because I didn't want the nightmare of running it all the way to that aux fuse panel. Maybe you have more patience than me, but Ive been running cable on a professional level for 30 plus years and that thing just plain pissed me off.
 
Last edited:
Yea, but I have to warn you the implementation of that remote fuse panel is horrible. If I had to do it over I would have put the aux fuse panel in my tub. Thats two more large gauge cables you have to hide under the trim, i only used 6 AWG and it was a nightmare. The terminal lugs on the fuse panel itself aren't big enough to handle the lugs on the cable end of a large gauge cable. The holes in the remote panel are too small and too close to the fuse panel itself to run anything through without a sharp bend in the cable. The outboard side if the fuse box ends up too close to the hardtop rendering one whole side basically unusable because there's not enough clearance for the lugs of even a small gauge wire to come out of the box without a hard 90° turn. In all honesty it turns into a mess. If I ever have to get back in there im ripping that whole fuse box out, as a matter of fact I have my tailgate light run directly to my big BUS bars with an inline fuse because I didn't want the nightmare of running it all the way to that aux fuse panel. Maybe you have more patience than me, but Ive been running cable on a professional level for 30 plus years and that thing just plain pissed me off.
I can imagine. I like thinks to be cleanly made, calculated well and with attention to detail so I hear you. Good to know that this fuse box is not a good match to that place. I will be mounting a Redarc Redvision system and I will just feed it either a AWG4 or AWG6 from the bus bar in the caddy. My plan is to install it above the AAL remote bracket using one of those brackets that mounts behind the rear window. That space is not well utilized anyway and I think it makes for a good option for the system. I am just a little worried about access to it after I mount the Goose Gear fridge sliders and fridge I would probably have to rethink it. Also the place for the 100Ah AUX battery is still to be determined. This is what the mounting bracket looks like:

71olRFs7K9L._AC_SX679_.jpg

Another option for me would be if I have a drawer from ARB to have some mounting plate behind the drawer where I can put the Redarc Redvision, but this would also require a 60% seat delete on the side of that drawer... difficult choices.
 
@JimLee your information was very detailed and shifted my initial plans into running it the same way. I already sourced everything I need besides the heat reflecting tape, which apparently needs to be of high quality. I found a good UK based brand called Funk Motorsports which make very good product but I will probably order DEI as it would be faster delivery. One area of concern after I did scout the space above the frame is the tie points to be used. My cable is quite thick and heavy being a 1/0 AWG cable and sleeved with two protection layers it is just a tad over 17mm in diameter. How exactly did you end up tying your cable over the frame?

Other than this once the heat reflective tape arrives I would be ready to rock and roll. Although the air compressor comes with inline fuses I decided to go with a fused distribution box with MIDI (mini ANL) fuses in the space where you have the bus bars. This would allow me to fuse the output to the battery charger without having to add additional fuses and will give me two spare fused outputs to be used in the future if needed.
I just zip tied to the factory harness above the frame (up front the factory harness transitions from above to the side of the frame on the passenger side), there are cable anchors holding some of it in place and they seen pretty sturdy. In a couple of places I had to double up large zip ties to get around the circumference of the frame. There is very little hand room above the fuel tank, but with a little patience I was able to get some zip ties (to factory harness) on there. I only ran the one cable up front but I think good quality heavy duty ties should work for you as well. If you are not opposed to drilling a few small holes you could also use some cable anchors for just your runs, but I doubt you will have the space under there to drill down on the frame and would have to mount them on the side, https://www.amazon.com/Assortment-Universal-Retainer-different-Replacement/dp/B07T7D2NV3?th=1
Every oil change and after any "serious" offroading I do an inspection on the underside of my Jeep and this cable run is one of the things I inspect, so far a couple of years down the road it has stayed put, has no chaffing areas, and hasn't needed any of the zip ties replaced.

Another option I looked at but didn't end up using was was what we know in the aviation industry as "click bond studs" https://www.amazon.com/Weld-Mount-T...ocphy=9031792&hvtargid=pla-572199471795&psc=1
These would require mounting to the frame with high temp JB Weld (or suitable alternative, and surface prep would be very important) and would allow the installation of rubberized cable clamps (AKA "Adel clamps) https://www.amazon.com/Clamps-Assor...t=&hvlocphy=9031792&hvtargid=pla-727285570440. If I ever have to re-do this run, or run another, this is the route I'd use. I actually considered going back and using this method after my initial install but the way every thing is holding up well I don't think it is a necessity.
Remember, for the heat tape you only need enough to wrap your run for about 18" or so, same area where the factory harness is wrapped going up and into the engine bay.
Okay that's great, my concern zipping to the factory harness is still valid as the cable I am running is 1lbs per 2.5ft in weight. I like the idea of welding those studs to the frame, but based on the prep that it requires that also seems to be very very difficult to achieve given the limited space above the frame, but if I find a way to do it that's a very good suggestion.

For the engine bay entrance near the exhaust I decided to go with a silicon heat sleeve https://www.amazon.com/gp/product/B08XZ3B33S/ref=ppx_yo_dt_b_asin_title_o02_s00?ie=UTF8&th=1 instead of the heat tape to keep things nice and clean and to allow for easier inspection down the road (e.g. no glue on the inner of the sleeve so it could be easily unsecured and inspection could be made underneath to the braided plastic sleeves for melting or degradation over time.

Being anal about cable runs I also decided to use my favorite tape https://www.amazon.com/dp/B09KHKX9Y5?ref=ppx_yo2ov_dt_b_product_details&th=1 on top of the two braided sleeves along the run, to add a factory look and to further protect from elements - I can't recommend enough the quality of this tape. Just grab 6 of them as they are awesome deal and you will end up using it on everything!
 
Top Bottom