Lord60
Member
There are some pretty cool deck lid/security enclosures for the wranglers for security when the top is down, but $600 - $700+ is a bit outside the budget right now. But it's also a PITA to go places with the top down, and have to take everything with me because there's no secure place to keep it. Being a woodworker, I decided I had to make my own. I thought I'd share the process with you.
Step 1 was deciding if I wanted the lid to hinge up... then decided that I didn't really need that...not on this first iteration. So, a flat 2 piece was what I chose to try.
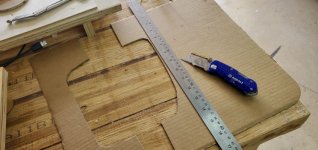
I took a 4'x8' sheet of 3/4" plywood and cut lengthwise down in half... about 24" each piece. Then I measured Mrs. Robinson's tub width at her widest, and went a few inches wider for the initial "this is how I want it" layout. The next step was to place the boards on the tub... and to measure out in some way the shape/outline of the base of the rollbars. To do this I used the lid of a pizza box, and a contour gauge. I used the contour gauge in two halves and transferred that to the pizza box lid and joined the halves together. This is how that turned out.
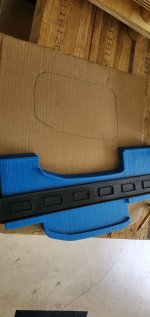
Next, I cut out that shape, and then cut the pizza box lid in half...
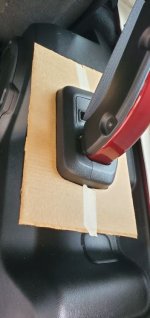
Now I had to test the shape against the rollbar base to see if I was even close. To my shock, got it on the first try!
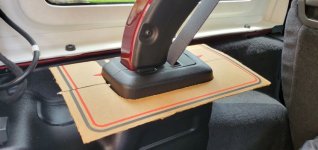
The real test is a test of symmetry. If it's truly correct, then just flipping it over means it should fit on the opposite roll bar just as well. It does.
OK now that I have the roll bar base shape set, I can transfer this to a wooden template to use. So I did. I put two scroll saw blades to account for the kerf of the saw blade along the same vertical cuts in the cardboard. Later, I opted not to go the vertical route, and went horizontal. You'll see what I mean in a couple of pics down. For now, here's the wooden template:
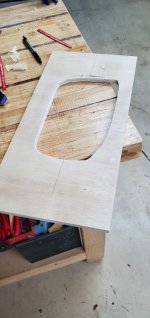
As mentioned, I opted to horizontal on the cut even though the scribed line in the image shows vertical. So, once I cut that template in half, it was time to transfer it to the boards that would make up the deck lid. I started with the driver side and made sure to align everything as square as possible, because the really hard part was coming up.... once I got the cutout of the "top" part of the hole, I had to flip the template and move to the other roll bar position... and then had to get out a carpenter's square to make sure that the openings in the front part of the deck lid, were properly spaced between the rollbars... but also, properly aligned with the other half of the deck lid which also had to be cut in the right spacing for the roll bars... Not sure if my explanation is working, so here's a couple of pics of that...
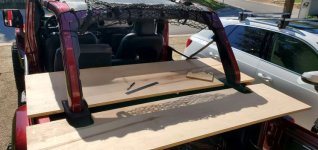
I used a jigsaw to cut all of it out... and went painstakingly slow to make the lines as smooth and sharp as possible... After I got the holes cut on both sides on both boards of the lid... I matched them up to see if the alignment worked for me....
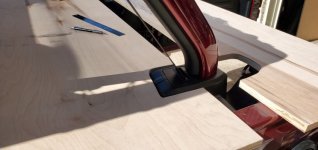
After I was sure they would align... I had to devise a way for them to always align the same way every time and also join the two boards solidly and securely... what I opted for was three struts that bolt into each of the boards. The front ones are permanently installed, while the back ones are installed in the back board, but can lift out of the holes.. see image
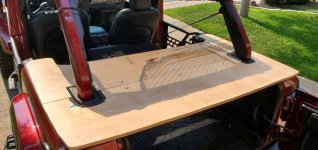
There are a few things to digest in that image... first, you can see the 6 carriage bolt heads in the middle. they pass through the struts that are on the underside, and they assure 1. that the line up is always going to be the same 2. that the deck lid pieces are solidly connected to each other, and 3. add strength to the center of the deck. Another thing to notice is that I was entertaining the idea of some 1/8" foam seal tape around the roll bar bases (see on the left roll bar base) but I took that one off later and went a different way... more on that in a bit. Finally, you will also notice that I trimmed the deck pieces down to match the contour of Mrs. Robinson's tub. I did that by using a pencil and scribe to trace it out, and back to the jigzaw. Once I got all of this where I wanted it, it was time to paint... I used Herculiner Truck bed liner paint in rattle cans. It's took me 2 cans for now....
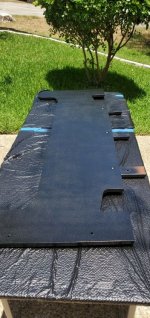
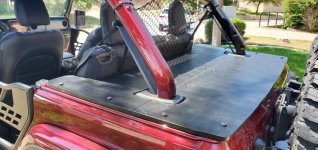
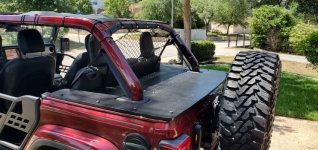
In the above image you can see the three struts that connect the two deck pieces together. Here's a tip... if you use this stuff, use it in FULL sunlight, on a HOT day that's not going to rain... the heat, lack of humidity, and full sun dried each coat in less than an hour... Once they were painted... I put them on Mrs. Robinson and used the hard top bolts to secure it down. I plan on getting secure torx bolts to replace these to reduce the likelihood that they'd be messed with in the future. That being said, here are some images of the near complete job.
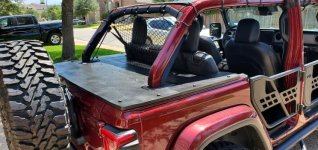
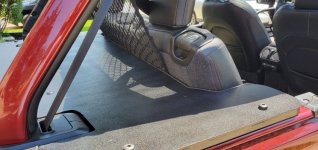
A closer view shows how I contoured around the back seats. Look closely enough and you will see the 1/8" seal tape around the edge along the seat. I put that tape on the underside of the deck where it meets the tub lip just like the hard top has, and also put some in between the two deck boards, and around the rollbar bases for water resistance should a sudden shower happen.
I was going to add a couple more pics, but I am only allowed 10 so I will try to reply to this post with the other two.
Step 1 was deciding if I wanted the lid to hinge up... then decided that I didn't really need that...not on this first iteration. So, a flat 2 piece was what I chose to try.
I took a 4'x8' sheet of 3/4" plywood and cut lengthwise down in half... about 24" each piece. Then I measured Mrs. Robinson's tub width at her widest, and went a few inches wider for the initial "this is how I want it" layout. The next step was to place the boards on the tub... and to measure out in some way the shape/outline of the base of the rollbars. To do this I used the lid of a pizza box, and a contour gauge. I used the contour gauge in two halves and transferred that to the pizza box lid and joined the halves together. This is how that turned out.

Next, I cut out that shape, and then cut the pizza box lid in half...

Now I had to test the shape against the rollbar base to see if I was even close. To my shock, got it on the first try!

The real test is a test of symmetry. If it's truly correct, then just flipping it over means it should fit on the opposite roll bar just as well. It does.

OK now that I have the roll bar base shape set, I can transfer this to a wooden template to use. So I did. I put two scroll saw blades to account for the kerf of the saw blade along the same vertical cuts in the cardboard. Later, I opted not to go the vertical route, and went horizontal. You'll see what I mean in a couple of pics down. For now, here's the wooden template:

As mentioned, I opted to horizontal on the cut even though the scribed line in the image shows vertical. So, once I cut that template in half, it was time to transfer it to the boards that would make up the deck lid. I started with the driver side and made sure to align everything as square as possible, because the really hard part was coming up.... once I got the cutout of the "top" part of the hole, I had to flip the template and move to the other roll bar position... and then had to get out a carpenter's square to make sure that the openings in the front part of the deck lid, were properly spaced between the rollbars... but also, properly aligned with the other half of the deck lid which also had to be cut in the right spacing for the roll bars... Not sure if my explanation is working, so here's a couple of pics of that...

I used a jigsaw to cut all of it out... and went painstakingly slow to make the lines as smooth and sharp as possible... After I got the holes cut on both sides on both boards of the lid... I matched them up to see if the alignment worked for me....

After I was sure they would align... I had to devise a way for them to always align the same way every time and also join the two boards solidly and securely... what I opted for was three struts that bolt into each of the boards. The front ones are permanently installed, while the back ones are installed in the back board, but can lift out of the holes.. see image

There are a few things to digest in that image... first, you can see the 6 carriage bolt heads in the middle. they pass through the struts that are on the underside, and they assure 1. that the line up is always going to be the same 2. that the deck lid pieces are solidly connected to each other, and 3. add strength to the center of the deck. Another thing to notice is that I was entertaining the idea of some 1/8" foam seal tape around the roll bar bases (see on the left roll bar base) but I took that one off later and went a different way... more on that in a bit. Finally, you will also notice that I trimmed the deck pieces down to match the contour of Mrs. Robinson's tub. I did that by using a pencil and scribe to trace it out, and back to the jigzaw. Once I got all of this where I wanted it, it was time to paint... I used Herculiner Truck bed liner paint in rattle cans. It's took me 2 cans for now....

In the above image you can see the three struts that connect the two deck pieces together. Here's a tip... if you use this stuff, use it in FULL sunlight, on a HOT day that's not going to rain... the heat, lack of humidity, and full sun dried each coat in less than an hour... Once they were painted... I put them on Mrs. Robinson and used the hard top bolts to secure it down. I plan on getting secure torx bolts to replace these to reduce the likelihood that they'd be messed with in the future. That being said, here are some images of the near complete job.

A closer view shows how I contoured around the back seats. Look closely enough and you will see the 1/8" seal tape around the edge along the seat. I put that tape on the underside of the deck where it meets the tub lip just like the hard top has, and also put some in between the two deck boards, and around the rollbar bases for water resistance should a sudden shower happen.
I was going to add a couple more pics, but I am only allowed 10 so I will try to reply to this post with the other two.
Last edited:

